With a little up-front work, you can set up accurate coverage tables and payment tables that help you provide patients with better insurance estimates.
Updated 11/17/21
A family tradition I’ve always enjoyed is working together to solve a jigsaw puzzle. As a child, I was taught the steps of putting together a puzzle. First, you go through and pull out the border and corner pieces. Second, you put similarly colored border pieces together until each side of the puzzle is linked together and joined to the corner pieces. Third, you look for similar colors and patterns on the middle pieces and begin to attach them to the borders. These initial steps make it easier to work on the remaining puzzle pieces.
As I have learned the business of dentistry and trained others on the importance of providing accurate insurance estimates, I often refer to this puzzle tradition. By completing a few important steps at the beginning, you can simplify your work and save yourself a lot of time, especially when you’re putting together the initial pieces of the insurance coverage puzzle.
Most insurance plans vary from other plans in their coverage of dental procedures, so billing at the time of service can sometimes be a challenge. If you want to get past “I’ll bill you later,” then your staff must complete some important steps up front, before the patient ever comes into the office.
Using Coverage Tables
The Dentrix coverage table is a powerful tool that helps you provide accurate cost estimates when you present a treatment plan to a patient. However, the coverage table is only as accurate as the information you put into it. For example, let’s say you’re presenting a treatment plan for a three-surface composite restoration to a patient whose insurance plan covers 80% of surface restorations after the deductible. If you leave the coverage percentage for all surface restorations at 80% in the coverage table, then the patient portion estimate for a three-surface composite will be exactly 20%. If the system isn’t set up to apply a deductible to this procedure, it won’t apply a deductible and your estimate will be much lower than what the patient will actually pay.
In many offices, the coverage table is not updated to include the deductible or the procedures that the deductible applies to. By correcting this one issue alone, payment estimates can be much more accurate.
You should adapt the default coverage table that is installed with Dentrix to each insurance carrier and group plan. For example, some insurance companies differ in the percentage at which they cover X-rays or composite material on posterior teeth. A few insurance companies allow as many prophys per year as the patient wants, while others restrict the number of prophys per year. You should ask insurance companies these types of coverage questions for each group plan and update the coverage table to reflect the answers you receive. That way, when you’re providing an estimated patient portion amount on a treatment plan, you can give an accurate estimate based on carefully defined coverage tables.
Setting Up Insurance Coverage Tables
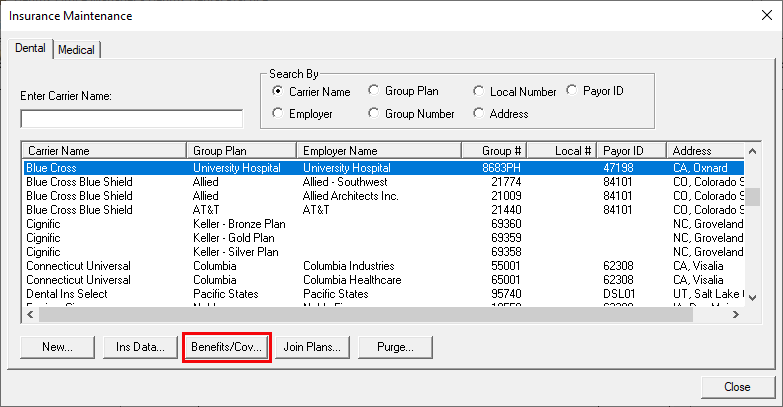
You can access the Dentrix coverage tables from the Family File or the Office Manager. In the Office Manager, from the Maintenance menu, point to Reference, and then click Insurance Maintenance to display the Insurance Maintenance dialog box.

Notice in the example that three Delta Dental Plans are listed, and each one has its own group number. Each group plan and group number listed for a carrier uses a separate coverage table to describe the insurance benefits of that plan.
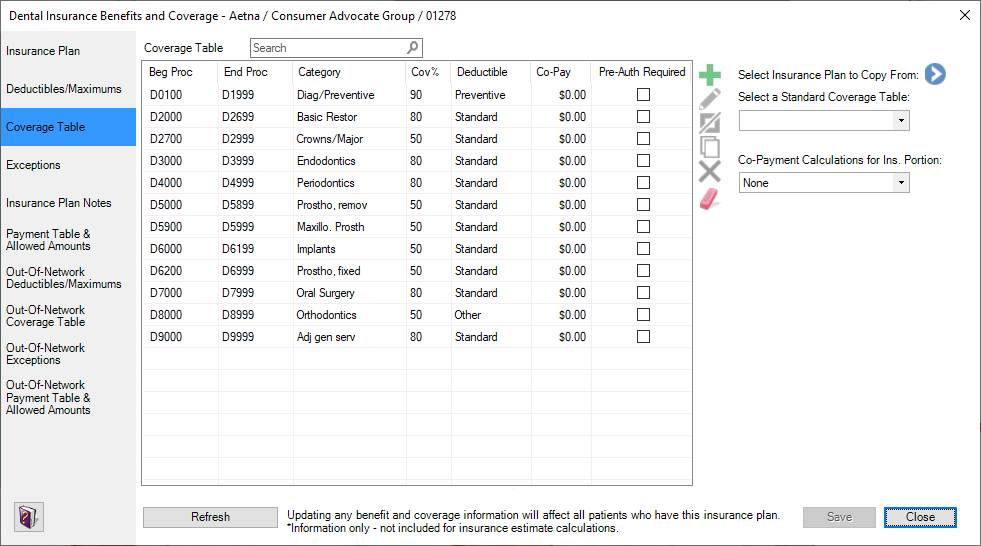
Click Cov Table to display the coverage table for the selected plan in the Insurance Coverage dialog box.

In the Insurance Coverage dialog box, you can set up three types of deductibles: Standard, Preventive, and Other. For each of these deductible types, you can enter a lifetime deductible as well as annual individual and family deductibles. You can also specify an annual maximum benefit for the individual and the family. When Dentrix calculates the patient portion, the deductible amounts defined in the coverage table will be included in the calculation.
Each line in the Coverage Table section of the dialog box represents a range of procedures. In the example, all the diagnostic/preventive procedures (D0100-D1999) are covered at 100%, all the basic restoration procedures (D2000-D2699) are covered at 80%, all the crown procedures (D2700-D2999) are covered at 50%, and so forth. To change a coverage amount, select the range (such as D0100-D1999), change the amount in the Cov% field, and click Change.
If an insurance plan covers a particular procedure at a specific amount, you can override the coverage table percentage for that procedure and specify the amount using the payment tables (see the section below called “Coverage Tables vs. Payment Tables”).
When you finish making changes to a plan’s coverage table, click OK. Dentrix notifies you that these changes will affect all patients to whom this specific insurance plan is attached.
You can also access the coverage tables from the Family File. With a patient selected in the Family File, double-click the Primary Dental Insurance block to display the Insurance Information dialog box. From here you can click Coverage Table to display the coverage table for the patient’s insurance plan and make changes as needed.
Be specific when asking insurance companies about coverage. For example, an insurance company might say they cover all surface restorations at 80% of what is “usual, customary, and reasonable” (UCR). Find out what UCR means for that insurance company and if they downgrade the charge based on location of tooth and materials used.
You can use the Dentrix Insurance Manager to verify patient eligibility is still the same if you previously obtained coverage information.
Coverage Tables vs. Payment Tables
The coverage tables in Dentrix list coverage percentages for procedures. But some insurance plans pay a specific fee for specific procedures. In these cases, instead of relying on the percentages in the coverage tables, you can estimate patient portions with the Dentrix payment tables.
Using Payment Tables
Are you looking for a more accurate way to accommodate the difference that the insurance company calculates for posterior composites? What about the fact that perio maintenance is in the perio category but is usually paid at 100%? Would you like to be able to give your patients a more accurate out-of-pocket estimate? If so, then using the Payment Table will make you very happy.
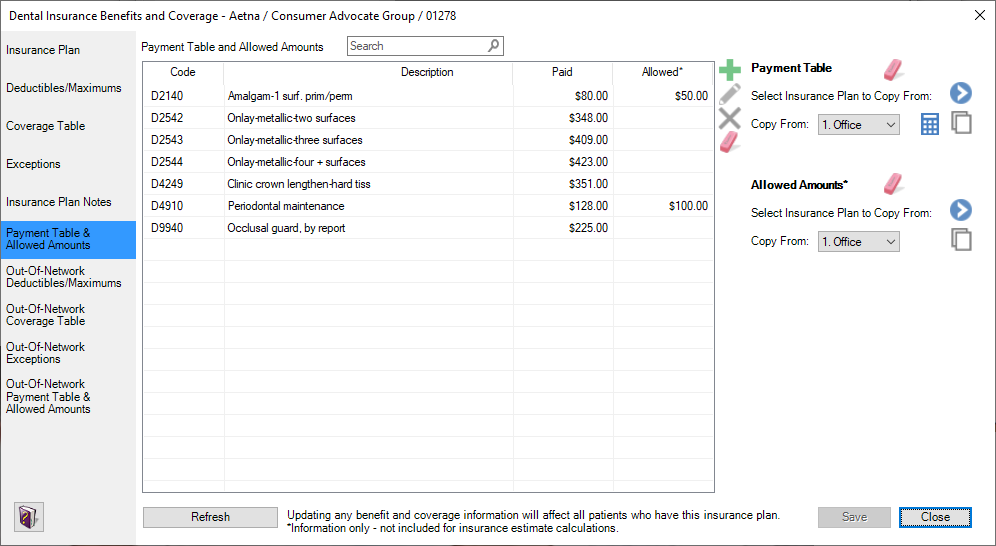
To use payment tables, in the Insurance Information dialog box, click Payment Table. In the Edit Updated Insurance Payment Table dialog box, you can specify the procedure code and the exact amount the insurance carrier will pay for that procedure.

The Payment Table overrides the Coverage Table so it is perfect for those procedure codes that fall outside of the default coverage table. Here are some examples:
- Posterior Composite Downgrades: Most insurance companies do not pay for composite fillings placed in molars, but they will pay for the equivalent of an amalgam filling. For example, you would take the fee for the D2140 (1 surface posterior amalgam code) and multiply this fee by the coverage %. Then in the Payment Table you would enter the D2391 (1 surface posterior composite code) and enter the fee you just calculated. This amount will override the coverage % and give your patient a more accurate estimate. I have seen some offices create a little “cheat sheet” in Microsoft Word for all the downgrade coverage and save it to the desktop for easy access.
- Nightguards (D9940): They are located in the Adjunctive category, which is typically covered at 80%. However, in my experience with nightguards, they are usually paid at 50% or 0%.
- Perio Maintenance (D4910): This code is in the periodontal category which is typically covered at 80%. However, the D4910 Perio Maintenance is usually covered at 100% like a prophy.
- Crown Lengthening (D4249): This code is also in the periodontal category. However, in my experience, it is covered at the same percentage as a crown (50%).
- Onlays: In the Dentrix default categories in the Coverage Table, they have onlays grouped in with the Basic Restorative at 80%. However, onlays are covered just like a crown at 50%. Instead of moving around your coverage table groupings, you can just add onlays to the Payment Table.
You can also update the Payment Table while entering itemized insurance payments. If you are using the Fee Schedule Method and attaching fee schedules to the insurance plans, do not use the update payment table during insurance payment entry for your contracted plans unless it is one of the exceptions listed above. Only update the payment table during insurance payments for insurance companies with which you are not contracted.
Note: Payment tables override coverage tables, and using payment tables changes the way deductibles are calculated.
Setting up your coverage tables and payment tables is an important step in maintaining an insurance system, and you need to diligently keep insurance information accurate and up to date. By making the proper time investment up front, you can save time later and provide patients with more accurate patient portion estimates so they can make informed decisions about their treatment plans.
Learn More
To learn more about using coverage tables, see the Creating Coverage Tables topic in Dentrix Help.
To learn more about using payment tables, see the Adding Procedures to Payment Tables topic in Dentrix Help.
For other ideas about when to use coverage tables and payment tables, read Improve the Accuracy of Patient Fee Estimates.
Visit https://www.dentrix.com/products/eservices/ecentral/insurance-manager for more information about the Dentrix Insurance Manager.
By Jason McKnight, Profitability Coaching Manager
and by Dayna Johnson, Certified Dentrix Trainer
Dayna loves her work. She has over 25 years of experience in the dental industry, and she’s passionate about building efficient, consistent, and secure practice management systems. Dayna knows that your entire day revolves around your practice management software—the better you learn to use it, the more productive and stress-free your office will be. In 2016, Dayna founded Novonee ™, The Premier Dentrix Community, to help cultivate Dentrix super-users all over the country. Learn more from Dayna at www.novonee.com and contact Dayna at [email protected].


