
Learn how to manage and update fee schedules so that you can present correct, current fees throughout Dentrix.
As a consumer, when you go shopping you expect to see the item you want and the price it will cost. Let’s call this the “Usual, Customary, and Reasonable” (UCR) price. But if you happen to be part of the store’s prime/plus/membership program, a different price or discount may apply. Some stores may even offer you a different price if you pay with cash, purchase on their website, or use the store’s branded credit card.
In other words, your unique situation will determine which price you will pay for the product. In Dentrix those sets of fees are called fee schedules.
What is a Fee Schedule?
When setting up your fees, you’ll set your UCR fee (sometimes also called your “office” or “cash” fee) according to the going rate in your geographic area. There will be many factors that can change the fee you charge one patient versus another patient, such as when the patient is covered by an insurance that you participate with, if they are part of your in-office discount plan, or if they are employees or family members who are entitled to a reduced rate.
Dentrix lets you assign up to 999 fees for each procedure, allowing the flexibility to pre-set alternative fees for a wide range of possible scenarios!
Which Fee Schedule Will a Patient Be Charged?
Dentrix uses the following three checkpoints to determine which fee schedule to charge a patient.
Checkpoint #1
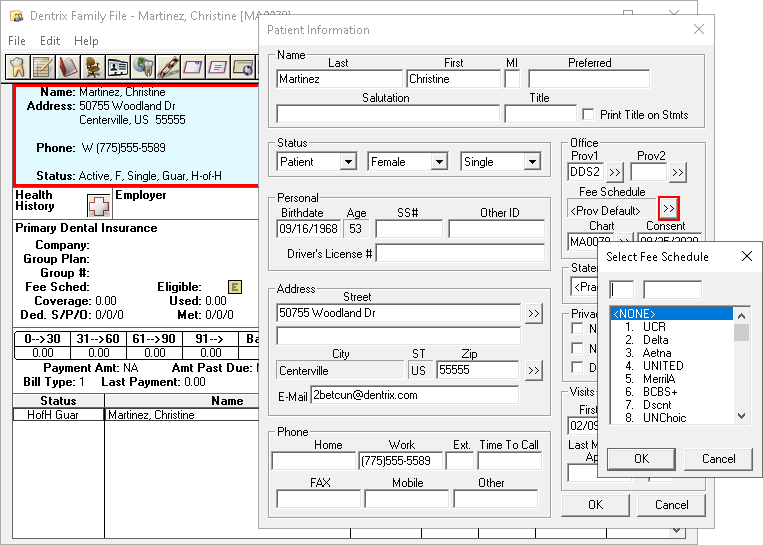
Each patient can have a fee schedule assigned in his or her Family File. If there is not a specific assignment made, you’ll see either “<Insr Default>” or “<Prov Default>” displayed here to indicate what fee is being used. For most patients, you will NOT make a direct fee schedule assignment unless this fee or patient circumstance is unlikely to change (such as being an employee or family member). By leaving this fee unassigned at the patient level, Dentrix will look to the next checkpoints and automatically adjust for the fee schedule associated with the patient’s insurance plan.
Instructions for Assigning a Fee Schedule to a Patient
To assign a fee schedule to a patient, double-click the Patient Information block in the Family File. The Fee Schedule assignment is located on the right side of the window. If the patient has been assigned a fee schedule and you want to clear it, scroll to the very top and select <NONE>.
Tip: Some offices fall into a trap of assigning the insurance fee schedule to the patient’s Family File. This is unnecessary because when left unassigned at the patient level, Dentrix will look to the insurance plan to determine if there is an assigned fee schedule (see checkpoint #2 below). Assigning an insurance fee schedule in the Family File often just causes further work for you and your team because when you clear an insurance plan you also need to remember to change the patient’s fee schedule.
Checkpoint #2
When the patient does not have an assigned fee schedule (as with checkpoint #1), but their insurance plan does, the patient will be charged the insurance fee schedule.
When an insurance plan is a PPO or DMO type, they will specify the prices that their participating dentists are allowed to charge for each procedure. If you are a contracted (or in-network) provider with that plan, you’ll be obligated to follow that fee schedule. Attaching the fee schedule to the insurance plan is a great way to make sure that patients who have a policy with that insurance coverage are charged the correct amounts.
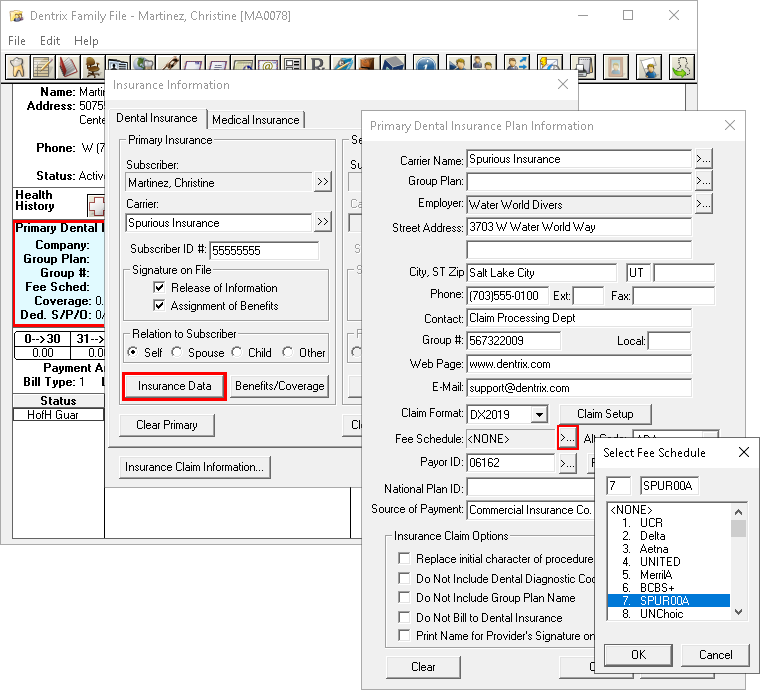
Instructions for Assigning a Fee Schedule to an Insurance Plan
You can assign a fee schedule to an insurance plan by selecting the plan and clicking the Insurance Data button (found in the Insurance Maintenance area of the Office Manager or in the patient’s Insurance Information block in their Family File). Click the selection button next to Fee Schedule and follow the prompts.
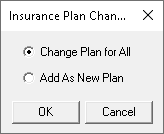
After you make this change to an insurance plan, you will be asked if you want to “Change Plan for All” or “Add As New Plan.” Change Plan for All means that the insurance plan will update, and all patients who have already been assigned this plan — even those outside of the family you might currently have selected — will be affected. Add As New Plan will create a duplicate copy of the insurance plan and save the changes to the duplicated copy. You can then assign the new plan to individual patients as needed.
Checkpoint #3
When neither the patient nor their insurance plan has an assigned fee schedule (as with checkpoints 1 and 2), the patient will pay their provider’s assigned fee schedule. In the patient’s Family File, every patient must be assigned a default “Prov1,” and in the Office Manager each provider is assigned a fee schedule (typically the UCR fee schedule for the practice). When Dentrix reaches this checkpoint, the provider’s fee schedule becomes the patient’s fee schedule.

Instructions for Assigning a Fee Schedule to a Provider
In the Office Manager, click Maintenance > Practice Setup > Practice Resource Setup. Select a provider and choose Edit. At the upper-right, click the selection button next to Fee Schedule, select the fee schedule for this provider, and then click OK.
Creating or Editing Fee Schedules
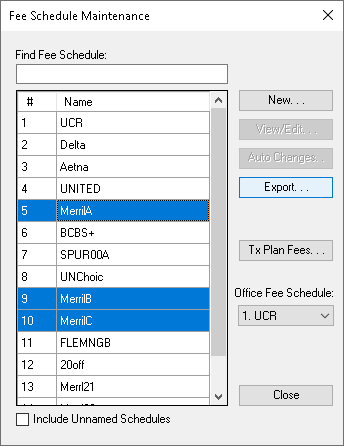
Creating or editing fee schedules is best handled using the Fee Schedule Maintenance feature. To use this feature, open the Office Manager and select Maintenance > Reference > Fee Schedule Maintenance.
Export Fees to a File
Before you edit a fee schedule, save it to a file for safekeeping! Not only will it serve as a record of what the fees were before they were changed, but if anything goes wrong during the process, you can import this file back into Dentrix to essentially “undo” your changes.
In Fee Schedule Maintenance, select as many of the schedules as you want by holding down the CTRL or SHIFT key on your keyboard while you select multiple schedules. Click Export, and then name and save the file.
Change Fees By a Percentage or Set Dollar Amount
When making an annual increase to your UCR fees, you may want to increase all of the fees by the same percentage.
To update fees by a percentage or specific amount, within Fee Schedule Maintenance select a fee schedule and click Auto Changes.
In the Automatic Fee Schedule Changes dialog box, a range of procedure codes will be set from <ALL> to <ALL>. You can narrow the codes down to a set of codes. For example, if only the oral surgery fees are changing, select from the first to the last numeric codes within that category.
Next, enter the Change Amount. Below that, select if the Change Type is a percentage or dollar amount and if the amount should increase or decrease the current fees.
Choose to round the amount off, and then optionally enter a minimum dollar amount by which all fees should change.
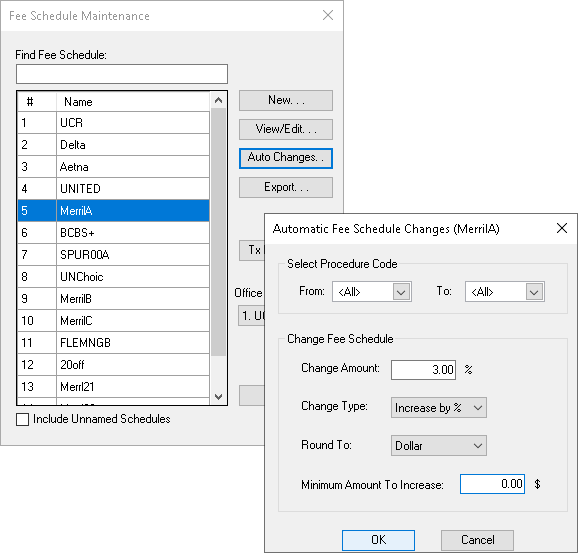
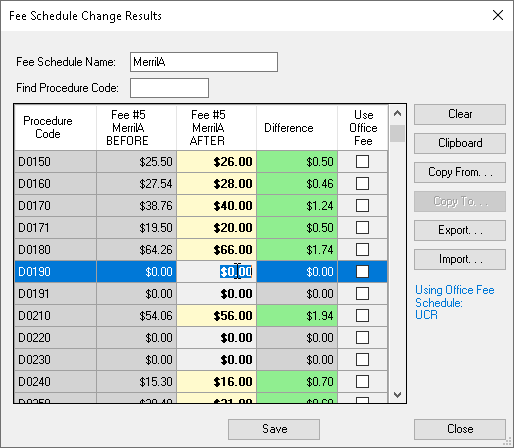
Click OK, and the Fee Schedule Change Results appear. You’ll see the original fee (“Before”), the new fee (“After”), and the difference between the two fees (“Difference”). The difference will be highlighted green for an increase or red for a decrease. If needed, you can fine-tune the changes by selecting individual procedures and entering new amounts. When you’re satisfied with the changes, click Save and close the window.
Edit Individual Fees (View/Edit)
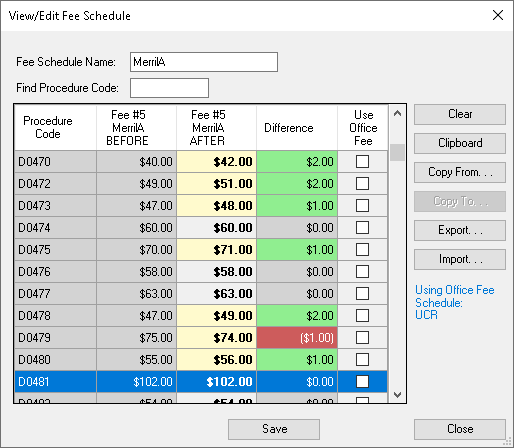
Quite often, the fees will not change by the same amount or percentage, which means that you’ll often need to do some manual editing. To start, within Fee Schedule Maintenance select the fee schedule and click View/Edit.
Select an individual procedure code and begin typing a new fee. You’ll see the original fee (“Before”), the new fee (“After”), and the difference between the two (“Difference”). The difference will be highlighted in green to show an increase or in red to designate a decrease. To help navigate the table (besides clicking rows with your mouse), you can press Enter to move down to the next line, use the Up and Down arrow keys, or press the Page Up and Page Down keys on the keyboard. At the top of the window, type a code into the Find Procedure Code box to automatically scroll down to that code.
When you’re satisfied with the changes, click Save and close the window.
Import from Spreadsheet
If an insurance carrier has provided you with an Excel spreadsheet or a Comma Separated Value (CSV) file that contains their fee schedule information, you’ll be able to import the fees instead of entering them yourself.
Within Fee Schedule Maintenance, select the fee schedule and click View/Edit, and then click Import. Select the file that the insurance carrier provided, and then click Open.
Dentrix attempts to identify the column that contains the procedure codes and the column that includes the fees, but if it cannot find them, a window opens asking for your help to identify the columns. Click Select Proc Column and then click the column header that contains the codes. Next, click Select Fee Column and click the column header containing the fees.
After importing the fees, you’ll return to the View / Edit dialog box (discussed above) where you can manually make additional adjustments to the fees as needed.
Updating Existing Treatment Plans
After you’ve updated any fee schedule, all treatment plans that you create going forward will post with the new fees. Existing treatment plans, however, won’t automatically be assigned the new prices. You can update treatment plans for individual patients or all at once for all patients that have existing treatment cases that meet specific criteria.
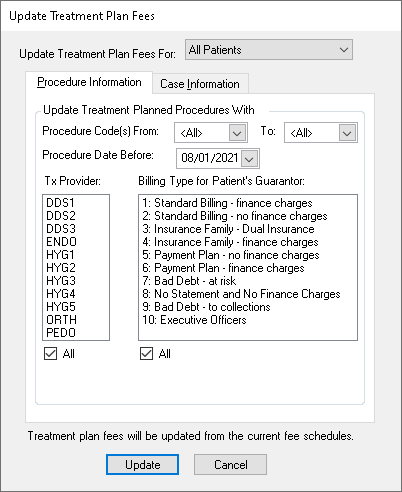
To update treatment plans for all patients, click the Tx Plan Fees button in the Fee Schedule Maintenance dialog box. Then in either or both of the two tabs, set the criteria that determines which treatment should be updated.
The Procedure Information tab contains general options that allow you to specify specific procedure codes, the treatment by date or provider assigned, or the patient’s billing type(s).
Tip: If your office offers a guarantee to honor a quoted price for a set time, change the Procedure Date Before option back the appropriate amount of time from the current date. Then return to this window once a week and repeat the treatment plan fees update, each time backing up the Procedure Date Before option. Eventually, the set time will come to pass, and all the plans will be updated.
The Case Information tab allows you to narrow down treatment cases that should be updated by status, severity, case financing, or expiration date.
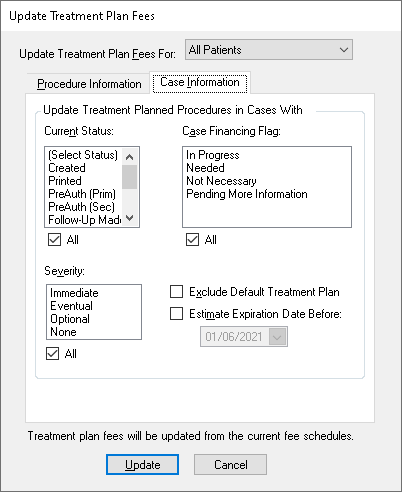
After setting the criteria on one or both tabs, click Update. Dentrix will analyze each treatment plan case and procedure to determine if it qualifies to be updated. Then it will compare the patient’s currently assigned fee schedule to determine the fees. This can take a bit of time, so if you have other tasks in Dentrix that you want to perform, you may want to run this from a different workstation.
You may also choose to update fees for an individual patient. To do this, open the patient’s Treatment Planner and choose Edit > Update Treatment Plan Fees. Be sure that the top setting, Update Treatment Plan Fees For, is set to Current Patient. The other options work as described in the previous section.
Tip: You can Update Treatment Plan Fees for a patient after making any change that affects a patient’s fee schedule—such as changing their insurance plan or the patient’s assigned fee schedule.
Updating Appointment Scheduled Production
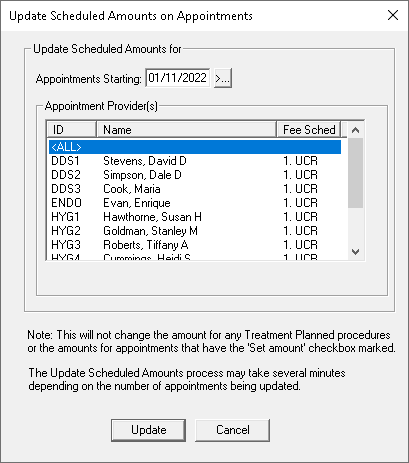
Scheduled appointments continue to display the fee that was in place when the appointment was created, but when you set the appointment complete, it will do so using the patient’s current fee schedule. This discrepancy between scheduled and actual production can be concerning for some offices.
To avoid this, you can refresh the appointment amounts. In the Appointment Book, select Options > Update Scheduled Amounts. Select the starting date (probably today’s date) and which providers you want to update appointment amounts for. Then, click Update and wait a few minutes as Dentrix analyzes and updates the scheduled amount for all future appointments.
Fee Schedule Report
Dentrix includes a Fee Schedule Report that can show you one schedule, or any five sequentially numbered fee schedules and if there is Lab Expense or Material costs associated with the procedures. In the Office Manager, click Reports, point to Reference and click Fee Schedules. You can include all procedures or limit them to a range of codes. Select whether to show just one fee schedule or a range of five fee schedules. Choose the fee schedule (or starting fee for the field of five), then click OK. Find the Fee Schedule Report on the batch processor, where you can preview or print the report.
Fee Schedule Export
Perhaps the most versatile report about fee schedules is not a “report” at all! Within Fee Schedule Maintenance, select as many of the fee schedules as you want (hold down CTRL or SHIFT on your keyboard to select multiple schedules, or to select all of them, click any fee schedule and press CTRL+A). Then click Export. Name and save the file. The exported file can open very nicely in any spreadsheet application, where you can view, compare, sort, or print it.
Conclusion
Managing your fee schedules is critical for operating a successful dental practice. Updated fee schedules will allow your team to present correct information to your patients, who can then confidently accept their treatment proposals.
Learn More
For additional information see the following articles:
- Should You Increase Your Fees?
- It’s Time to Update Your Fees Again
- Updating Treatment Plans Fees at the Beginning of a New Year
For step-by-step instructions, see the following Help files:
By Ryan Beardall, Contributing Editor


