Follow these tips to create a patient information slip and customize Dentrix to record the information you gather.
Updated 10/28/21
You know the old saying: “You never have a second chance to make a first impression”? Well that old saying still means a lot today. How your front office team handles the very first phone call from a new patient not only establishes the patient’s perception of how his or her visit will go, it also impacts the likelihood that they will refer their friends and family.
Scripting your Success
Here’s a common scenario that plays out in every dental office:
“Thank you for calling Smiles by Johnson, this is Dayna, how may I help you?”
“Hi, my name is Susie. I want to schedule an exam and cleaning appointment.”
“Great! How long has it been since you have been in, Susie?”
“This is my first visit–I’m a new patient.”
Now what do you do? Does your office have a scripted phone slip you use? If you have a well-rehearsed format for handling the new patient phone call, the patient will feel heard and taken care of. I suggest using a form that helps the team member navigate through all the questions that are necessary to ensure the patient has an amazing first appointment and the office collects enough information so the clinical team can treat the patient effectively. Check out the sample telephone information slip below that was created by Pride Institute.

Or you may want to create and use a custom form that meets the particular needs of your office. It should be kept simple but capture all the important information you need to gather during the initial new patient phone call.
Integrating The Telephone Slip With Dentrix
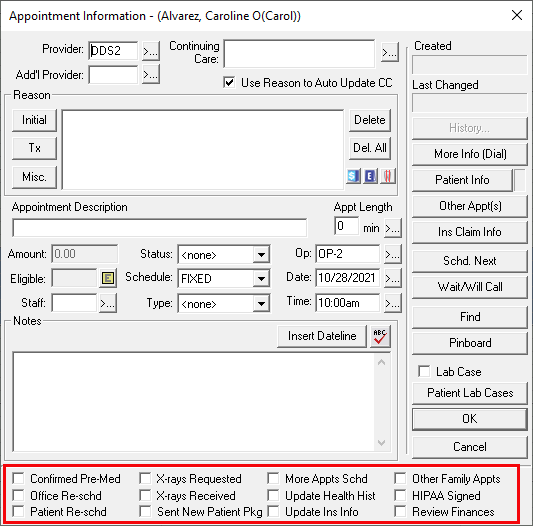
Now that you have collected this information, where do you put it? If your office is still using paper charts, you might put it in an accordion file until the patient comes in for the appointment and then file it with the paper chart. But what if your office is paperless? I know I don’t want to keep unnecessary paper. Much of the information you gather can be entered in the Enter New Patient Information dialog box and in the Reason and Notes fields in the Appointment Information dialog box. But I have an additional suggestion for you–use the check boxes at the bottom of the Appointment Information dialog box.

Did you know that they are customizable? You can take some of the checkbox information that you gather from the initial telephone call and use this area to record this information for yourself and other team members.
Up to 12 checklist items can be listed at the bottom of this dialog box. Keep in mind, however, that if you change these definitions, they will change for all patients, including existing patients. If your practice has already been using these check boxes to record other information, you may not want to change the definitions now. If you haven’t been using them, now may be a good time to customize them the way you want and begin using them to record some of the standard appointment information you gather on your patient information slip.
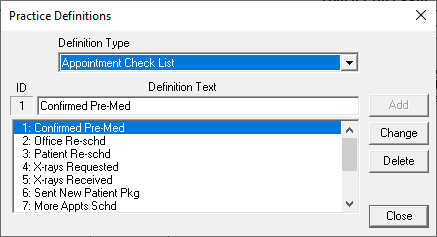
To customize these 12 items, in the Office Manager, from the Maintenance menu, point to Practice Setup, and then click Definitions to display the Practice Definitions dialog box. From the Definition Type list, select Appointment Check List. The current list of checklist items is displayed.

Select the items you want to change, type a new Definition Text (up to 20 characters), and click Change. After you’ve finished customizing the definition text, click Close.
Now when new patients call your office, you’ll be ready with a telephone information slip and a place in Dentrix to store the information you gather.
Scheduling the Appointment
You say (in your best first-contact-friendly voice): “Okay Susie! Let’s find you an appointment.”
Susie says: “Well, I am already overdue, I know I should have called earlier, but I have been so busy. Do you have anything this week?”
You think to yourself: “She’s joking right? Does she not know we are booked out 6 weeks in advance?”
Of course you have the right to your moment of griping, and, yes, the world would be a better place if all your patients magically understood exactly how your systems and processes work…
But what if you could spare yourself your moment of angst because you actually did have an appointment available this week to accommodate her? You would make Susie’s day and at her next ‘girls day out luncheon’ she would be bragging about how awesome your office is.
It takes a little discipline, but you and your front office team can do it with the help of Perfect Day Scheduling in the Appointment Book. To set it up, click Setup > Provider Setup. Select the provider and click the Setup button. Click Add to add a new time block. Enter the name, color, days, operatory, and block type for that time block, and click OK.

I’d suggest you set these new patient time blocks in prime time. If your goal is two new patients per day I would put one block at the end of the day since this is usually after work for most people and one either in the early morning or mid morning. Later, if you find that your new patient spots are filling up weeks in advance, you might want to consider increasing the number of blocks you have per week. If patients have to wait for their first visit, they may not schedule at all; you risk them calling the next dentist on the list to see if they can get in sooner.
Once these time blocks are set in the schedule they stay open for new patients. This is where discipline comes into play; you need to keep these spots available for new patients until 48 hours prior to the appointment. Inevitably, you will have continuing care patients who want the spots, but don’t give them up! Simply put your continuing patient on a call list and let them know that if you get an opening they will be the first person you call.
Conclusion
New patients are the lifeblood of the practice and should be treated with extra special care. People are, by nature, procrastinators, and when they are ready to buy something—in this case your dentistry—they don’t want to have to wait. That’s just how we imperfect humans operate. Using a thoughtful new patient phone call script and Perfect Day Scheduling builds this insight right into your daily processes and ensures that each new patient experience gets started on the right foot.
Learn More
Read Creating an Exceptional New Patient Experience for more ideas.
To learn more about customizing the scheduling options in the Appointment Information dialog box, see the Customizing Appointment Check Lists topic in Dentrix Help.
To learn more about Perfect Day Scheduling, see the Perfect Day scheduling Overview topic in the Dentrix Help.
By Dayna Johnson, Certified Dentrix Trainer
Dayna loves her work. She has over 25 years of experience in the dental industry, and she’s passionate about building efficient, consistent, and secure practice management systems. Dayna knows that your entire day revolves around your practice management software—the better you learn to use it, the more productive and stress-free your office will be. In 2016, Dayna founded Novonee ™, The Premier Dentrix Community, to help cultivate Dentrix super-users all over the country. Learn more from Dayna at www.novonee.com and contact Dayna at [email protected].


