
Use clinical note templates to save your providers time and help them create thorough, consistent clinical notes.
Updated 1/13/21
Documenting treatment and exams in order to create a complete clinical record is an important part of each appointment, but creating detailed clinical notes takes time. Since providers’ time is one of the most valuable commodities in the dental office, how can you ensure that you’re getting detailed notes without wasting provider time? Clinical note templates is the answer.
Using clinical note templates, all the doctors and hygienists can easily record specific details in their clinical notes while maintaining the important consistency, accuracy, and legibility that’s often missing from handwritten notes. Clinical note templates can also help prevent spelling errors. (Have you ever noticed the many different ways people spell hygiene?) They can also save you time! You can accurately record several paragraphs of patient notes in just a few minutes without typing every word of a long note. With clinical note templates, you can also read all your clinical notes from any computer, and you can sign and lock the notes into history.
How Clinical Note Templates Work
Dentrix comes with several clinical note templates already created. You can use and customize those, or you can design your own templates. Templates are made up of note text and prompts. The note text is always the same every time you use that template. The prompts allow you to enter custom information that will vary patient by patient.
To illustrate this, let’s begin by looking at some typical new patient exam notes, which might look something like this:
Patient was seen for a New Patient Exam.
X-rays: FMX and BWX
CC: gums bleeding when brushing.
OH: Fair
Calculus: Moderate
Stain: Light
OCS: Neg
For consistency, the questions for a new patient exam should always remain the same. It’s the answers that change from patient to patient.
In the example above, the constants are:
Patient was seen for a New Patient Exam.
X-rays:
CC:
OH:
Calculus:
Stain:
OCS:
Because these clinical notes are for a new patient exam, this first line will never change. The other lines identify other clinical note details that will be recorded during each new patient exam. I think about clinical note templates according to the 90/10 rule: the 90 percent of text I write for every new patient exam–text that never changes–is work the computer can do; the information I change for each patient is usually only about 10 percent.
Using Clinical Note templates also eliminates the need for abbreviations, which can be confusing and may mean different things to different people. For example, does CC in the example above stand for Carbon Copy, Continuing Care, or Chief Complaint? The answer is Chief Complaint. In the past, when clinical notes were all handwritten, the healthcare system allowed for abbreviations so that doctors or hygienists didn’t have to waste time writing out every word. Now that software can automatically enter the complete word—making it easier for people to understand what you mean—abbreviations are not necessary.
Exercise: Designing a Template
For practice, let’s create a template in Dentrix. Follow the steps below to design a New Patient Exam template that you can use for clinical notes during every new patient exam.
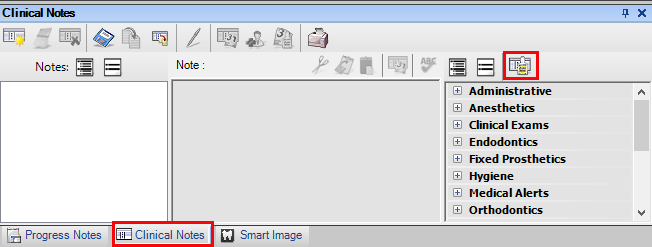
With a patient selected in Patient Chart, click the Clinical Notes tab at the bottom of the window. Next, click the Template Setup icon on the right of the panel.
In the Template Setup dialog box, click New Template.
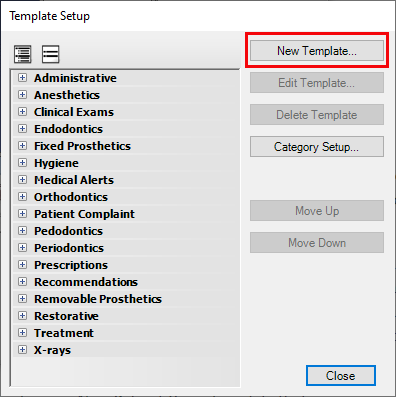
This opens the New Clinical Note Template dialog box where you will create your template.
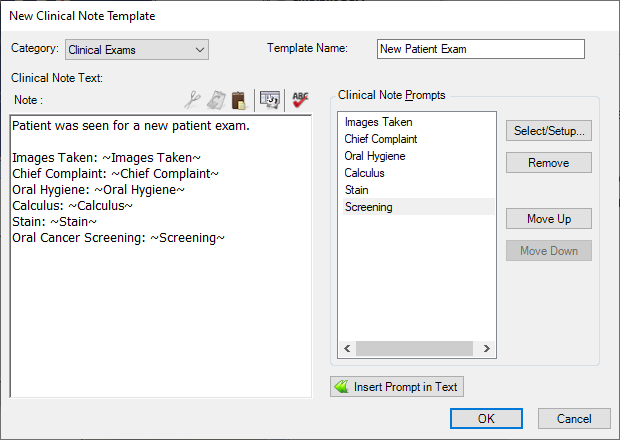
Since we’re setting up a template for new patient exams, select the Clinical Exams category. In the Template Name field, type New Patient Exam. In the Clinical Note Text area, type “Patient was seen for a new patient exam.” Then press ENTER to begin a new line. Type the first question words, “Images taken”, followed by a colon and a space. It’s important to add the space so that when you insert your prompt there is a space between the end of the question text and the beginning of the text that is inserted through the prompt.
Adding a Prompt to the Template
We want to be able to enter the type(s) of images taken during the exam, so we need to insert a prompt where that information should be added. Make sure your cursor is placed after the colon on the “Images taken:” line and click Select/Setup to display the Clinical Note Prompts dialog box with predefined prompts that you can use.
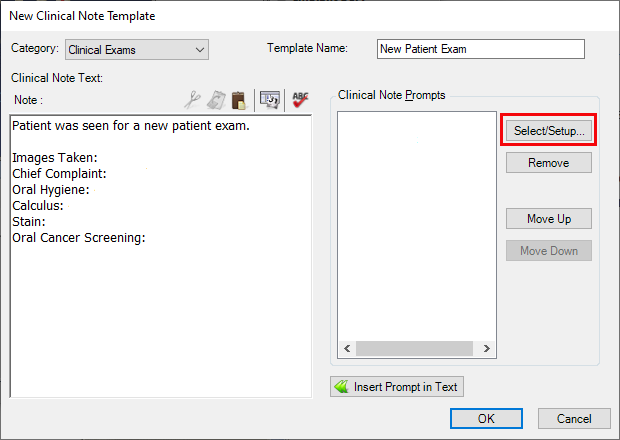
We want to add a prompt that reads “Images Taken”, but this prompt is not available in the list. If a prompt you need is not listed, you can create your own. Click New to display the New Prompt dialog box, and type the name of your prompt, “Images Taken”, in the Prompt Name field.
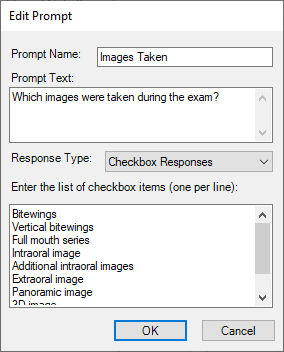
The prompt text is the text that will appear on the screen while you are creating the clinical notes. This prompts you to select an answer, and that answer is what will be inserted into the note. In the Prompt Text field, type “What images were taken during the exam?”.
The Response Type gives you different options for your answers. In this case, since multiple answers are possible, choose “Checkbox Responses.” Enter all the possible answers that could come up for this question, one answer per line. When finished, click OK.
Select the “Images taken” prompt in the prompt list and click OK. Your prompt will be added to the Clinical Notes Prompts list in your template setup. Select the prompt and click Insert Prompt in Text. The prompt will be added to the template where your cursor was. You can identify where a prompt is in the note text because the name of the prompt is set off by tildes (eg: ~Images Taken~).
Add the other prompt questions and answers. When finished, click OK and then Close.
Using the Template
Your template is now ready to use, and you can find it under the Clinical Exam category in the clinical notes list.
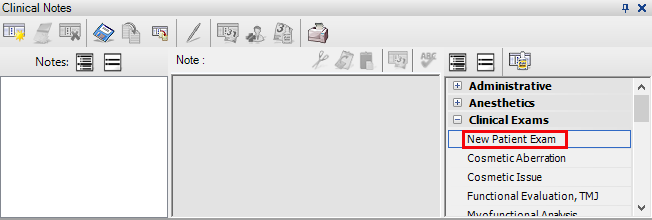
Click the New Clinical Note icon, then double-click New Patient Exam, and the first prompt appears.
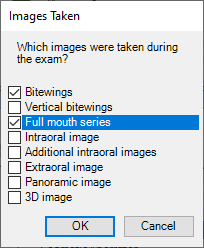
Select the answers to the questions you have defined. When you finish responding to the prompts, your completed clinical note will appear in the Patient Chart with the custom answers that you have chosen.

Now that your template is set up, adding specific information for a new patient exam is a snap! All the other types of clinical notes you record can be set up with a similar template just as easily, so think about the kinds of notes you want to make and make a project of setting up new templates or customizing existing templates.
Train everyone on your staff to use clinical note templates and prompts to improve efficiency, accuracy, and consistency in your notes!
Learn More
Read Stay on Top of Your Clinical Notes and Making Changes to Clinical Notes for tips about managing the clinical note process.
To learn more about using the Clinical Notes Templates, see the Creating Clinical Note Templates and Creating Clinical Note Prompts topics in Dentrix Help.
By Melinda Dyches, Contributing Editor, and Erin Brisk, Senior Editor
Originally published in Dentrix Magazine, Fall/Winter 2010


