
Don’t waste time calling patients on the phone. Send appointment reminders and practice announcements through text messages and emails instead.
One of the most important things the administrative team does is communicate with patients. They remind patients about scheduled appointments, let patients know they are due for treatment, and relay messages about office closures or schedule adjustments. The problem is that many patients don’t answer the phone, so staff members end up leaving the same message over and over.
That’s not the best use of anyone’s time. Instead, send your patients emails and text messages! That’s how a lot of people prefer to communicate, so you’ll reach more of your patients while saving time by not leaving phone messages.
There are three types of communications you can send with Patient Engage. Click the link to learn more about each type.
- Campaign Studio allows you to send one-time or recurring emails to every patient with an email address. Use these messages to tell patients about office closures, policy changes, special announcements, or promotions.
- Appointment Reminders enable you to send a series of emails and text messages to remind patients about appointments they have scheduled so they can put them on their calendars and you can reduce no-shows.
- Personalized Recall allows you to send text and email messages to remind patients who don’t have a recall appointment scheduled that they are due. You can even include a link for patients to schedule online in these emails so you can keep your hygiene schedule full.
Sending Email Messages to All Patients Using Campaign Studio
When you need to get a message to all of your patients to let them know about an office closure or when you’re running a special promotion and want to let patients know about it, how do you do it? If your answer is anything other than “send a custom email message to all patients,” you’re doing it the hard way.
With the Patient Engage Campaign Studio, you can create custom email messages that can go out to all patients or to a group of patients you select. You can start from a template and customize your message from there, or you can build a message from scratch.
Watch the video to learn how to send emails through the Campaign Studio.
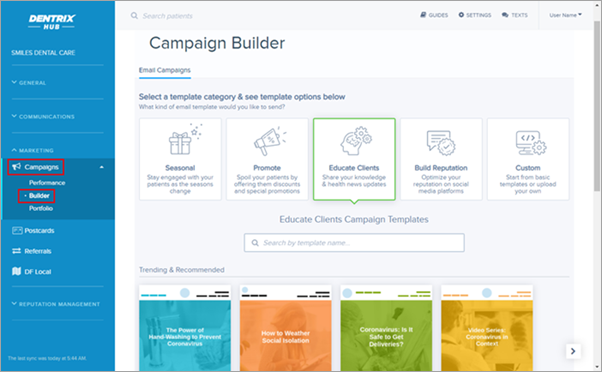
To create an email campaign, log in to Patient Engage. Then, from the Dentrix Hub, click Marketing in the left menu, and then click Campaigns. Scroll through the templates and find one you want to use and then click Use Template. Or, click Custom to design your message from scratch.
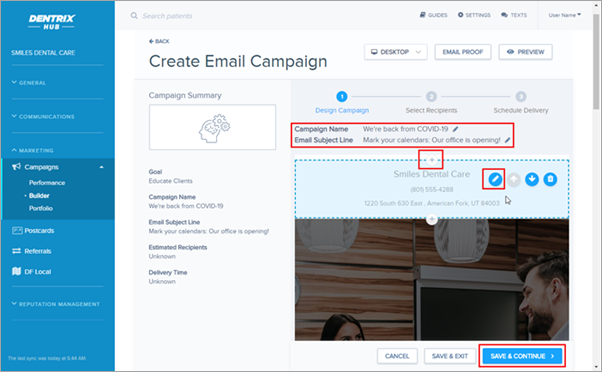
The campaign builder will guide you through the three-step process of creating and sending an email campaign. The first step is to design the message. Give the campaign a name that will be used to identify this campaign in Patient Engage. Patients won’t see this name. Then choose an email subject line. Patients will see this come through in the email they receive.
As you hover over each section of the email, you’ll see editing options for that block. As you build or customize your message, you can insert another block of text, a graphic, or other elements like a link to confirm the appointment and a link to add the appointment to your calendar. When you’re finished editing the email, click Save and Continue.
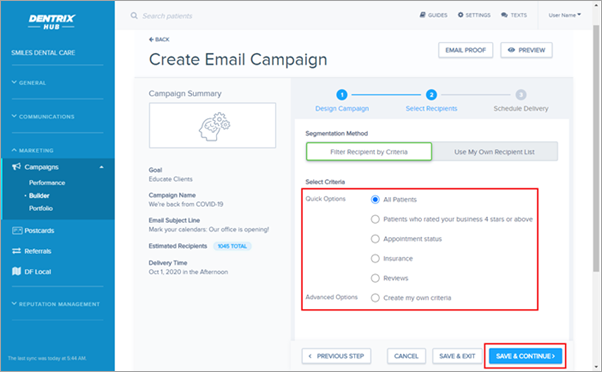
The next step is to select who should receive the email campaign. Use the filters to narrow down the recipients of the email or send the message to everyone. Click Save and Continue.
The last step is to select when the message should be delivered and whether this is a message that should be sent again.

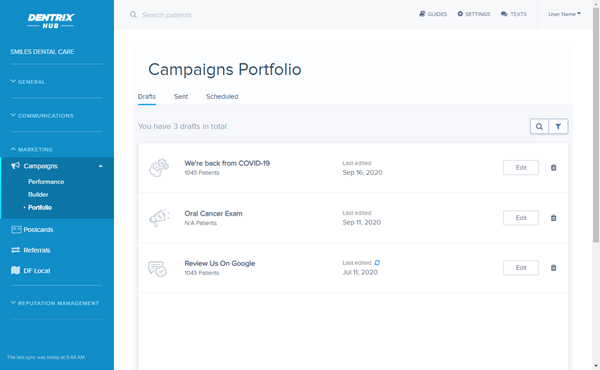
Patient Engage keeps track of your campaigns in the Campaign Portfolio. From the left menu, click Campaigns and then Portfolio. From there you can view or edit the settings for the campaigns you have waiting to send, that have been sent, or that are scheduled to send in the future.
Sending Appointment Reminder Emails and Text Messages
We’re all busy, and it’s easy to forget things like dental appointments. But when patients forget appointments, you end up with no-shows and holes in your schedule. That’s why your admin team members spend so much time calling patients to remind them about appointments.
There’s a better way to do it! Send automated emails and text messages to patients to remind them about their scheduled appointments. You can even allow patients to confirm their appointment electronically and add their appointments to their calendar, and all of that can happen while the admin team takes care of other tasks.
Watch the video to learn how to send appointment reminders.
To set up appointment reminders, log in to Patient Engage. Then, from the Dentrix Hub, click Appointments and then Reminder Settings.

Reminders are set up in what’s called “campaigns.” A reminder campaign lets you specify which type of reminders will be sent to patients and when. You can make changes to your campaigns by clicking Edit to get to the Appointment Reminder Settings.
These settings offer several reminder types, which occur at different stages. “Save the Date” reminders happen soon after an appointment is created. “Pre-appointment reminders” occur within the month before and leading up to the appointment. The “Day Of” text message is sent a few hours before the appointment. And “Follow-up messages” go out after an appointment with either surveys for completed visits or missed appointment messages.

Change these settings to match your desired timeline. You can view and edit the settings for any of these messages. When you edit emails, you can also include links for the patient to add the appointment to their calendar and to confirm the appointment.
Once you’ve set up your reminder campaign, click Save. Make sure you inactivate any campaigns you don’t want to send. Any campaigns marked as active will be sent to patients.

Sending Email and Text Message Reminders to Patients Due for Recall
It’s always important to have a full recall schedule. That’s what helps patients maintain their oral health and what helps you diagnose necessary treatment. But calling each patient, leaving a message, and hoping they call you back to schedule is not the most efficient way to get the patients on the schedule.
Recall Due reminders are especially important in time when your practice has been closed and patients may have had to cancel scheduled appointments. These reminders can help patients remember that they need to schedule again, which will help you rebuild your hygiene schedule.
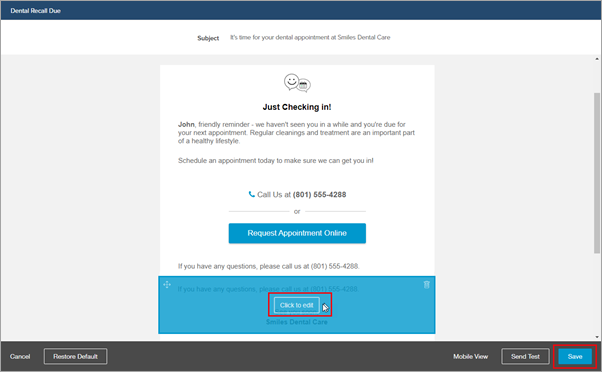
With Patient Engage Personalize Recall, you can send a custom email message to patients who are overdue for recall, and you can include a link to book online. Make it as easy for your patients to schedule, and they’ll be more likely to do it.
Watch the video to learn how to send personalized recall reminders.
To set up personalized recall, log in to Patient Engage. Then, from the Dentrix Hub, click Settings and then Personalized Recall.
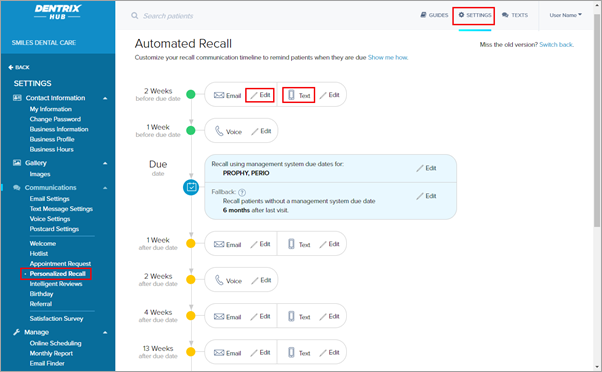
You can see the timeline for which types of messages will be sent when. Some recall messages will be sent before a patient’s due date, and some will be sent after to remind the patient they were due. To edit the timeline, click Edit on the interval you want to change, and set a new time for that communication to be sent. You can also disable any communications you don’t want to send.
Additionally, you can preview the emails and/or text messages that will be sent at each point in the timeline and view and edit the settings for any of these messages.

When you edit emails, you can also include an online booking link that patients can use to book their own recall appointment online without having to call your office. If you don’t use Online Booking yet, this link will allow patients to request an appointment. You’ll see those requests on the main page of the Dentrix Hub, and you’ll be able to follow up with patients to schedule their appointment.
Viewing Your Email and Text Message History
The Dentrix Hub includes a History section that shows you all of the emails and text messages you have sent. You can see what is going out through your appointment reminders, personalized recall, and campaigns. You can also see statistics about how many communications you have sent.
The history tells you if the patient has read your message. You can even resend email messages from the history and read replies if the patient tried to reply.
To see the email and text message history, from the Dentrix Hub click History in the left menu. Click the date on the calendar to see the history for a specific day, or sort the list by the type of reminder you want to see.
Communicate with your patients the way it’s most convenient for them while saving your staff members time.
Learn More
Watch the videos to learn how to set up communications in Patient Engage.
- Watch the Campaign Studio video.
- Watch the Appointment Reminder and Personalized Recall video.
For more information about Patient Engage, visit www.dentrix.com/patient-engage.


