
Find procedures and claims that should have been billed to insurance but weren’t so you can collect your reimbursement in a timely manner.
Updated 2/21/22
Insurance companies will only pay for the procedures that you send them, and if you don’t send them within a specific time frame, some insurance companies will refuse to pay. If you aren’t sending all eligible procedures to both primary and secondary insurance and sending them in a timely manner, you are leaving money on the table that you could have collected from insurance. Luckily, it’s easy to track those things in Dentrix and solve any problems quickly before insurance refuses to pay on the procedures or claims.
The Problem
Your total reimbursements from insurance are lower than expected. Patients are calling your office saying that they received a bill for a procedure that was never sent to insurance, or they tell you that their secondary insurance was never billed.
This happens when claims are not created for procedures that should have been billed to primary or secondary insurance or when claims are created but not sent. This can happen when staff members are out of the office and someone less experienced is covering for them or when you have new staff members who have not yet mastered all of their duties and make mistakes. This problem is also common in offices where different people create and send claims.
For example, if the front office manager creates the claims as patients are checking out and the insurance coordinator sends a batch of insurance claims every night, it’s common for mistakes to happen because two different people are involved at different points in the process.
Not identifying these problems means you won’t collect money that is available to you. And since some insurance companies have only a small window in which they will pay for claims, this can be a costly mistake.
The Solution
Run the following three key Dentrix reports to find any procedures that were not attached to claims, claims that were not created, and claims that were not printed or sent.
- Procedures Not Attached to Insurance Claims Report–Finds procedures that were completed that week but were not attached to an insurance claim.
- Secondary Insurance Claims Not Created Report–Finds any patients who have secondary insurance and for whom the primary claim payment was received but a secondary claim was not created.
- Insurance Claims to Process Report–Finds any claims that were created but not printed or sent electronically.
You can run these reports daily or weekly depending on what fits best in your office workflow, but you should run them at least weekly so that you don’t let your procedures and claims age too much before you send them.
Step 1: Run the Procedures Not Attached to Insurance Claims report
It’s easy to forget that you haven’t created a claim for a patient’s completed procedures. Office interruptions can distract you from your routine, clinicians could chart additional treatment after you have already created a claim, or you could simply miss a procedure when you create a claim. To find the procedures that were completed for patients with insurance but not attached to an insurance claim, run the Procedures Not Attached to Insurance Claims Report.
Watch the video to learn how.
To generate this report, from the Office Manager, click Reports > Ledger > Procedures Not Attached to Insurance. Choose whether you want to look at procedures not attached to dental claims, medical claims, or both. (The most common setting is a dental claim with or without a medical claim so that the report will find all dental claims regardless of whether they are attached to medical insurance.)
If desired, select a range of patients or providers. Select the procedure dates you want to include on the report (the default range is for the last week). Dentrix uses the date the procedure was set complete to determine if the procedure falls in this range. Click OK to generate the report.
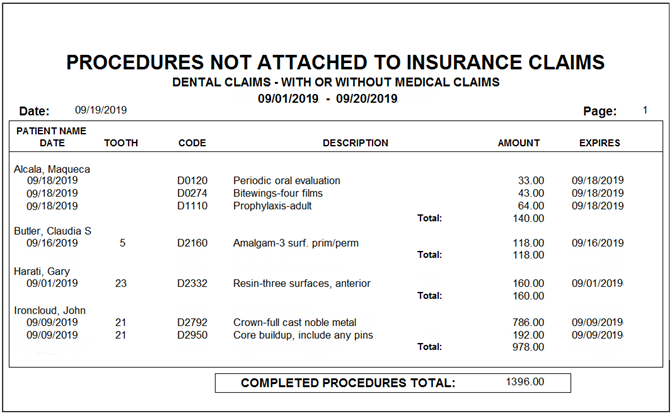
The report is grouped by patient name and lists the date of the procedure along with the pertinent procedure information. Use this report to open each patient’s Ledger and determine whether the procedures should have been billed to insurance. If so, create a claim for the procedure(s).
Note: The Expires column in this and other reports pulls the claim expiration date from the Claim Deadline field in the Insurance Coverage dialog box for the insurance plan. If you have not customized this deadline, the expiration date will be the same as the claim creation date. This date is coming from Dentrix and is not necessarily an indication that the insurance company will not pay on the claim.
There may be cases where you have a reason for not attaching a procedure for a claim, so read this report carefully to determine which procedures should have been sent to insurance.
If you do not want to send the procedure to insurance for a specific patient, in that patient’s Ledger, edit the procedure and check as Do Not Bill to Dental Insurance. If there are procedures you never want to send to dental insurance, such as custom procedure codes for a toothbrush the patient can purchase, mark that procedure to never be billed to insurance. From the Office Manager, click Maintenance > Practice Setup > Procedure Code Setup, select the procedure and click Edit, and then check Do Not Bill to Dental Insurance.
Step 2: Run the Secondary Claims Not Created Report
If you don’t create a secondary claim at the time you enter the payment on the primary claim, it’s easy to forget to go back and create that claim. If you don’t create the secondary insurance claim then there’s no chance of getting additional reimbursement on the procedures. To find the patients who have secondary insurance for whom a primary claim was created and received but no secondary claim was created, run the Secondary Claims Not Created Report.
From the Office Manager, click Reports > Ledger > Secondary Ins Claims Not Created. Choose whether you want to look for dental or medical claims. If desired, narrow the search by patient, insurance carrier, or provider. Enter the primary claim dates you want to include on the search (the default date range is for the past year). This is the date the payment was entered on the primary claim. You can also choose to have the report list primary claims that have not yet been received so you can follow up on those claims. Click OK to generate the report.
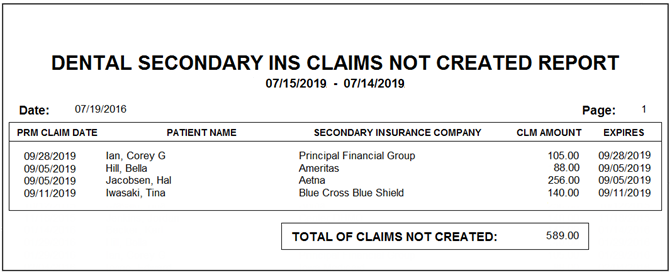
This report shows all the patients who have secondary insurance but for whom no secondary claim was created, listed in ascending order from oldest primary claim date to newest. Use the information on this report to create the secondary claims and submit them to insurance.
Tip: You can prevent this problem in the future by using the Auto-Create Secondary Claim feature. In the Ledger, click File > Insurance Payment Setup. Check Auto-Create Secondary Claim with Primary Payment. Dentrix will automatically make a secondary claim when you enter the payment on the primary claim. Check Auto-Receive Secondary Claim if No Pending Ins Estimate to have Dentrix automatically close the secondary claim if the claim amount is $0.00.
Step 3: Run the Insurance Claims to Process Report
One of the most common claims errors offices make is simply forgetting to submit the claim to insurance. This is usually due to an oversight, but when it happens it means that even though you created the claim it is just sitting in Dentrix and the insurance company will never pay on the claim. To find the claims that were created but not printed or sent electronically, run the Insurance Claims to Process Report.
Watch the video to learn how.
From the Office Manager, click Reports > Ledger > Insurance Claims to Process. Select whether you want to look for dental or medical claims. Narrow your search by patient, insurance carrier, or provider, if desired. Leave those settings set to to find all of your outstanding claims. Set the date range you want to search, and click OK to generate the report.
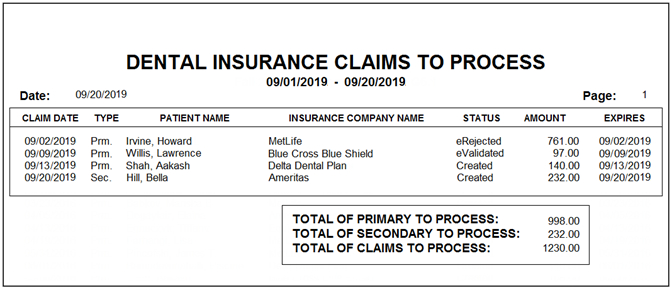
This report lists all the procedures that were not attached to insurance claims, sorted from oldest claim date to newest. Use the report to find the claims that have been created but have not been submitted and send them to insurance for payment.
Next Steps
Use the following checklist to help you implement ideas from this article in your practice.
- Generate the Procedures Not Attached to Insurance Report. Evaluate the report data and decide which of those procedures should be billed to insurance, and create claims for those procedures. Then send the claims.
- Generate the Secondary Insurance Claims Not Created Report. Evaluate the report data and decide which secondary claims should be created. Create the claims, and send them to insurance.
- Generate the Insurance Claims to Process Report. Evaluate the report data and decide which claims on the report need to be sent to insurance, and send those claims.
- Meet with the members of your team who work with insurance claims. Create a protocol for who will run the reports discussed in this article and how often. Assign one team member to be responsible for creating and sending the missing claims.
- If there are procedures that you regularly set complete and do not want to send to insurance, edit the procedure code for each of those procedures and mark them as Do Not Bill to Insurance so that it doesn’t show up on the Procedures Not Attached to Insurance report.
Learn More
Watch the recorded webinar to see the features in action or read Three Steps for Efficient Insurance Systems to get more insight into improving your insurance processes.
By Erin Brisk, Senior Editor
Originally published in Dentrix Magazine, Fall 2016


