Keeping documents organized is key to finding that information when you need it. Learn how you can attach a document to multiple sources for better organization.
You’re probably familiar with the Document Center, and how you can use it to store scanned documents in Dentrix. But here’s some things you may not know about the Dentrix Document Center.
You can avoid printing paper copies of documents (such as emails from referring doctors) and turning right around and scanning them into the Document Center. You can simply send those documents straight to the Document Center. While in another program, like Microsoft Word, print your document. When you have the option to print, instead of selecting a physical printer on your network, select the Send to Dentrix Document Center option. Instead of printing on paper, the document will be sent to the Unfiled Documents folder in the Document Center. From there the document can easily be attached to patients. Save time and paper by avoiding printing and scanning!
Most often, you’ll attach documents to individual patients in the Document Center but consider attaching documents to other sources as a way of further organizing them.
- By Provider/Staff – Documents can be attached by a provider or staff member in the Document Center for future reference. Examples of Documents you may want to attach to providers or staff could be copies of forms or articles you may want to refer to in the future.
- By Employer – Documents can also be attached by employer. For example, you may want to attach a document listing insurance companies a particular employer offers, to that employer in the Document Center.
- By Dental Insurance or Medical Insurance – Attaching documents such as coverage tables by insurance carrier would prevent you from having to remember benefit information for the insurance you accept and can refer to it when patient have questions about their benefits.
- By Referred To or Referred By – For specialists you refer patients to, you may have a copy of a referral or a map to their office to attached to the referred doctor within the Document Center.
To attach a document to a source, open the Dentrix Document Center, select the document you want to assign, select Edit > Modify Document Attachments. Then click the > button and search for the individual the source(s) you want to attach the document to.
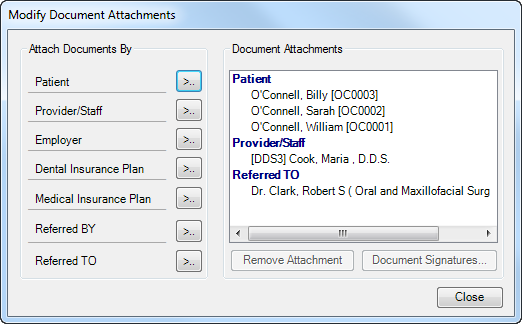
A document can be attached to more than one source. For example, you can scan a patient’s insurance card and attach it both the Patient, and to the Dental Insurance Plan. Or a specialist referral could be attached to the Patient and the Referred To provider. When you attach a document to multiple sources, the same document is visible in each source’s Document Center.
It’s easy to view the Document Center based on the source of information you wish to see. For example, if you want to view documents that are attached a specific provider, from the Document Center, click View > By Provider/Staff and then select the provider whose documents you want to view.
Organizing documents and assigning attachments can make it quicker and easier to find the information you are searching for. Being more organized and having information more readily available to you can help your office be more efficient.
Learn More
For additional information, read the following :
- Sending Documents to the Document Center Without Scanning
- Attaching Another Patient to a Document
- Viewing the Dentrix Document Center by Provider
- Document Center

By Charlotte Skaggs
Certified Dentrix Trainer and The Dentrix Office Manager columnist
Charlotte Skaggs is the founder of Vector Dental Consulting LLC, a practice management firm focused on taking offices to the next level. Charlotte co-owned and managed a successful dental practice with her husband for 17 years. She has a unique approach to consulting based on the perspective of a practice owner. Charlotte has been using Dentrix for over 20 years and is a certified Dentrix trainer. Contact Charlotte at [email protected].


