
Learn how QuickBill Premium can help consolidate your efforts and lessen the amount of time spent on your billing processes.
With staff shortages all over the country (maybe even in your practice), businesses are looking for ways to be more efficient. One labor-intensive part of your practice is sending billing statements. How long does it take you to print, sort, fold, stuff, seal, and stamp them? How many team members help with that effort? If the time involved in completing that task could be returned to you, what else could your team accomplish instead?
QuickBill Premium is a real time saver for your practice! With only a few clicks, the work is done for you. Plus, you are not limited to sending by postal mail. You can select multiple delivery methods, including email or text. With electronic delivery, patients can click a link to pay their bill online right away, and you can follow up with a report showing who opened their email, clicked the link, and viewed their bill–something you just can’t do with a physically mailed statement.
Setup Steps
The first step is to sign up to begin using QuickBill. In this process, you’ll agree to the billing terms and be assigned your QuickBill ID and password.
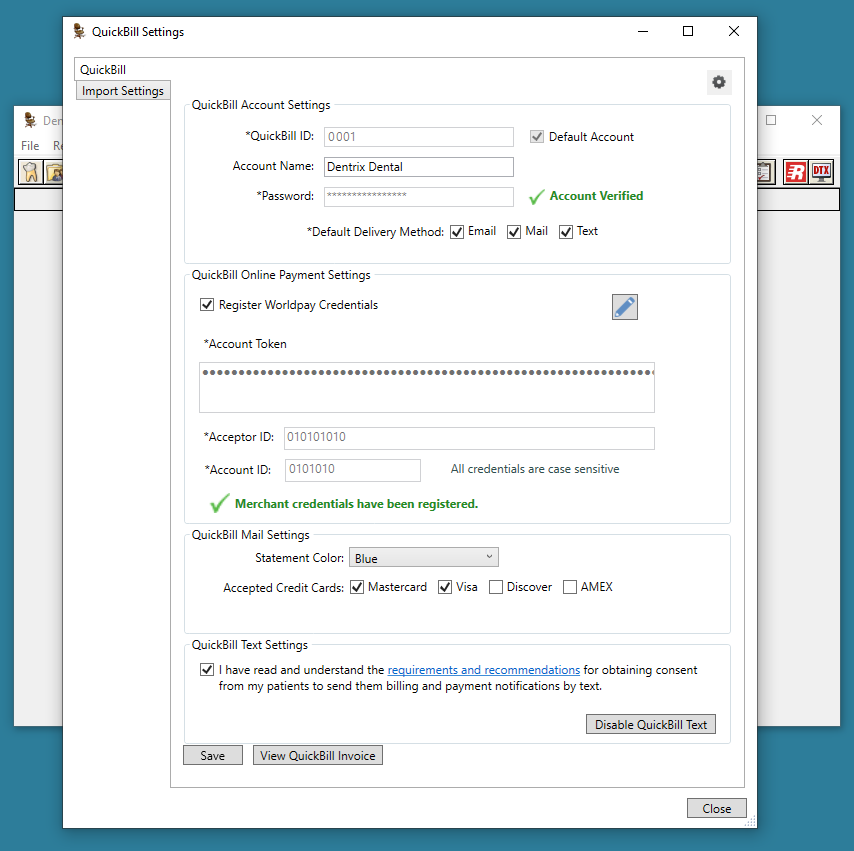
A Dentrix eServices Customer Support agent will help you activate your QuickBill service. After it is activated, in the Dentrix Office Manager, click Maintenance > Practice Setup > Electronic Billing Setup. Enter the credentials that your office was assigned. After the system verifies your information, additional options are enabled in this window.
Click the Enable QuickBill eMail, Enable QuickBill Mail, and Enable QuickBill Text buttons to activate the features that your office will use. As you click these buttons, additional related options appear in this window.
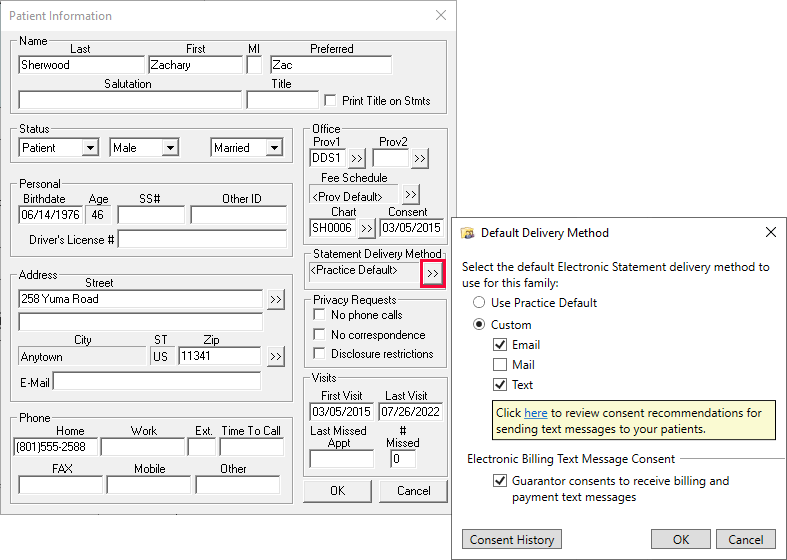
Choose the Default Delivery Method for your office. This becomes the distribution preference used for families who don’t have a statement delivery preference set in their Family File.
If you have enabled email or text options, you can enter your office’s WorldPay Credentials. This will allow your patients to pay their balances online by credit card.
When using the postal mail option, you can select the Statement Color, which is used for the lines and shading graphics on the statement. Also select the credit card types that your office accepts, and those card logos will be included on the printed form.
There are important legal considerations regarding consent that you should follow before sending your patients text messages. Read the requirements and recommendations, then select the check box to acknowledge that you understand these.
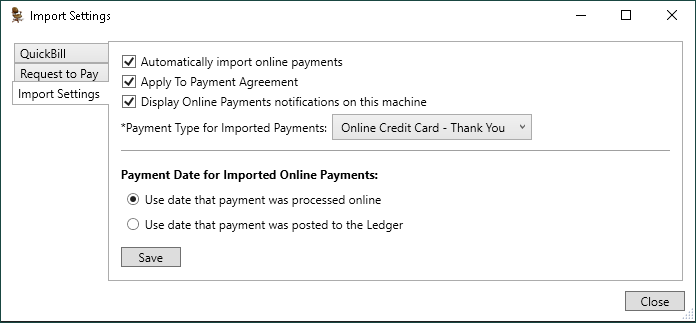
If you will be accepting online payments, click the Import Settings tab to adjust how your office will receive those payments.
If you want online payments to be received and posted automatically to the patient’s ledger, select Automatically import online payments. Leaving this option cleared will require a member of your team to manually acknowledge each payment before it is posted to the Ledger (that process is discussed later in this article).
Choose the Payment Type that will be used for these online payments. It is recommended that you choose a payment type that is uniquely reserved for online payments. Doing so will allow these payments to be easily recognized and distinguished from other credit card payments on reports.
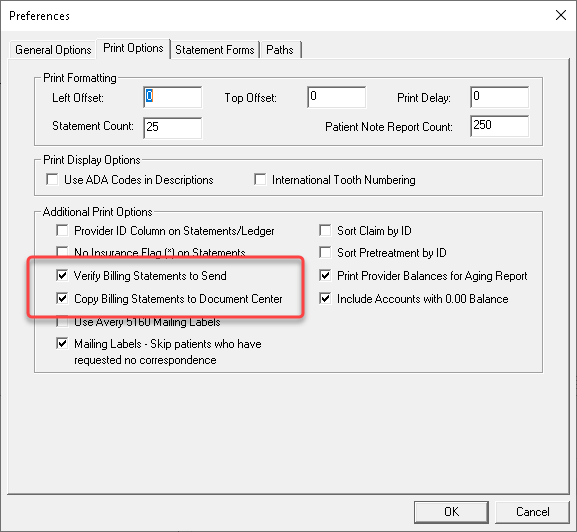
There are a few other options worth considering. In the Office Manager, click Maintenance > Practice Setup > Preferences.
On the General Options tab, review the Payment/Adjustment Options. Like all payments that you receive, these options are used to split the payment among providers or family members within the account.

On the Print Options tab, select Verify Billing Statements to Send to enable a preview window that will allow you to review an account, edit the billing statement note, and change the delivery method for receiving a statement. Select Copy Billing Statements to Document Center to automatically keep a copy of the statement in the guarantor’s Document Center. These copies can be useful for reference should patients call with questions about their statement.
Generating Statements
The process for generating statements is the same as it has been in the past, except that you won’t click the Print button.
You can send individual statements from the Ledger. From the Print menu, select Billing Statement. Then select Send Electronically as the method.
You can generate a group of statements for multiple families from Office Manager. From the Reports menu, select Billing.
You can also set up statements to generate automatically on a schedule through the Task Scheduler. In the Office Manager, open Maintenance > Task Scheduler. Find the Billing Statements task and click Add. Select a queue and set up the options to use for your billing statements. The statements will appear in the Office Manager on the Batch Processor at each scheduled recurrence interval.
No matter which way you created the billing statements, submit them for processing by selecting them from the Batch Processor list and clicking File > Electronic Billing Submission (or click the Electronic Billing Submission button on the toolbar).
Verifying Statements
In your old system of processing statements, you had the option to review the physical statements as they came from the printer and discard any that shouldn’t be sent. When using QuickBill, you have the option to view statements on screen and decide which ones should be sent and how they should be sent, by using the Verify Statements to Send window.
In this window, select a guarantor to preview their statement. Above the preview window, you can toggle the setting to show how the statement would look when printed or sent electronically.
The Verify Statements to Send window offers a lot of options, so let’s break them down.
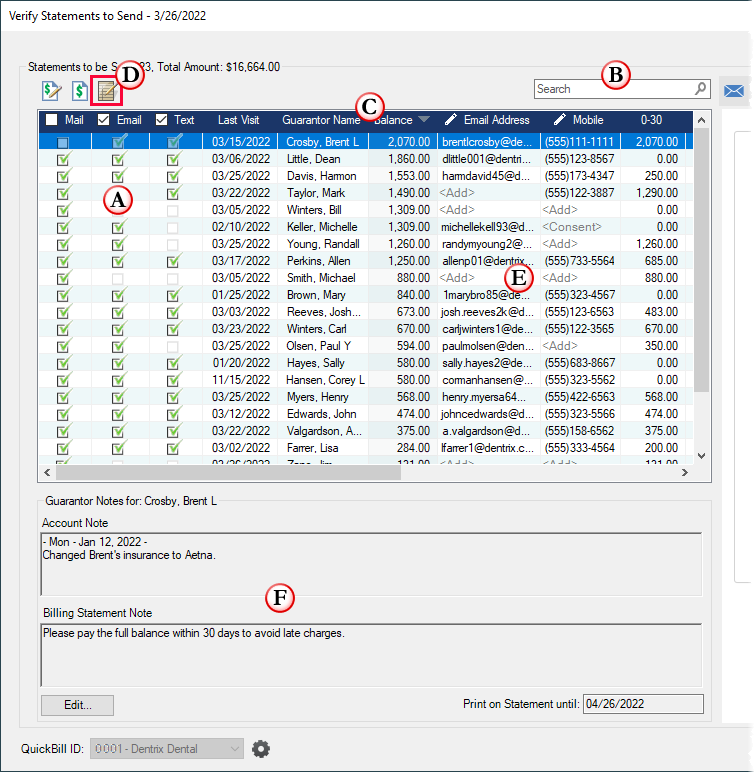
A. Use these check boxes to select how each statement should be delivered to each account. Select Mail, Email, and/or Text. Or remove all three selections if you don’t want the patient to receive a statement in this batch.
B. Use the Search box to find a specific guarantor in the list. Enter a name, phone number, or email address.
C. Click on a column header to sort the list. You could sort by balance, last visit date, or other information that is helpful in finding the accounts you are looking for. Also, you can right-click any column header to reveal a menu that allows you to display or hide additional columns, or to sort or filter the list using more advanced options.
D. You might not remember every detail about each account. Select a row and click the Ledger button to open the Ledger to the selected guarantor. Review the account details to refresh your memory of notes, transactions, payment history, and so forth. Minimize the Ledger window to return to this list.
E. If an account is missing an email address or mobile phone number, or if you catch a mistake in either, you can click and edit it here. Similarly, if you have not yet marked that the guarantor consents to receive text messages, click the word Consent and update that permission from this window. Changes are conveniently saved back to the guarantor’s Family File!
F. You can review, add, or edit the Guarantor Note and Billing Statement Note from this window, without needing to open the Ledger to do so. As a reminder, the account note is for internal use (it can print on the Aging Report or in Collections Manager), while the Billing Statement Note will be printed on this account’s statement.
Once you’ve reviewed all the statements in the Verify Statements to Send window, click the Send button to submit them to QuickBill for processing.
As a reminder, in each Family File there is a Statement Delivery Method option. If you don’t change this, the account follows the practice’s Default Delivery Method (which you selected during QuickBill setup). This area is also the place that you can record if the guarantor has granted consent to receive text messages.
Patient Experience
Now that you’ve seen how quick and easy it is to generate a batch of statements for your patients, let’s look at what the patients will see and do when they receive their statement.
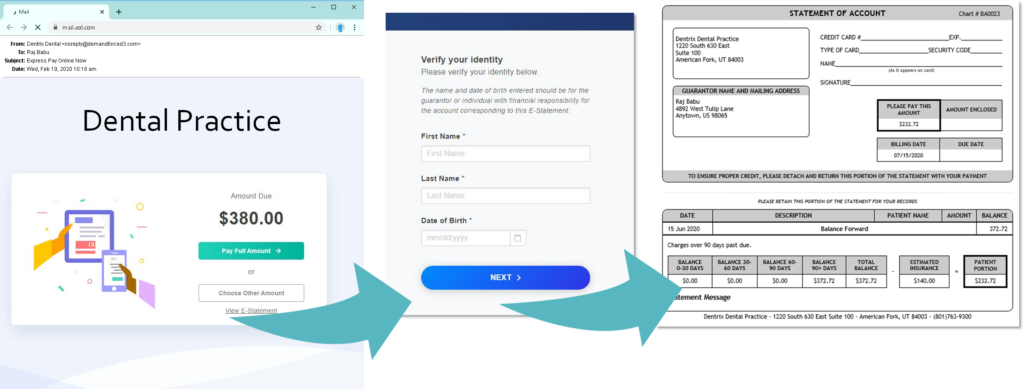
Receiving an Email Statement
When receiving an email statement, patients click the View E-Statement link. The guarantor is invited to enter their name and birthdate to verify their identity. Once verified, they can view the account’s statement.
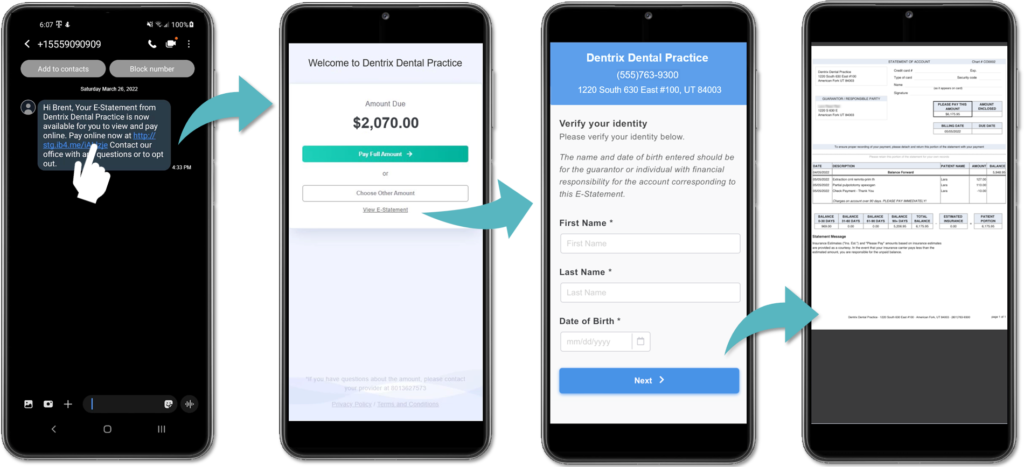
Receiving a Text Statement
When receiving a statement by text, the patient taps the link in their text message and can view their balance. They tap View E-Statement, verify the guarantor’s name and birthdate, and can then view the statement.
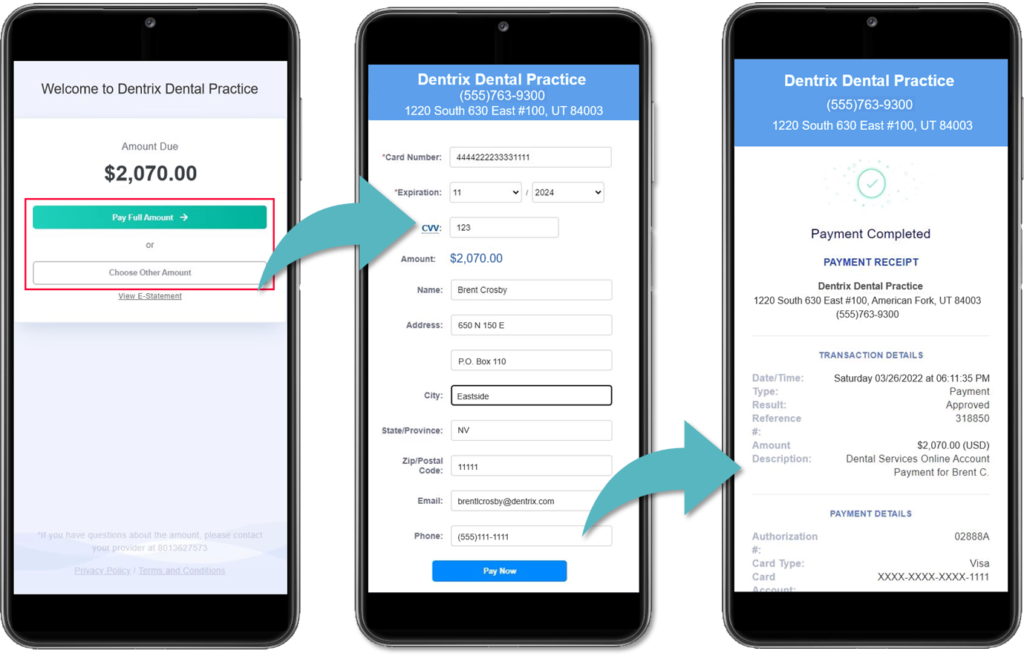
Paying a Bill Electronically
Email and text statements both include buttons to enter a payment. The patient taps the payment option, enters credit card information, and submits the payment.
Receiving Patient Payments
With electronic payments, patients have the ability to pay any time, day or night. You might wonder how you’ll know that you’ve received a payment. Depending on your Import Settings you selected earlier, payments will be received in one of two ways:
- If your payment settings are set to automatically receive payment, Refresh the Ledger and you’ll see the payment added automatically.
- If payments are not set to import automatically, you will see a notification banner indicating that there is an online payment waiting to be received. Click Review and Import Payments to open the Import Online Payments window. Select the payment and click the Post Selected button to receive it into the patient’s Ledger.

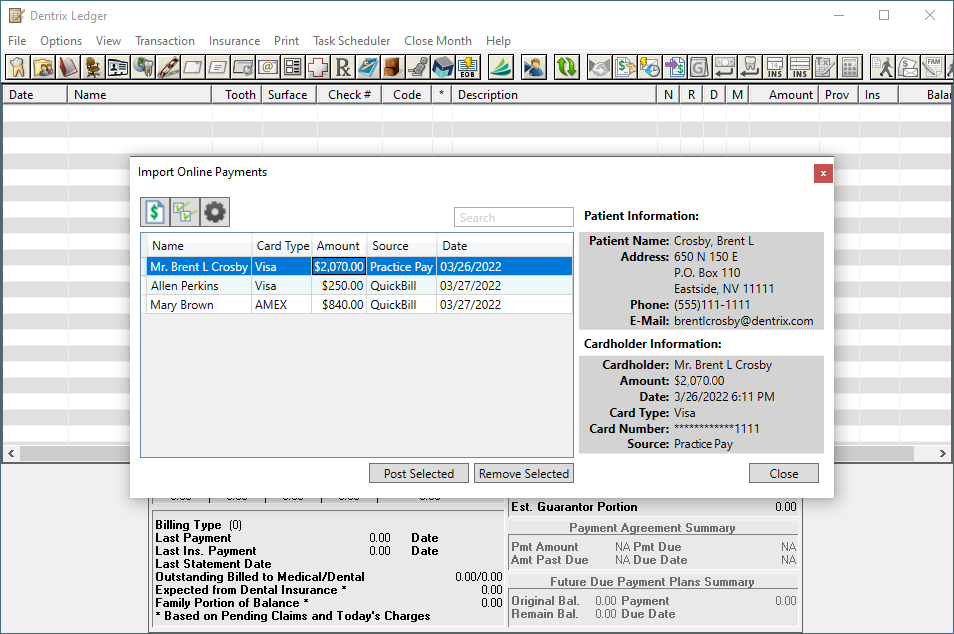
There may be certain workstations in your office where you don’t want to receive these online payment notifications. View this tip to learn how to disable notifications on individual workstations.
These payments will be split according to your standard payment and adjustment split options (which we talked about earlier during the setup process). After posting the payment, you’ll be able to double-click the payment and edit, split, or do anything else that you can normally do with payments in the Ledger.
The payment will be posted to the Ledger using the Payment Type that you selected during setup under Import Settings. You’ll be able to identify that these payments were made online when viewing them in the Ledger and on your reports by looking for that specific payment type.
Viewing Statement History
Sending statements through QuickBill Premium has another great benefit – you have access to the Statement History for each of those patients.
In the Office Manager, you can view all statements submitted on a given day. Open File > Electronic Billing Submission History (or click the Electronic Billing Submission History button on the toolbar).
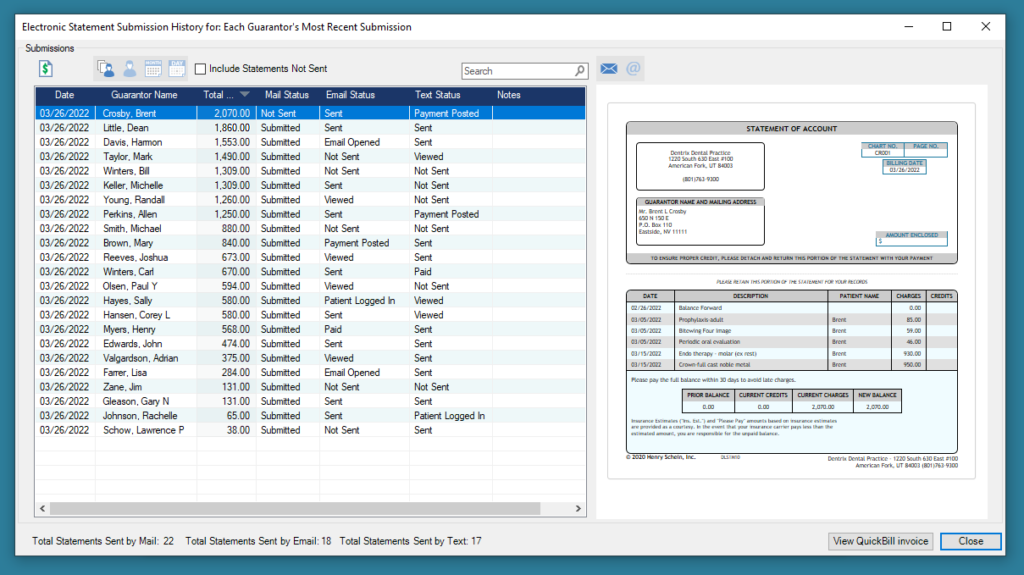
Click a guarantor’s name to see what their statement looked like in that batch. You can also see the status of each billing statement:
- If the statement was mailed, the statuses are limited to knowing if the bill was or wasn’t sent by mail with this batch of statements.
- If the statement was sent by email or text, you can see just how far the patient went in the process of receiving their statement. For example, did they open the email? Did they click the link to view their statement? Did they successfully log in and view the statement? Or did they make a payment. (Imagine talking to a patient who claims that they never received a statement and being able to see that they opened their email or even actually viewed their statement!)
You can type in the search bar to narrow down the list to specific accounts, click any column header to sort the information, or right-click any column to display or hide columns or used advanced sort or filter options.
You can also open the Electronic Billing Submission History button from the Family File, allowing you to see the statement history for a family (whereas Office Manager lets you view it for the whole practice).
Conclusion
With QuickBill Premium, you can help consolidate your efforts and lessen the amount of time spent on your billing processes. This tool simplifies management of billing statement notifications and payments. With both mail and electronic capabilities, you can customize billing and payment notifications to fit your practice and patient preferences, making it convenient for them to pay their bill quickly and efficiently. Plus, information found in the Statement History gives you new tools to help you follow up on collections. Revolutionize and supercharge your patient billing process with QuickBill Premium!
Learn More
For additional information:
- Watch our on-demand webinar titled, Collect Payment Faster with Online Patient Payments to learn more about how to use QuickBill Premium.
- Read 5 Reasons You Should Be Sending Text and Email Billing Statements
- Read Display Online Payment Notifications on Individual Workstations
By Ryan Beardall, Contributing Editor


