
Discover the options you should include for billing statements so patients understand exactly how much you expect them to pay and when you expect them to pay it.
Sending billing statements to patients is an essential part of your dental business. It’s how you notify patients about their outstanding balance and give them the information they need to make a payment, which helps your office maintain a healthy cash flow.
I recommend offices send statements to patients immediately after receiving an insurance payment if the patient has a remaining balance, and then also generating billing statements for all patients on a monthly basis. For larger offices that generally have lots of statements to send, I recommend sending billing statements on a weekly basis by breaking up statements into groups. For example, the first week of the month, send statements to all guarantors with the last name beginning with A-H, the second week of the month I-M, the third week of the month N-S, and the fourth week T-Z. By splitting statements into groups, it makes the task of generating and sending the statements more manageable, as well as spreading out the inevitable phone calls with billing questions, so you don’t have to handle them all at once.
Dentrix G7.4 added an option giving you the ability to email patients their billing statements. While this is an exciting new feature, some patients will still prefer their statement to be printed and mailed.
When printing billing statements, I recommend that offices decide how they want their statements to look and the information they want to include, and then save those options so that billing statements always print consistently.
Below are eight key settings to include when printing billing statements:
1. Change the Balance Forward Date
By default, the Balance Forward Date will be one month prior to the date you are generating the statement. This means that only procedures and payments made between the Balance Forward Date and the date you generate the statements will appear on the patient’s statement. Patients who have a balance from procedures prior to that date will just see Balance Forward and a due amount to pay. This can be confusing to patients and cause them to call the office with questions. You can save yourself a phone call, and the patient some confusion, by changing the Balance Forward Date to three months prior to the date you are generating the statements. This will then show the patient a detailed view of all procedures and payments for their family members over the last three months and give them a better understanding of why they have a balance.
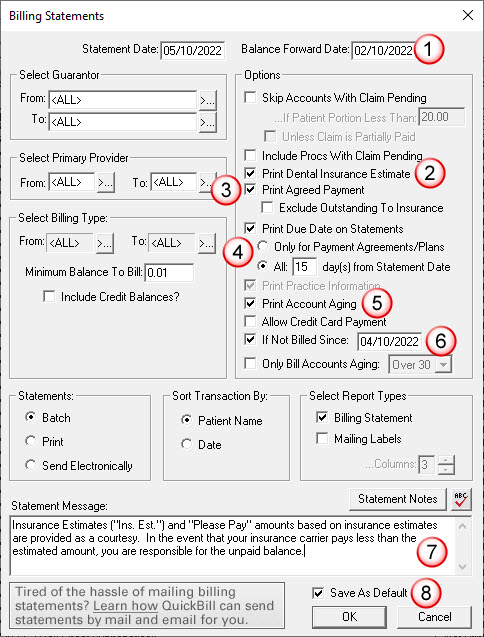
2. Print Dental Insurance Estimate
When selected, this option shows a dollar amount you are estimating their insurance to pay. This can help patients to know what you are expecting them to pay and what you are estimating their insurance to pay.
3. Print Agreed Payment
By selecting the Print Agreed Payment option, a box will print on the billing statement that says Please Pay with the estimated patient portion. I like this option because then there is no question of what you are expecting the patient to pay.
4. Print Due Date on Statements
All billing statements should have a due date. I usually recommend fifteen days after the date of the statement. In my experience, most people pay their bills based on the date that they are due. The bills that are due first generally get paid first, so you can get patients to pay their balances more quickly by selecting the Print Due Date on Statements option, and then selecting All, and entering a number of days for the payment to be due.
5. Print Account Aging
The Print Account Aging option is an important option to include on statements. When patients see the aging bracket on their statement, it creates a sense of urgency to pay their balance if they can see that it’s over thirty (or more) days past due.
6. If Not Billed Since
If you send statements to patients immediately after you receive payment from their insurance (and they still owe a balance), and then you generate your regular billing statements a couple of days later, you wouldn’t want that same patient to receive another statement. You can select If Not Billed Since option and use the default date of one month prior to the date that you are generating statements. That way, if the patient has already been sent a statement within the last month, they won’t receive another one.
7. Billing Statement Notes
When sending patients a statement after having received a payment from their insurance, you can include a billing statement note to indicate to the patient why they have a remaining balance. This can help team members by not having to take time-consuming phone calls from patients regarding their balances. For example, if the patient has a balance because they met their insurance annual maximum, you could create a custom billing statement note to communicate this, and then attach it to the next statement that you send to them.
8. Saving Billing Statement Options
Once you have selected the options you want to use for your billing statements, you select the Save As Default option to save you from having to select these same options the next time you have a statement run. However, the options will only be saved on that particular workstation. Because of this, I usually recommend that offices use the same workstation to generate their billing statements, or duplicate and save their option selections on all workstations they will use to generate billing statements.
Save a Copy of the Billing Statement
Another tip I recommend is for offices to save a copy of each billing statement to the guarantor’s Document Center. That way, if a patient does call with a question about their statement, you can look at exactly what they are looking at. It takes the guess work out of answering patients’ questions because often times the Ledger can look different than the billing statement when there have been procedures or payments posted since the statement was originally sent.
Simplify Billing with QuickBill
Once you have set up the options you want to use to generate your billing settings there’s still the task of printing, sorting, folding, stuffing, sealing, stamping, and mailing them. But there’s an easier way! QuickBill can electronically send your billing statements to a clearinghouse where they are professionally printed, folded, and mailed for you.
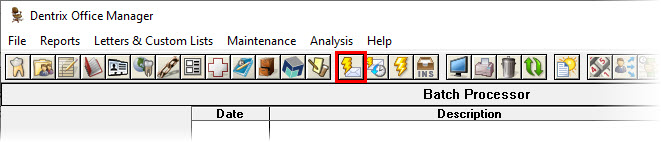
To send billing statements using QuickBill, begin by sending statements to the Batch Processor as you normally would in Dentrix. In the Batch Processor, select the statements you want to send to QuickBill, then click the Electronic Billing Submission button on the Office Manager toolbar.
When the Electronic Billing Submission dialog box appears, make sure Selected Billing Statements is selected, and click OK.
QuickBill sends the billing statements that you selected to the clearinghouse. When the statements have been sent, a message states, “Your statements have been successfully sent and all statement reports are received.”
Conclusion
Sending clear billing statements to patients that they can understand is key to encouraging them to pay their outstanding balance in a timely manner. Send statements immediately after receiving an insurance payment if a patient has a remaining balance and then also regularly on a weekly or monthly schedule. Use the options for the information you want to include so that patients understand exactly how much you expect them to pay and when you expect them to pay it. This will help you to maintain healthy cash flow and accounts receivables in your practice.
Let QuickBill simplify your billing statements and save you time by doing the printing, sorting, folding, stuffing, sealing, stamping, and mailing for you. Your patients will receive professional looking statements along with a pre-printed return envelope to complete the billing cycle quickly.
Learn More
For additional information, see the following :
- Generating Billing Statements
- Custom Billing Statement Notes
- Send Copy of Billing Statement to Document Center Automatically
- Simplify Billing with QuickBill
- Learn more about setting up Dentrix QuickBill to automatically mail professional patient billing statements.
- Learn how to cut costs by sending electronic billing notifications via email with Dentrix QuickBill Email.

By Charlotte Skaggs
Certified Dentrix Trainer and The Dentrix Office Manager columnist
Charlotte Skaggs is the founder of Vector Dental Consulting LLC, a practice management firm focused on taking offices to the next level. Charlotte co-owned and managed a successful dental practice with her husband for 17 years. She has a unique approach to consulting based on the perspective of a practice owner. Charlotte has been using Dentrix for over 20 years and is a certified Dentrix trainer. Contact Charlotte at [email protected].


