Explore options in the procedure code setup you didn’t know existed and learn how they can benefit your office.
There are many ways to customize Dentrix in order to make it work more efficiently for your office. In today’s post, we’ll talk about some ways you can edit the way procedure codes are set up so they work best with your office workflow.
You’ll find the Procedure Code Setup in the Office Manager. From the Maintenance menu, point to Practice Setup, and then click Procedure Code Setup. Select the procedure code category and individual procedure you want to customize, and the click Edit.

Patient Friendly Treatment Descriptions
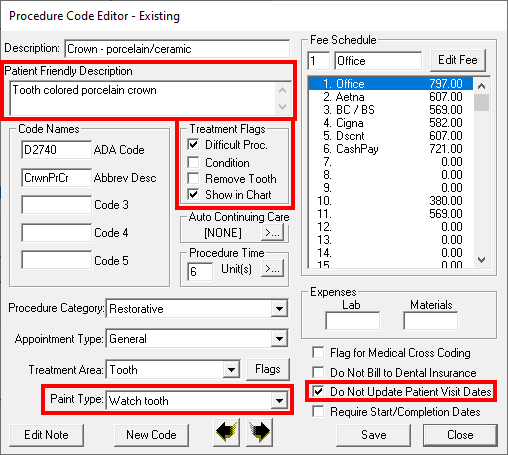
You can customize a procedure’s Patient Friendly Description to reflect the verbiage that you use in your office. For example, instead of having a procedure code description of “Crown – porcelain/ceramic” for procedure code D2740, you could use a patient friendly description of “Tooth colored porcelain crown.” These patient friendly descriptions can be used on the patient’s printed treatment case so it’s easier for the patient to understand.
Abbreviated Description
The abbreviated description of an ADA code is how the code will be displayed on the patient’s appointment. In my experience, the simpler these are, the better. For example, for a one surface composite filling, an abbreviated description could be 1surcomp. This makes it clear to the entire team exactly what the patient’s appointment is scheduled for.
Treatment Flags – Difficult Procedure
You can mark a procedure as difficult, which will flag that procedure for patients on the Day Sheet. This is a good tool to use if your doctor wants to call patients that had a difficult procedure performed that day to check on them. Adding the Difficult Procedure treatment flag makes it easy for the doctor to glance at the Day Sheet to know which patients had those procedures completed and may need a follow-up phone call.
Treatment Flags – Remove Tooth
By checking this option, the tooth will be removed from the graphic Chart whenever this procedure code is set complete.
Treatment Flags – Show In Chart
If there are procedures that your office doesn’t ever complete, you can clear the Show in Chart treatment flag so those procedures don’t show in the Patient Chart. This reduces the risk of a team member accidentally selecting an incorrect procedure code from the Patient Chart and can also help streamline your treatment planning processes.
Procedure Time
You can indicate the default appointment time for a procedure. You can also allow for chair time, assistant time and provider time. This is important because a provider (doctor or hygienist) can’t be scheduled for provider time during more than two appointments at the same time. I find this to be an issue when offices are scheduling their doctor in three or four rooms at a time, but it’s an easy problem to correct by changing the provider time to either assistant or chair time.
Paint Type
The Paint Type is how a procedure appears when posted in the patient’s graphic chart. Many offices say that bridges don’t look like bridges in the Patient Chart. If that’s the case in your office, double-check the Paint Type assigned to the procedure in the Procedure Code Setup. You can also use Paint Type to document conditions. For example, some offices use the Circled Tooth paint type to indicate they are watching a tooth; others use the Watch Tooth paint type, which puts a W at the bottom of the tooth. The paint types you use for different procedures are based on the needs and preferences of your office.
Do Not Update Patient Visit Dates
A patient’s first and last visit dates affect your new patient and active patient numbers and reports. If there are procedures that shouldn’t count towards a patient’s last visit date when set complete in the Patient Ledger, you can set up those procedure codes with the option of Do Not Update Patient Visit Dates. For example, if you have set up a procedure code for a missed appointment or for products, you can set these as Do Not Update Patient Visit Dates and still post them to the Ledger.
Edit Note
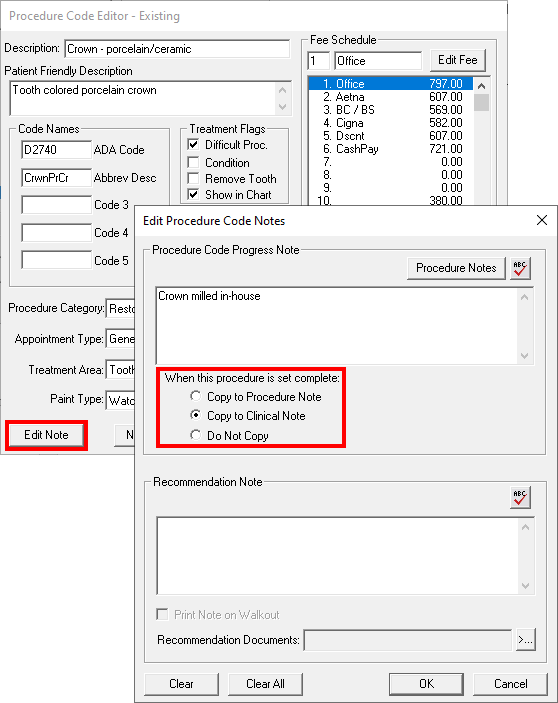
You can attach automatic notes to procedure codes and then select whether you want them to copy to the procedure note or clinical note. This can save time when writing clinical notes. For example, if you always fabricate porcelain crowns in your office on a milling machine, you could edit the note for the porcelain crown procedure code and then mark it as Copy to Clinical Note to automatically attach the note stating that the crown was milled in-house.

Additional Options
You also have options to flag a procedure code for medical cross coding, mark the procedure as do not bill to dental insurance, require start and completion dates for the procedure (great for crowns and bridges) and my personal favorite, setting the do not update patient visit dates option. The reason I like this option so much is that the patient’s last visit date is very important in Dentrix. It is how Dentrix calculates your office’s active patient number. Some procedure codes should not update the patient’s last visit date. For example, if you use a code for a missed appointment, the patient’s last visit date should not be affected when charging this code.
I really like these features in the Procedure Code Setup in the Office Manager because you have the option to customize settings so that the codes can work best for your office.
Learn More
For additional information, read the following topics in Dentrix Help:
By Charlotte Skaggs
Certified Dentrix Trainer and The Dentrix Office Manager columnist
Charlotte Skaggs is the founder of Vector Dental Consulting LLC, a practice management firm focused on taking offices to the next level. Charlotte co-owned and managed a successful dental practice with her husband for 17 years. She has a unique approach to consulting based on the perspective of a practice owner. Charlotte has been using Dentrix for over 20 years and is a certified Dentrix trainer. Contact Charlotte at [email protected].


