
Three steps to help you create and track pre-authorizations for dental procedures in Dentrix.
Updated 11/15/21
Insurance is such big issue in most dental practices that I feel it is worth talking about…even if it is not the most exciting topic. An often-overlooked part of managing insurance is managing your pre-estimates/pre-authorizations. I don’t know if it is because of the economy or if insurance companies are mandating pre-authorizations more these days, but I am noticing more and more offices sending in pre-auths for treatment.
Many of you already know how to send out a pre-authorization for treatment, but the work don’t stop there. Here’s a checklist for better managing your patients’ dental pre-authorizations.
1st: Create and Send the Pre-Authorization
The first thing you need to do is create and send the pre-authorization claim form from the patient’s Ledger. To do this, from the Ledger, click Options > Treatment Plan. This will open the Treatment Plan View of the Ledger. If the patient has treatment-planned procedures on this page, you can simply select the line items and click on the insurance icon to batch the pre-authorization. (If there are no treatment-planned procedures you can add them from this page by clicking on Transaction > Enter Procedure.)
Now you can attach any electronic X-ray or image and also document the clinical narrative in the Remarks for Unusual Service box and this pre-estimate is ready to go out with your next batch of eClaims.
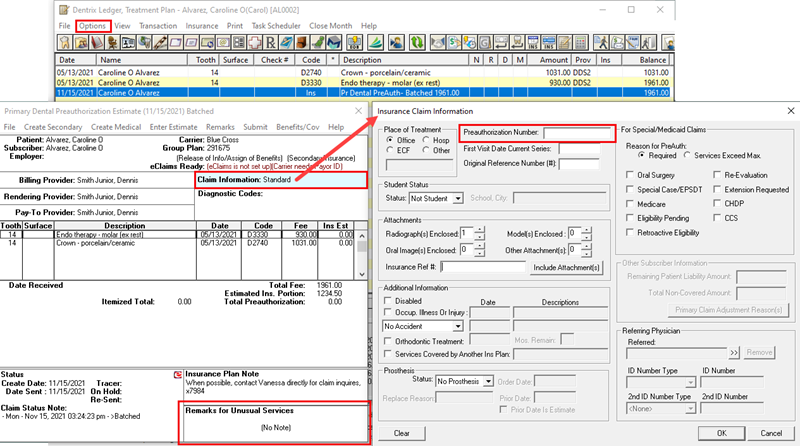
Tip: You can define the color of this page so it’s not confused with the actual ledger page. To change the color of this page, go to File > Ledger Colors Setup and then choose your personal color scheme.
2nd: Follow Up on Outstanding Pre-Authorization Claims
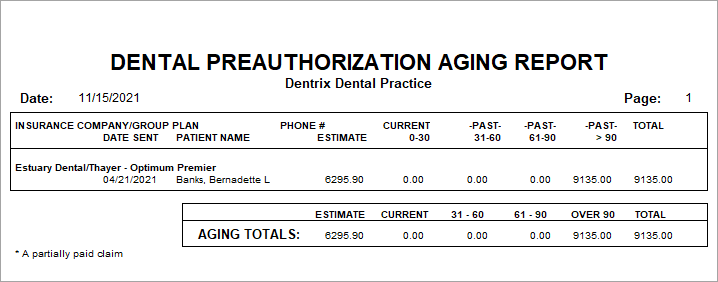
Just like you would follow up on unpaid insurance claims, I would suggest checking on unprocessed pre-authorzations exactly the same way. Go to Office Manager > Reports > Ledger > Preauthorization Aging Report. Filling your doctor’s schedule might depend on making sure these pre-authorizations are being received in a timely manner.
3rd: Enter Payment Estimate
When the Pre-Authorization EOB is sent to your office showing the itemized approval of the procedures, you will need to enter the pre-estimate amount just like you would a payment on an actual claim. It is important to receive your pre-authorizations just like an actual claim because it will give you a more accurate out-of-pocket estimate for your patient.
Double-click on the pre-authorization claim form and click on Enter Estimate. Now you can itemize each procedure to document what the insurance company is estimated to pay on each line item and document the reference number for this pre-authorization.
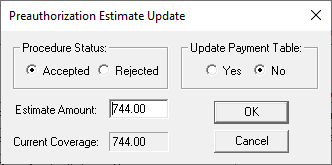
This process of entering an estimate amount on a pre-authorization claim also clears it off the Preauthorization Aging Report and closes it on the Ledger. And, once the patient has completed the treatment and you are now creating an actual insurance claim, Dentrix will automatically insert the Pre-Authorization reference number onto the actual claim so you don’t have to look it up. Pretty slick, huh?
I hope this will help you better manage your patient’s treatment plans and pre-treatment estimates and keep your doctor’s schedule full and productive.
Learn More
For more information about managing the insurance process, read My Insurance Claim Was Denied…Again.
To learn how to create and manage pre-authorization claims, read the Pre-authorization Estimates topic in Dentrix Help.
By Dayna Johnson, Certified Dentrix Trainer
Dayna loves her work. She has over 25 years of experience in the dental industry, and she’s passionate about building efficient, consistent, and secure practice management systems. Dayna knows that your entire day revolves around your practice management software—the better you learn to use it, the more productive and stress-free your office will be. In 2016, Dayna founded Novonee ™, The Premier Dentrix Community, to help cultivate Dentrix super-users all over the country. Learn more from Dayna at www.novonee.com and contact Dayna at [email protected].


