
Streamline your charting processes and accomplish tasks more efficiently with these seven custom settings.
Updated 11/11/21
You can customize the Patient Chart in many ways. This is great because you may have multiple doctors and team members in your office that like to view the Patient Chart differently. By taking the time to set up the Chart in a way that works best for your workflow, you can streamline your charting processes and accomplish your tasks more efficiently.
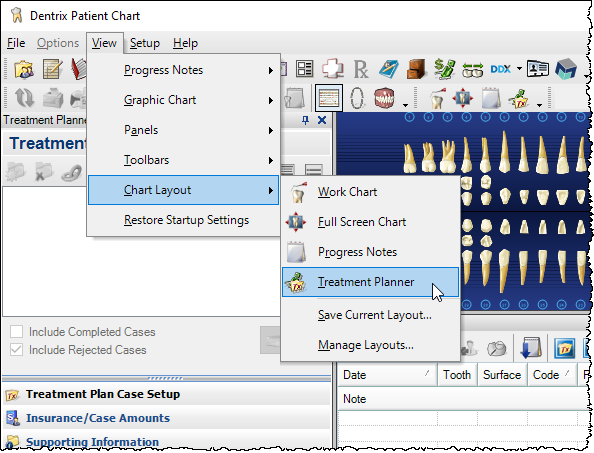
Customizing the Chart Layout
In the Patient Chart you can select a Chart Layout that best fits your individual needs. My favorite is the Treatment Planner Layout because in this layout, you can perform many tasks from a single screen, including treatment-planning procedures and conditions, setting visits, organizing a patient’s treatment plan, and printing their treatment case. You also have the option to have patients sign consent forms and accept and reject presented treatment plans.
Using Large Toolbar Icons
Another fan-favorite customization in the Patient Chart is the option to use large icons on the toolbar. Many offices ask if they can increase the size of the toolbar icons in Dentrix. Smaller monitors and the fact that team members may be looking at a monitor from across the operatory can make toolbar icons difficult to see. It can be helpful to use larger icons. This option is available in the Patient Chart, Document Center, and the Treatment Planner.
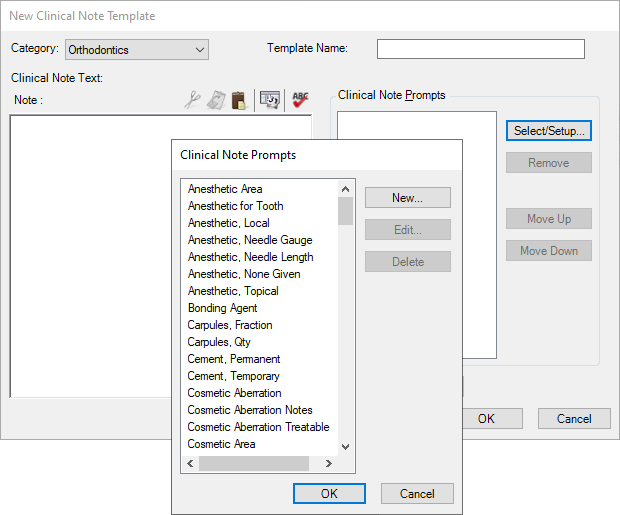
Creating Custom Clinical Notes
One of the customizations in the Patient Chart that will dramatically change your office workflow is the ability to create custom clinical notes. By creating custom clinical note templates, you can save your clinical team so much time while writing their clinical notes. In addition to being a much faster way to write clinical notes, you can be sure that the clinical notes are written consistently and exactly the way the doctors and hygienists want them to be written.
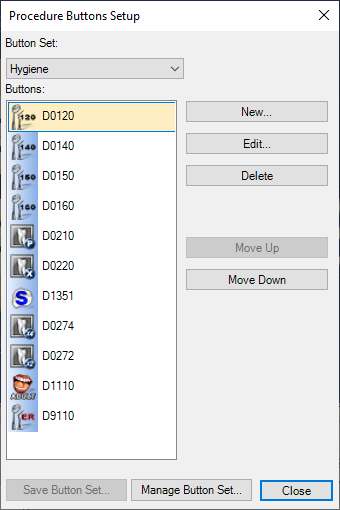
Customizing Procedure Buttons
Setting up procedure buttons will also dramatically improve your office workflow. Having these buttons available makes charting and treatment planning much faster because you don’t have to search through lists of codes to find the one you need. You can simply click a custom button that displays the icon of your choosing and is attached to the procedure codes you specify. By setting up procedure buttons, you reduce the possibility of a team member accidently using the wrong code, such as the wrong code for the type of crown done in your office. You can save and use procedure buttons sets on more than one workstation, so you have the ability to use the same button set throughout the office or create customized button sets for each user.
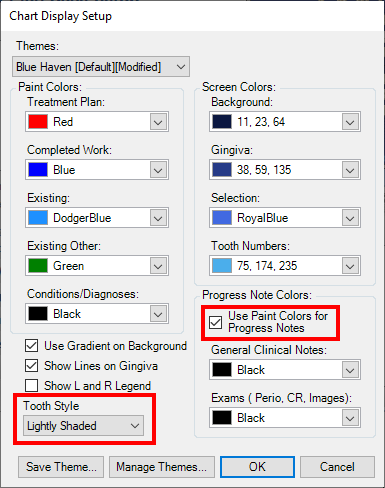
Customizing Chart Colors
Another customization option in the Patient Chart is the Chart Display setup. You can change the background theme, tooth style, and colors used to denote particular statuses to your preference. I would suggest if you do change the background theme colors in the Patient Chart, keep them consistent throughout the office. My favorite feature in the Chart Display setup is the option to use paint colors for progress notes. Selecting this option will cause the colors of the progress notes to correspond with the colors in the graphic portion of the Patient Chart. This feature makes it much easier to differentiate between conditions and treatment-planned, completed, and existing procedures at a glance.
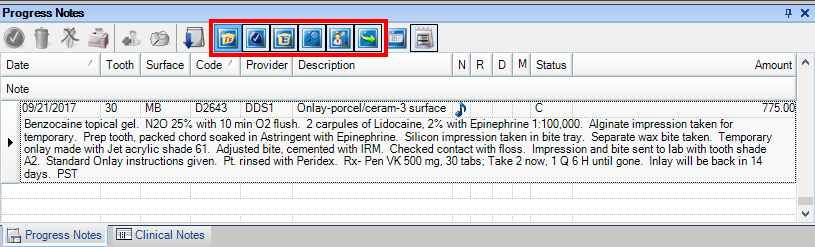
Selecting Progress Notes Viewing Options
You can choose to filter the Progress Notes to view the procedures you want. The filter buttons are toggle switches that you can turn on or off. They include options to view treatment-planned procedures, completed procedures, existing work, conditions, exams and/or referrals. Using these icons to filter the Progress Notes can help you to quickly find the procedures or notes you’re looking for. This can be especially helpful when working with a patient with a long list of Progress Notes.
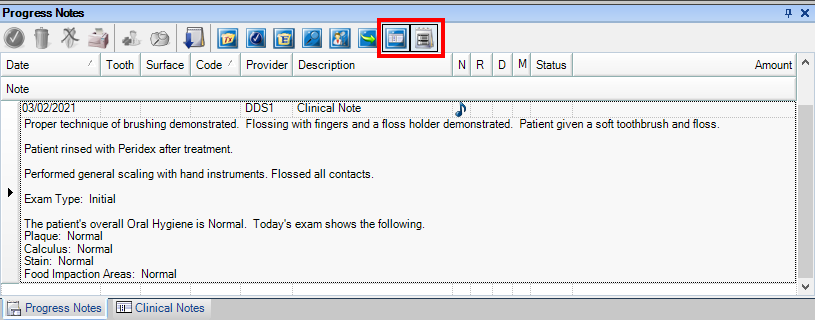
Viewing Chronological Clinical Notes
I’ve come across many doctors and hygienists that miss the way that they used to read their paper charts and clinical notes, in chronological order, the way they would read a book. You can help your doctor and hygienists to view their notes that way by selecting the icons for Clinical Notes and Expand Notes. Turn all the other filter icons off. I’ve found many doctors prefer to view their clinical notes in this format.
By using customizations, Dentrix can help your office to optimize efficiency and improve workflow. The features I mentioned are just a few of many available customizations. Dentrix is designed to make your work life easier and to do some of the work for you.
Learn More
For additional information, see Clinical Notes Made Easy, and the various topics under Customizing the Patient Chart in Dentrix Help.
By Charlotte Skaggs
Certified Dentrix Trainer and The Dentrix Office Manager columnist
Charlotte Skaggs is the founder of Vector Dental Consulting LLC, a practice management firm focused on taking offices to the next level. Charlotte co-owned and managed a successful dental practice with her husband for 17 years. She has a unique approach to consulting based on the perspective of a practice owner. Charlotte has been using Dentrix for over 20 years and is a certified Dentrix trainer. Contact Charlotte at [email protected].


