
Discover seven workstation customizations you can set to increase your efficiency in the day-to-day Dentrix tasks you perform.
As individuals, we all have our own personal likes, dislikes, and preferences, and it’s the same way for how we work in a dental practice. There are certain processes we like to follow, habits we get into, and ways we like things to function. Dentrix allows certain features to be customized based on user preference on individual workstations. This can be especially beneficial since staff on the administrative team tend to work with Dentrix differently than clinical team members because they access information from different areas and modules. Here are some of my favorite features in Dentrix that you can customize based on your preferences for your workstation:
The Hover Window
The Hover window in the Appointment Book can provide vital information about the patient and their appointment, including phone number(s), referral source, account balance, appointment length, provider(s) assigned, and any appointment notes. You can also view the patient’s photo when hovering your mouse over the appointment to be able to know which patient is which. This can be very useful if there are several patients in the waiting room.
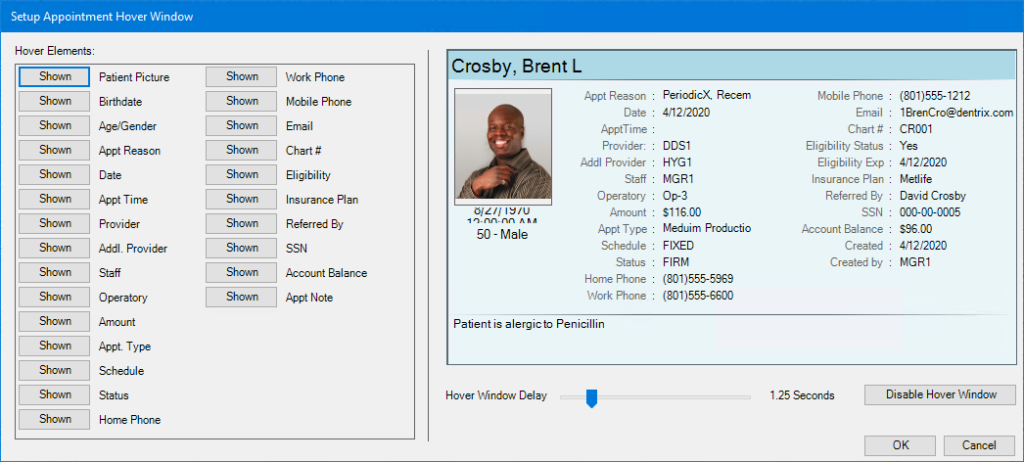
You can fully customize which information is displayed in the Hover window, how long it takes for the window to appear, and even disable it, if it’s a feature you prefer not to use on your workstation.
Appointment Book Views
You can set up views in the Appointment Book to determine which type of information is displayed on the appointment. This is great for the clinical workstations that may be visible to patients because you can select to only include information that is not patient-specific in order to protect patient’s privacy. For example, you can set up an Appointment Book view that only displays the appointment reason, the provider, and the staff member that scheduled the appointment.
Conversely, you may want to set up administrative workstations that are not visible to patients so the appointment views can include confidential patient information such as the patient’s name, phone number(s), and insurance plans.
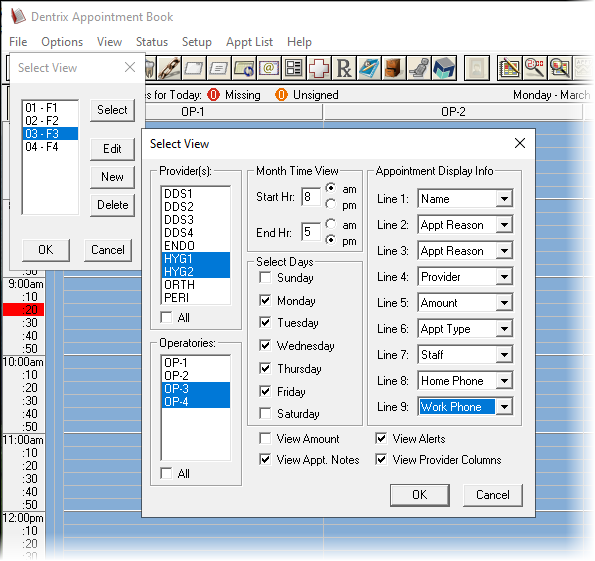
The Appointment Book View can also be used to track scheduled production, so you can easily see which days during the month may have lower production amounts. You can use this information to schedule additional appointments and larger treatment cases on those days. I recommend creating a view that includes all providers in the practice, as well as a view for each individual provider. That way you can view scheduled production for the entire office, as well as each individual provider.
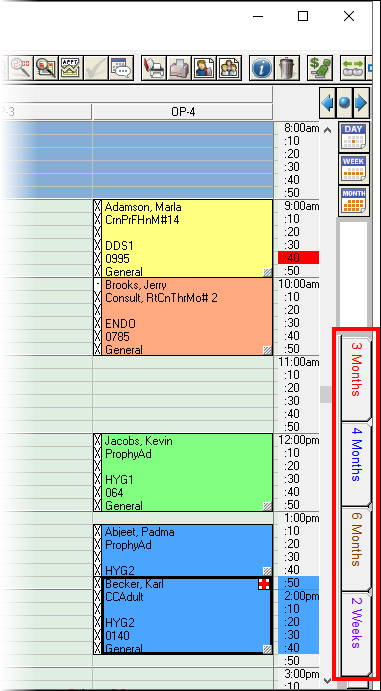
Flip Tabs
Flip Tabs can be set up in the Appointment Book to allow you to quickly and easily jump to a specific date in order to schedule a follow-up appointment for a patient. These may be set up based on the types of appointments being scheduled on that workstation. For example, on a hygienist’s workstation, you may set up flip tabs that jump three months, four months, and six months from the current date, making it easy for the hygienist to schedule her patient’s next continuing care appointment. On another workstation, you may have a dental assistant who sets up flip tabs for two-week, three-week, and four-week intervals from the current date for procedures such as crown seats, bridge seats, and denture deliveries.
Procedure Buttons
Similarly, hygienists and assistants may have the need for different procedure buttons that they use while working in the Patient Chart. While hygienists may want procedure buttons for periodontal procedure codes like scaling and root planning, Arestin, and periodontal maintenance, an assistant may not typically treatment plan those procedures and therefore have the need for more restorative procedure code procedure buttons.
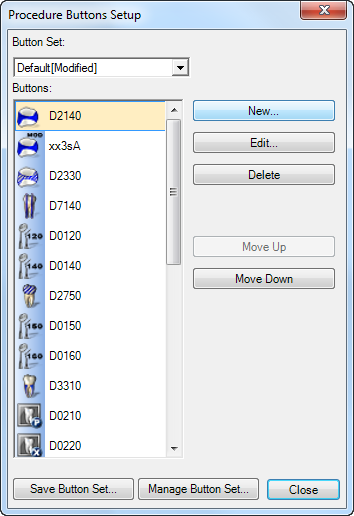
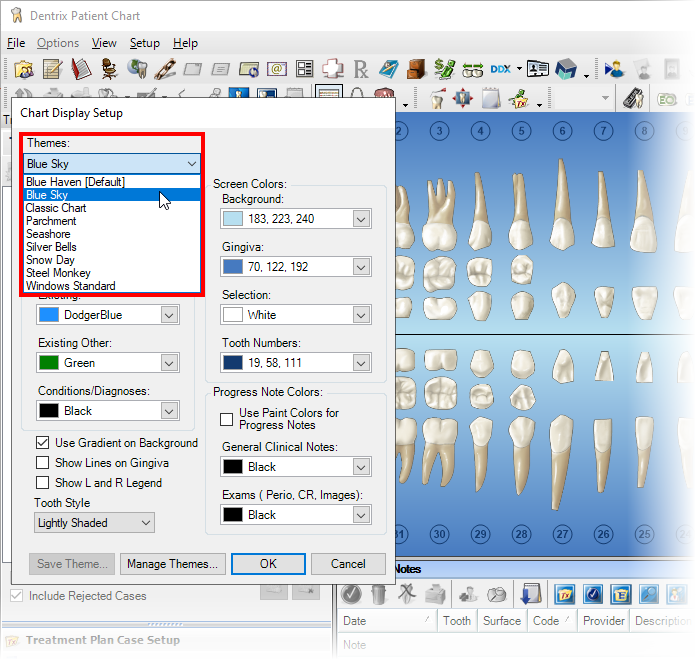
Chart Display
You also have the ability to customize the Patient Chart display in Dentrix. This includes the background color and style. While this is a workstation-specific setting, I tend to caution offices to be careful about having different color themes on each workstation. If your doctor has to look at workstations in different operatories, he may not like adjusting to something different each time he switches rooms. In this case, it may be best to make a group decision on what color theme your practice likes the best and use it on all workstations in the office.
Patient Search Window
There are two options for the Select Patient search window: simple search and advanced search. I like the advanced search window because it gives you the option to search using filters other than name, such as Social Security number, birthday, and phone numbers. You also have the option to view a list of patients with appointments on a specific date, including today, which I find helpful if I’m scheduling a patient’s next appointment and I forgot how to spell their name.
Large Module Icons
Especially on smaller monitors, toolbar icons can be difficult to see. You can use large icons in the following modules: Patient Chart, Treatment Planner, Document Center, Perio Chart, and Questionnaires.
Take some time to look at these workstation customizations and see which ones can help you to work with Dentrix in a way that makes the most sense for you personally, therefore making you more efficient.
Learn More
For additional information, read the following :
- Customizing the Appointment Book Hover Window to Fit your Needs
- Creating Appointment Book Views that Work for You
- Viewing Scheduled Production Amounts
- Customizing Flip Tabs in the Appointment Book
- Customizing Procedure Button Sets in the Patient Chart
- Changing Colors in the Patient Chart
- The Select Patient Dialog Box
- Choosing Which Patient Details are Visible When Selecting a Patient
- Searching for Patients Scheduled Today
- Setting Toolbar or Menu Options
By Charlotte Skaggs
Certified Dentrix Trainer and The Dentrix Office Manager columnist
Charlotte Skaggs is the founder of Vector Dental Consulting LLC, a practice management firm focused on taking offices to the next level. Charlotte co-owned and managed a successful dental practice with her husband for 17 years. She has a unique approach to consulting based on the perspective of a practice owner. Charlotte has been using Dentrix for over 20 years and is a certified Dentrix trainer. Contact Charlotte at [email protected].


