
If you participate in a PPO insurance plan and post your own fees to the Ledger, the Allowed Amounts feature can help you to show the patient a correct insurance estimate and calculate the necessary write-off adjustment.
Updated 10/10/2023
When your office contracted with a Preferred Provider Organization (PPO) insurance plan, you agreed to charge those patients a fee set by the insurance carrier. This fee is sometimes known as a “negotiated,” “allowed,” or “contracted” fee. The insurance’s fee will often be lower than your office’s usual and customary fee.
Presenting correct insurance and patient estimates to your PPO patients can be challenging if your office chooses to post your own fees in the Treatment Planner and Ledger. In the past, you’ve been left to calculate for yourself what the insurance will cover for each procedure and the difference between your charge and the allowed insurance fee to create a write-off adjustment. Now the Allowed Amounts feature will calculate these things for you!
When Should You Use Allowed Amounts?
You can use Allowed Amounts if your office is a participating provider with an insurance plan and you have chosen to post procedures complete using your UCR fees. The Allowed Amounts feature will inform Dentrix of the contracted fee to base the estimate on, helping you present accurate estimates and make necessary write-off adjustments.
When Should You Not Use Allowed Amounts?
If your office posts procedures complete using contracted PPO fees, the estimates are typically already correct and don’t require use of the Allowed Amount feature.
If your office is out of network (OON) with the insurance plan, your patient will be responsible for paying your full fee, not the insurance’s contracted rate. Entering Allowed Amounts is not necessary.
Explaining Allowed Amounts
To explain how allowed amounts work, let’s look at a sample scenario:
- You completed a crown for your patient.
- Your office fee is $1000, which is the amount charged in the Ledger.
- The insurance plan only allows you to charge $500.
- The plan pays 80% of their allowed fee, which equals $400.
- The patient will be responsible for 20% of the allowed fee, or $100.
- Under the terms of the PPO, you must write off the difference between your fee and the contracted fee, or $500.
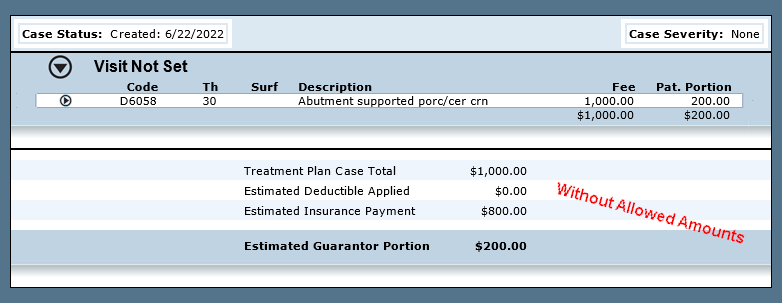
Without using Allowed Amounts, Dentrix will calculate from the plan’s coverage table that crowns should be covered at 80%, but it will base the estimate on the $1000 fee that you charged. In our scenario, that would equal an estimate of $800. The estimated patient portion would be the remaining 20%, or $200. In this example, the estimated guarantor portion is double what it really should be!
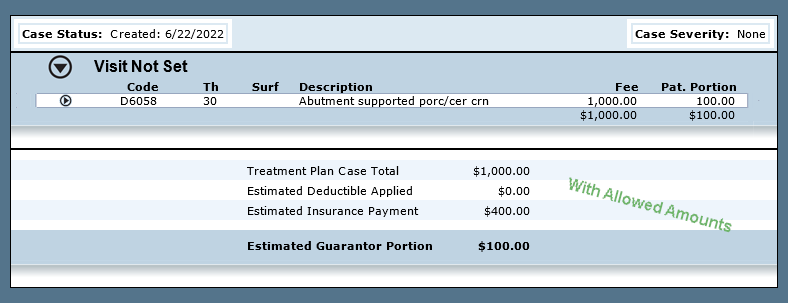
To address the problem, you need to let Dentrix know the fee that the plan allows to be charged for the procedure. This will allow the 80% coverage to be multiplied by the contracted fee instead of the amount charged.
Entering Allowed Amounts
There are several ways to enter Allowed Amounts. They include the following:
- Adding individual codes
- Adding multiple codes by copying a fee schedule
- Adding multiple codes by copying from another plan
- While entering insurance payments
Adding Individual Codes
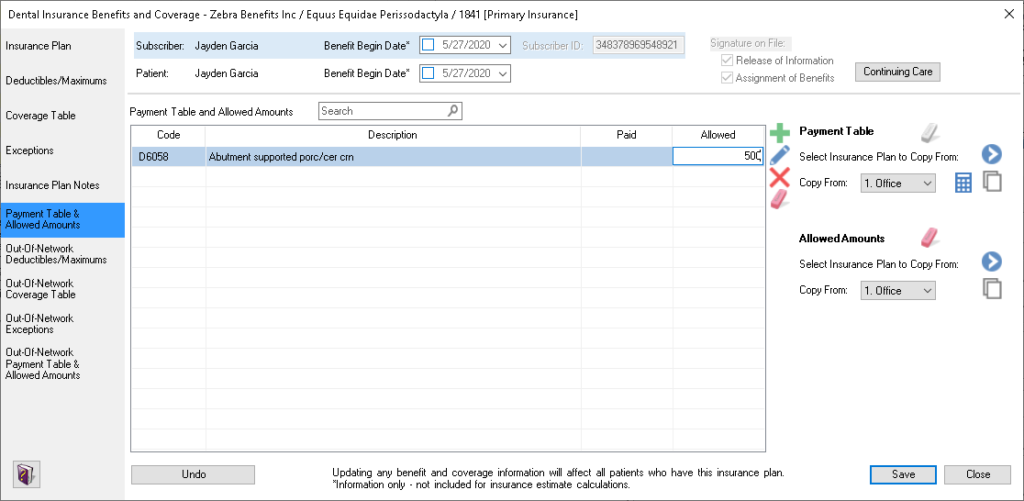
To enter individual procedures and their Allowed Amount, open the plan’s Dental Insurance Benefits/Coverage dialog box and select Payment Table and Allowed Amounts. Click the Add button (+). Type a procedure code and the allowed amount for that procedure. Add as many codes as you need and click Save when finished.
Add Multiple Codes by Copying a Fee Schedule
If you have entered the contracted fee into Dentrix as a fee schedule, you can copy those amounts into the table.
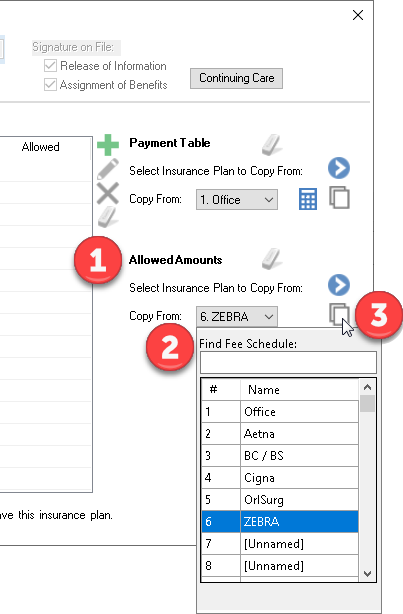
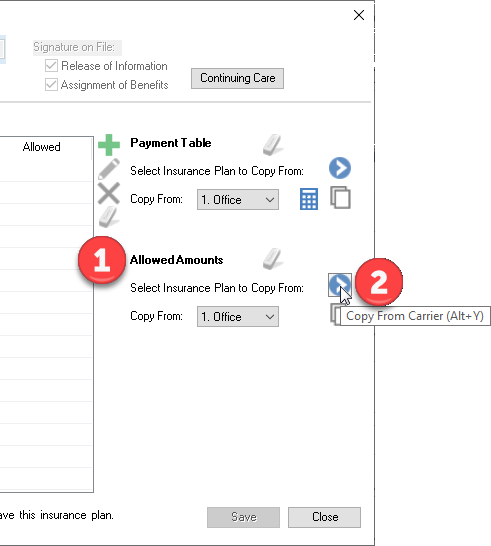
Open the plan’s Dental Insurance Benefits/Coverage dialog box and click Payment Table and Allowed Amounts. Locate the Allowed Amounts section at the right (1). Select the fee schedule using the Copy From menu (2) and click the Copy button (3). Follow the prompts to confirm your choice, and all procedure codes and amounts will be added into the table. Click Save to keep these changes.
Add Multiple Codes By Copying From Another Plan
If you previously entered the Allowed Amounts information into another similar insurance plan, you can copy the amounts from that plan into this PPO plan.
Open the plan’s Dental Insurance Benefits/Coverage dialog box and click Payment Table and Allowed Amounts. Locate the Allowed Amounts section at the right (1). Click the Select Insurance Plan to Copy From button (2) and follow the prompts to choose the other plan. Click Save to complete the changes.
While Entering Insurance Payments
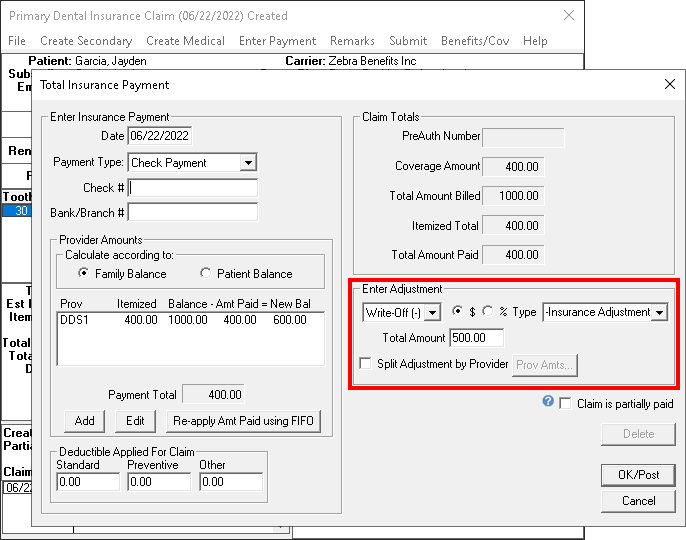
The PPO’s allowed amount will often come to your attention while you’re entering an insurance payment. When using the Itemize by Procedure option to enter the payment, you’ll see the amount paid, the payment table entry, and the allowed amount for each procedure. Editing these fields will also update the amounts in the Payment Table and Allowed Amounts section of the plan’s Benefits and Coverage window.
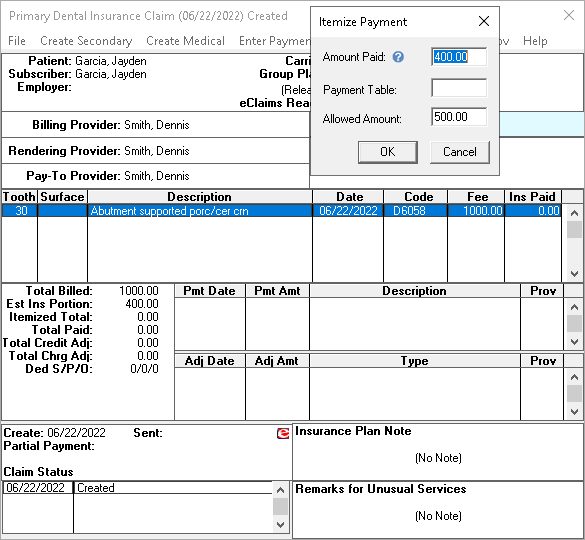
Note: If a Payment Table amount or an Allowed Amount does not apply to the procedure you are itemizing, you can leave those fields empty. Any numbers entered in these fields (including zeros) will update the plan’s Payment Table, which may incorrectly affect insurance coverage estimates for all patients with this insurance plan.
How It Appears
When an allowed amount has been entered, Dentrix will calculate the estimates according to the PPO plan’s negotiated rate.
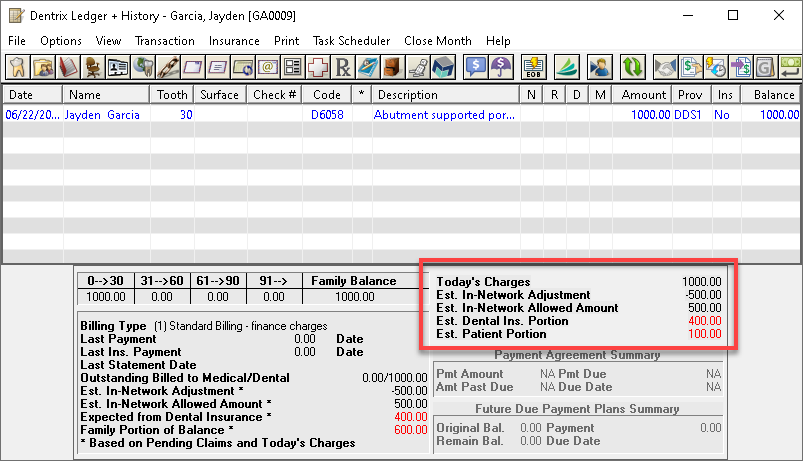
In the lower-right corner of the Ledger, the Today’s Charges section combines the total amount of all of today’s transactions:
- Est. In-Network Adjustment – Shows the estimated amount of write-off adjustments that will apply from today’s transactions that utilize an allowed amount coverage. If no adjustment is applicable because of Allowed Amounts, “NA” will appear.
- Est. In-Network Allowed Amount – Reveals the sum of today’s charged procedures with allowed amount coverage, had they been billed using the insurance contracted fees. If allowed amounts are not applicable, “NA” will appear.
- Est. Dental Ins. Portion – The estimated amount that dental insurance will pay according to the insurance plan’s coverage.
- Est. Patient Portion – The estimated amount the patient owes according to the insurance plan’s coverage.
Allowed Amounts on Statements
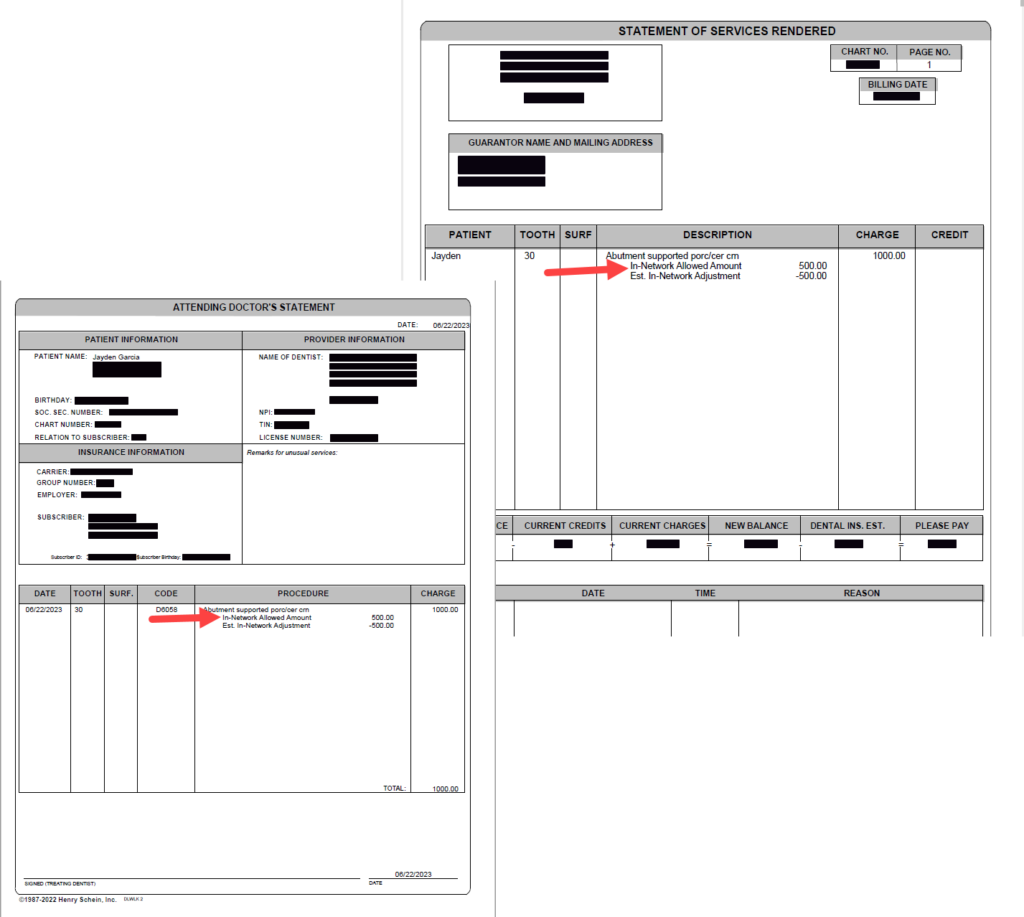
In the Walkout Statements (Ledger > Print > Walkouts), a new checkbox selection is available. When you select Print Allowed Amounts Estimate, a breakdown of allowed amounts will appear with each applicable procedure on the Family Walkout Statement and the Doctor’s Attending Walkout Statements.
Write-Off Adjustments
Allowed Amounts can also assist you in making write-off adjustments automatically while posting payments.
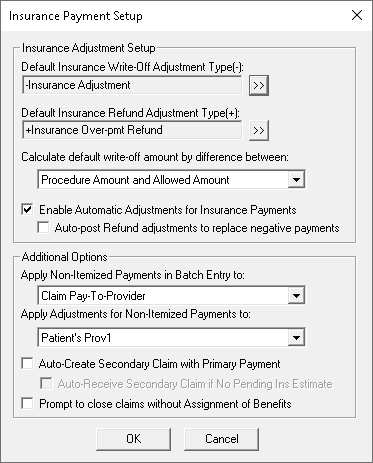
In the Ledger, from the File menu, click Insurance Payment Setup. At the top of the window, select the Default Insurance Write-Off Adjustment Type you typically use to post insurance write-offs. Then open the Calculate Default write-off amount by difference between drop-down list and select Procedure Amount and Allowed Amount. If you work mostly with PPO plans, you may also choose to select Enable Automatic Adjustments for Insurance Payments.
After making those changes, the write-off adjustment will automatically be calculated and posted to the Ledger at the same time that you enter the insurance payment.
By using Allowed Amounts with your PPO plans, your patients will receive accurate insurance estimates, and your team will not miss the hassle of making manual calculations and adjustments. Allowed amounts are another great new feature in Dentrix!
Additional Information
- Learn about adding procedures to payment tables in Dentrix Help.
- Learn about posting itemized insurance payments in Dentrix Help.
- Learn about setting up fee schedules in Dentrix Help.
By Ryan Beardall, Contributing Editor


