
Learn how to acquire images using a seamless workflow between multiple devices and Dentrix and how to analyze and refine images with built-in processing tools.
Your dental images are critical to your practice’s success. They assist you in diagnosing conditions and monitoring dental health issues. Those images also guide your decisions regarding restorative and cosmetic procedures.
To aid you in this important work, the Dentrix Imaging Center provides a consistent and straightforward way to capture and analyze many different image types. Read on to find information about acquiring, processing, and comparing images using Dentrix Imaging Center. Click to view an on-demand webinar recording about Dentrix Imaging Center.
Acquiring Images
Dentrix Imaging Center offers a seamless imaging workflow between multiple hardware devices and Dentrix. Let’s look at three different ways you can get images into the system.
Option 1: Using Smart Image Acquisition
To acquire any image type, in Dentrix, open a patient’s Chart and click the Acquire Image button.
![]()
The Smart Image Acquisition window opens. Next, select an image type from the Preset column. Verify the associated code, checkbox options, and provider for posting to the patient’s Chart. Then press Acquire Now to launch Dentrix Imaging Center.

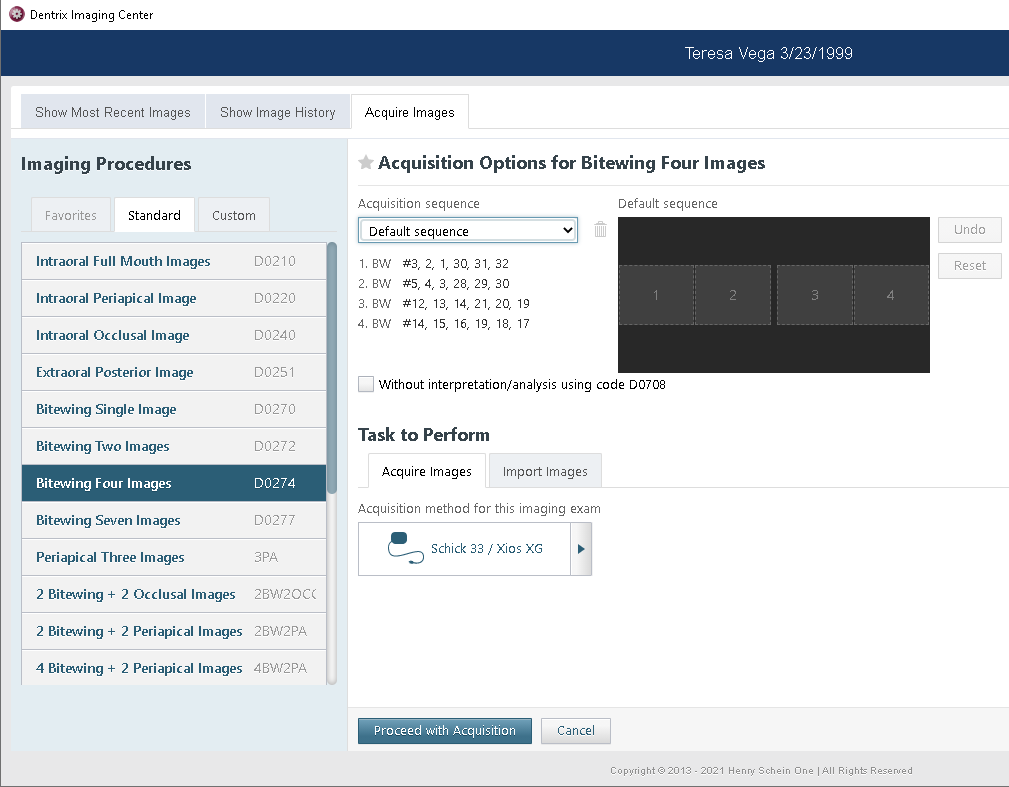
Dentrix Imaging Center will launch with the patient and imaging procedure(s) selected. If the imaging type will be capturing a series of two or more images, use the Acquisition Sequence menu to choose the order you will be capturing the images in.
Then choose whether to capture a new image or to import saved files that were taken from another source.
Option 2: Capturing New Images
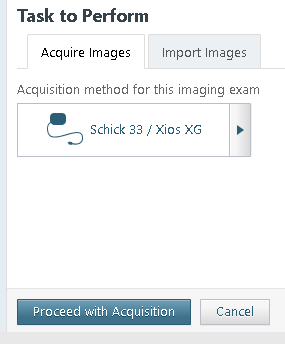
If you are going to capture new images, under the Acquire Images tab, choose the acquisition method (or device) that you want to use. For your convenience, Dentrix will remember the acquisition method or device you selected on this computer for future use! Then click the Proceed with Acquisition button.
Dentrix Imaging Center will display the tooth numbers that the next expected image should target, using a large font over a green background which is easily readable from across the room. It will give you a few seconds to get set up, then the color will change to yellow, and then to red. At this point Dentrix Imaging Center triggers the device to capture the image.
After an image has been captured, you’ll see that image on screen. Dentrix Imaging Center will repeat the process, moving to the next expected image and displaying teeth numbering in the sequence. You’ll have a short time to adjust the sensor and prepare for the next capture. Here you’ll see buttons along the bottom of the screen that can interrupt the automatic progression. You can choose to Pause the process, Recapture the last image, or Skip Forward or Skip Backward in the acquisition sequence.
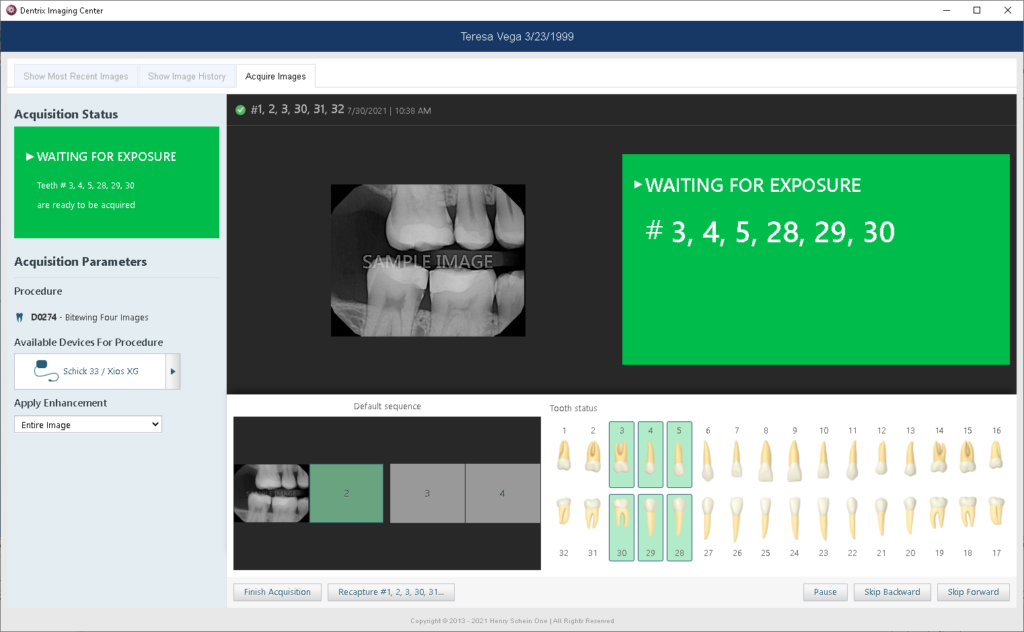
If you don’t like how an image turned out, click Recapture. Reposition the sensor and take the image again. You’ll then see a comparison of the two images and you can decide which one to keep.
When you are finished capturing all images, click Finish Acquisition. The images will then be saved in Dentrix.
Option 3: Importing Images
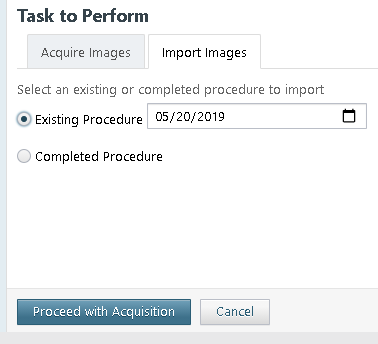
If you are adding images from a file (whether from a previous imaging system or images that were sent to you from another provider), choose the Import Images tab in the Dentrix Imaging Center window. If these images were taken previously, choose Existing Procedure and select the date for the images. If the images were taken today, select Completed Procedure. Then, click the Proceed with Acquisition button.
Search for the file folder that contains the images. Then drag-and-drop the images to the lower tray of the Dentrix Imaging Center.
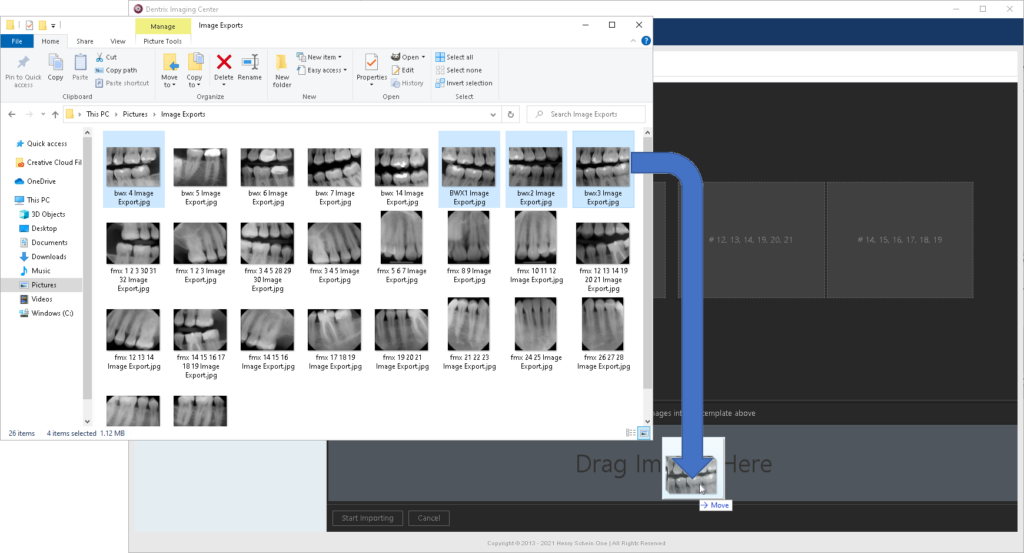
With the images in the tray, drag-and-drop them into the acquisition template — where they belong. Simple editing options appear under each image, which you can use to flip or rotate the image as needed.
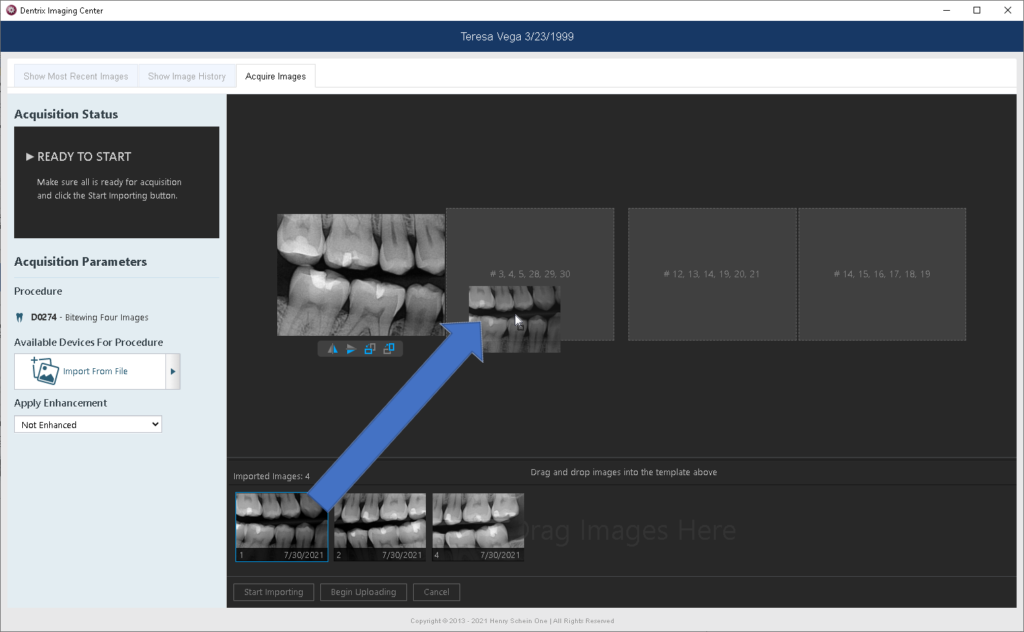
When all of the images are in place, click Begin Uploading to save the images to the patient’s file.
Processing Images
Dentrix Imaging Center also offers tools to help view and diagnose patient images. After acquiring the image, the Tools tab automatically opens. Click an image within the small preview area to select that image out of the series. Then choose one (or more) of the five image editing tools described below.
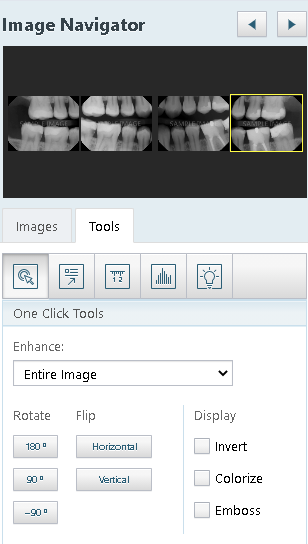
One click tools apply changes to the entire image at once.
Use the Enhance menu to select an option that will adjust the sharpness and contrast levels of the image. Then select options to Rotate or Flip the image, or adjust the Display settings as needed.
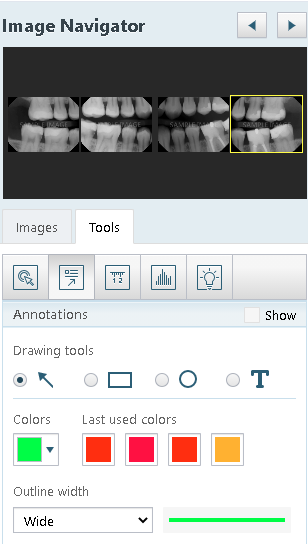
Tool 1: Annotations
Annotations allow you to add shapes such as arrows, rectangles, circles, or text labels that highlight portions of the image. These tools can draw attention to and/or emphasize areas of concern. After selecting a shape and a color, use your mouse to draw the annotation on top of the image in the preview area at the right. For text, use your mouse to draw a box on the image, then type the message when prompted.
There is also a Show checkbox that can quickly toggle the annotations on or off, as well as Undo and Clear All buttons to remove the annotations.
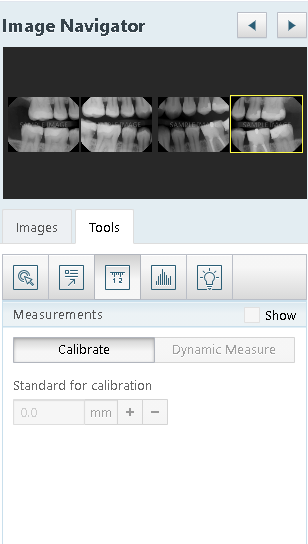
Tool 2: Measurements
To use the measurements tool, start with the Calibrate button and draw a line across part of the image for which you already know the measurement. Then enter the measurement where prompted. After calibrating, switch to the Dynamic Measure button and draw additional lines on the image. Dentrix Imaging Center will use the known measurement you provided to calculate the length of the additional lines.
Precaution: It is your responsibility to properly calibrate prior to clinical measurements and to determine if the accuracy achieved is within the error range required.
Tool 3: Density
When working with X-rays, you can use the Density tool to read the grey level of the image from one point to another. Select either Line or Rectangle, then draw the shape and the density level will be displayed.
Density measurements are calculated from specific points on the image and are reported from the actual pixel values selected. Image resolution, displayed size, inherent image quality, and the accuracy of the selected point or points to be measured, can all affect the accuracy of the density measurement.

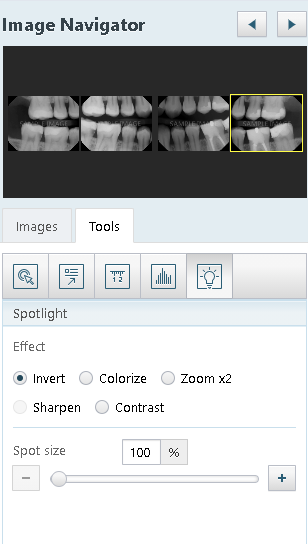
Tool 4: Spotlight
The Spotlight tool allows you to emphasize or clarify part of the image. With it, you can choose to Invert, Colorize, Zoom, Sharpen, or Contrast a selected portion of the image. To do so, click the image and drag the Spotlight tool to the area that you want to view. Move the slider to change the size of the spotlight.
Click the image in another area to add an additional spot, which may help you compare different parts of the image.
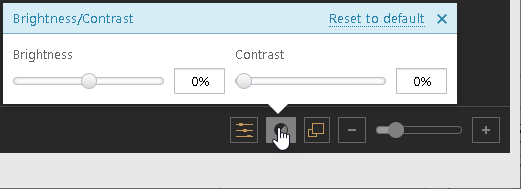
Tool 5: Brightness and Contrast
While using any of the image-editing tools, the Brightness and Contrast options are always accessible to help you improve clarity of the images. Find the button at the lower-right corner.
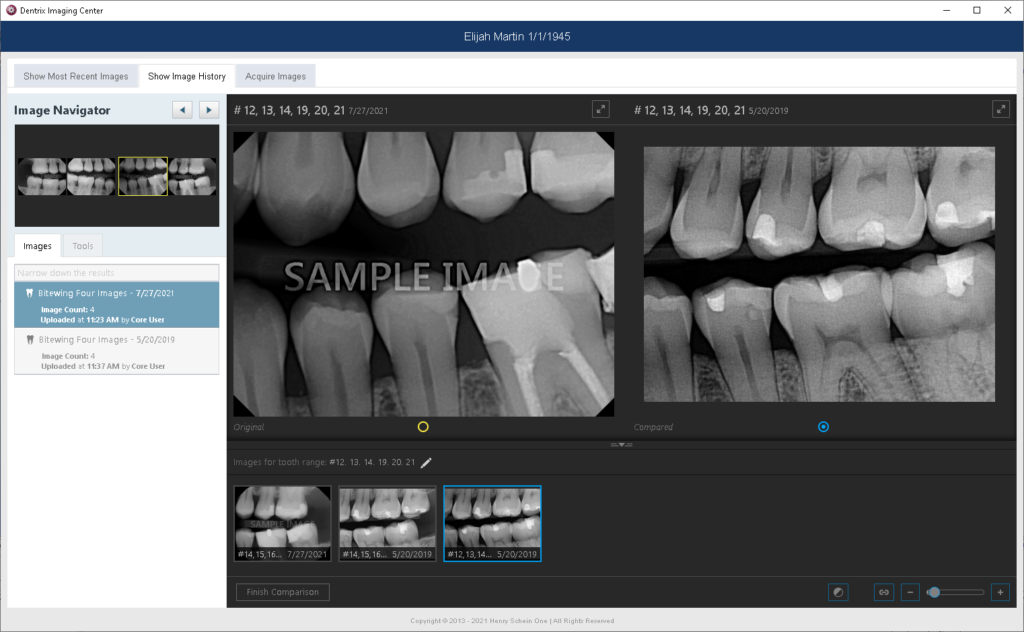
Comparing Images
Comparing current and previous images may help you to better diagnose the progression of a problem and necessary treatment.
To do so, select any image form the Image Navigator and click the Compare button.
Along the bottom of Dentrix Imaging Center, you’ll see other images associated with the same tooth number. Select an image to view a side-by-side preview of the two selected images.
Use the Link/Unlink Zoom Factor button (found in the lower-right corner of the preview window) to scroll or zoom both images at the same time and speed.
Conclusion
Whether you are capturing 2D or 3D dental images, Dentrix Imaging Center interacts seamlessly with Dentrix to provide efficient and versatile image management. With its simplified, visual interface, Dentrix Imaging Center has smart workflows and powerful processing filters and enhancements for capturing and reading your patient’s digital images.
Learn More
For additional information:
- View the on-demand webinar called Introducing Dentrix Imaging Center.
- Read the article titled, Dentrix Imaging Center – 10 Years in the Making.
- Visit the Dentrix Imaging Center Quick Start to see an overview video, tutorials, and more.
By Ryan Beardall, Contributing Editor


