
The Hover window and the More Information dialog box give you easy access to key patient information.
Updated 6/30/20
Have you ever found yourself wishing you could access patient information more easily? Patient information is the lifeblood of your practice. You depend on information about patients’ insurance plans and eligibilities, treatments, account balances, schedules, and contact information. Building a practice means building relationships with your patients, but trying to remember something about each of your patients can be daunting.
Imagine if just before you greeted each patient for the day you were able to quickly read a few personal notes and view the patient’s picture and birthday, along with the account balances, chart numbers, and treatment plans. With the Hover window, you can review all of that information without even having to click your mouse. The Hover window allows you to view appointment and patient information without double-clicking an appointment in the Appointment Book or clicking More Information on the toolbar.
Whenever you place your mouse pointer over an appointment in the Appointment Book, a Hover window displays information about that patient.
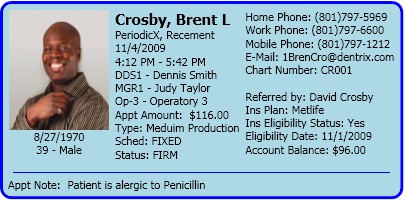
The Hover window combines much of the information contained in the Appointment Information and More Information dialog boxes. You can also specify what information appears in the Hover window.
Customizing the Hover Window
To customize the Hover window, in the Dentrix Appointment Book, from the Setup menu, click Practice Appointment Setup. The Practice Appointment Setup dialog box appears.

Click Hover Detail Setup, and the Hover Detail Setup dialog box appears.

From this dialog box, you can choose what patient information you want to display, set how quickly the Hover window appears when you move the mouse pointer over an appointment, and disable the Hover window.
Click Hide or Show, as appropriate, to specify what information you want to display in the Hover window. For example, you can set up the Hover window to show you who referred a patient to your practice. In addition, you can view a patient’s appointment status, schedule, type, and amount. You can also choose to include the patient’s insurance plan, eligibility status, and eligibility date. The sample Hover window in the dialog box changes dynamically as you select each hide or show option. All information except a patient’s Social Security number (SSN) is visible by default. To set how quickly the Hover window appears, click the Hover Window Delay slider and move it to the right to increase the delay or to the left to decrease the delay. After clicking OK, test your settings by placing your cursor over an appointment in the Appointment Book.
To add a patient’s photo to the Hover window, select a patient. From the File menu, click Patient Picture. To add a note to the Hover window, double-click the appropriate appointment in the Appointment Book, and enter a note in the Notes field of the Appointment Information dialog box. However, the Appt Notes field in the Hover window only displays approximately 3 lines (about 200 characters), so you may want to keep your appointment notes fairly short. And, just as with the Notes field in the Appointment Information dialog box, appointment notes in the Hover window only apply to the current appointment. They do not automatically carry over from appointment to appointment. To carry a note forward to the next appointment, you can copy the note from the previous appointment and paste it into the Appointment Notes field.
Once you’ve added appointment notes and configured your Hover window the way you want it, you’ll be surprised at how quickly and easily you can view patient information.
Using the More Information Dialog Box
With the latest release, the Auto Dial and More Information dialog boxes were combined so you can start auto dial and see contact information, family members, appointment history, continuing care dates, and balance information from the same dialog box.


To access the More Information dialog box, you just right-click an appointment, and then select More Information (Dial) from the menu.
But where the Hover window only provides you with a single patient’s information, the More Information dialog box allows you to select the name of another family member and instantly view that person’s information. You can also double-click an appointment to re-visit previous appointments or start Continuing Care, Family File, or Ledger to take advantage of their features. You can even add a journal entry, send an e-mail message, or call a patient automatically. In the end, whichever feature you use, Dentrix provides you with the information you need when you need it.
Learn More
To learn more about the Hover window, read Customizing the Hover Window in Dentrix Help.
For more ideas about using the Appointment Book, read 10 Time-Saving Tips for the Appointment Book.
By Roger Gagon, Senior Editor
Originally published in Dentrix Magazine, Summer 2010


