
Give patients different treatment options and document them in Dentrix.
When I was growing up, my dad worked for a company that produced high performance sports cars. The cars had a Lamborghini engine and cost about $200,000. My dad took me on a sales trip once that taught me a very valuable lesson.
Two prospective buyers came to look at the car which we had brought to a high-end car dealership in Houston. The first prospective buyer was a well-dressed man with an expensive looking watch who already owned an earlier year model of the car. The second prospective buyer was a man in dirty overalls and a cowboy hat who drove a beat-up pickup truck. At the end of the day my dad asked me who I thought was going to buy the car. I answered naively, “The first man, he’s the one who can afford it.”
My dad informed me that the man in the overalls was in fact one of the wealthiest land owners in Texas. That was a lesson in sales and about people in general that I have carried with me ever since.
I’ve referred to that experience many times over my dental career. It taught me to never assume what a patient may want or be able to afford. It’s our job as the dental office to offer every patient all available treatment options. Present the cost for each treatment option and discuss the pros and cons. Allow the patient to make an informed decision about their dental care.
The Dentrix Treatment Planner allows you to create different treatment options for a patient by creating multiple treatment cases. For example, a patient may have a missing tooth. They have several options to replace the missing tooth. A partial, a bridge, or an implant. When creating a treatment plan, I like to use the Treatment Planner Layout within the Patient Chart because it allows me to do multiple tasks from one screen. To switch to the Treatment Planner Layout, in the Patient Chart select the View menu, then Chart Layout, then Treatment Planner.
First, you should treatment plan all of the options for the patient in the Patient Chart. These procedures will automatically go into the default treatment case in the Treatment Planner. The default case will be the one with the bold title.
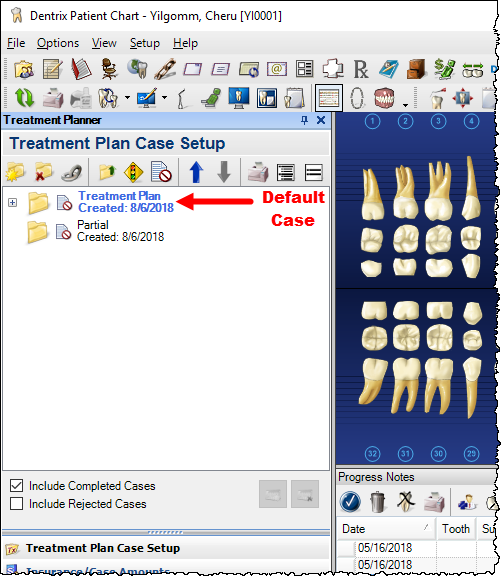
Create a new treatment case by choosing the New Case icon in the Treatment Planner Case Setup panel.

Click on the partial procedure within the default case, and drag and drop it into the new case folder. You can right-click on the word Treatment Plan next to the folder and select Rename Case. Rename this case “Partial”.
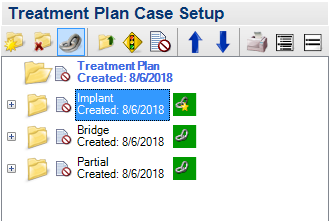
Next create another new case and move all procedures associated with the bridge option from the default case to the new folder and rename it “Bridge.”
Repeat these steps for the remaining procedures associated with the implant option, renaming the new case “Implant.”
Dentrix gives the option to link these cases. Select the Link Alternate Cases icon on the tool bar and a menu will appear for you to choose which cases you want to link together.
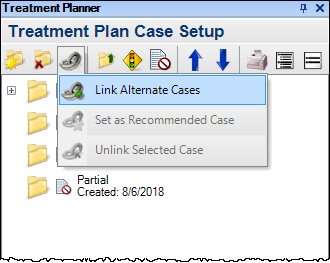
When one or more cases are linked together, one of the cases is designated as the recommended case. The recommended case is shown with a yellow star on the link symbol. You can change the recommended case as needed by right-clicking any case, and then selecting Set as Recommended Case.
Once you have presented the options to the patient you can accept the patient’s chosen treatment plan. To accept a treatment case, select the folder and then click the Update Case Status button and choose the Accepted option.

My favorite part about linking alternate cases is that when you accept one treatment case that is linked to other treatment cases, Dentrix will give you a warning message that this case is linked to others and it will automatically reject the other treatment options. Select OK to accept the selected case and reject the others.
Rejected cases no longer show in the graphic chart or in the treatment planner unless you check the box to Include Rejected Cases.

I like this feature because although we may not want to always view rejected cases, Dentrix has kept a record in the Patient Chart that additional options were presented to the patient. Rejected cases will not show on unscheduled treatment plan reports.
Linking cases is a great feature to use when you are presenting a patient with more than one treatment option.
Learn More
For additional information, read the following :
- Creating Treatment Plan Options for your Patients
- Creating Alternate Treatment Plans
- Simplify Treatment Planning with Alternate Cases

By Charlotte Skaggs
Certified Dentrix Trainer and The Dentrix Office Manager columnist
Charlotte Skaggs is the founder of Vector Dental Consulting LLC, a practice management firm focused on taking offices to the next level. Charlotte co-owned and managed a successful dental practice with her husband for 17 years. She has a unique approach to consulting based on the perspective of a practice owner. Charlotte has been using Dentrix for over 20 years and is a certified Dentrix trainer. Contact Charlotte at [email protected].


