
Tools to help you implement a virtual waiting room and contactless check-in and checkout using Patient Engage and Dentrix.
Updated 6/18/20
As you prepare to re-open your practice after being closed for COVID-19, you will need to make a few adjustments to help keep your patients and team members safe. The ADA has created a Return to Work Interim Guidance Toolkit you can use to get suggestions about what to do as you resume operations. Another way you can adapt your current operations to add extra precautions is by setting up a virtual waiting room using the tools you have in Patient Engage and Dentrix.
The goal of the virtual waiting room is to reduce in-person interaction and help maintain social distancing during a patient’s visit. This will help your patients and team members feel safe coming back to the office.
To help your office achieve this goal, we recommend that you adopt the following policies:
- Patients are requested to use online tools as much as possible.
- Patients must be symptom-free before coming into the office.
- Patients should wait outside the practice until they are called via phone call or text.
- Few, if any, patients or other office visitors should wait in the practice waiting room.
- Physical interaction with patients should be limited to clinical staff only.
Evaluate your practice needs and meet with your team to decide which of these policies to adopt. Use this article to learn how to use Patient Engage and Dentrix to implement these policies in your practice. There are four tasks you’ll need to focus on, listed below. Click on one of the tasks to jump to that section of the article.
- Notifying Patients About Your New Policies
- Preparing for Patient Visits
- Checking Patients In When They Arrive
- Checking Patients Out After Treatment is Complete
Watch the on-demand webinar to see a demonstration of how to use these features.
Click here to watch the video about notifying patients, preparing for patient visits, and checking patients in.
Click here to watch the video about revenue cycle management and contactless check out.
Notifying Patients About Your New Policies
After you have defined the new policies you will be following, you need to let your patients know about them. Take this opportunity to reassure patients that you are doing everything you can to safeguard their health and to let them know how things will be different the next time they come in for treatment.
Complete the following steps to notify patients about your new policies:
1. Update your practice website with information about your new policies and reopening plan.
a. Describe how check-in will work so that patients know how things will be different and what to expect when they arrive.
b. Tell patients what they should do before they arrive at the office, including filing out their forms online.
c. List the symptoms of COVID-19 and encourage patients to contact the office and reschedule if they are experiencing any of those symptoms.
2. Send an email to all of your patients to let them know about your reopening plan and new policies.
a. Click here to learn how to email all of your patients about policy changes with Patient Engage.
Preparing for Patient Visits
In order to facilitate a virtual waiting room experience when patients arrive at the office, you will need to give them information about your new policies and protocols before they arrive. Use your appointment reminder campaigns to send this information to patients with their appointment reminders.
Complete the following steps to set up your pre-visit communications in Patient Engage:
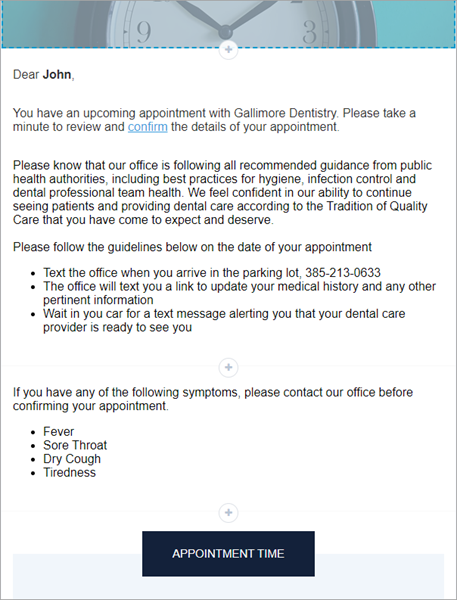
1. Update the text of your appointment reminders/appointment confirmation email that is sent several days before the appointment.
a. Describe your new check-in policy and tell patients what to expect when they arrive at the office. Ask patients to confirm that they have read the policy.
b. List the symptoms of COVID-19 and ask the patient to notify the office if they are experiencing or have experienced any of those symptoms.
c. Click here to learn how to adapt your appointment reminders in Patient Engage.
d. See the image below for a sample email message.
2. As part of your new policies, request that patients fill out and update forms online before the appointment, if possible.
a. Let patients know that you will not be passing out tablets or clipboards for them to use to fill out forms in the office in order reduce contact.
b. In the reminder email that goes to patients three days before their appointments, add text that encourages the patient to fill out their patient forms online before their appointment. Include the link to the patient portal in the message.
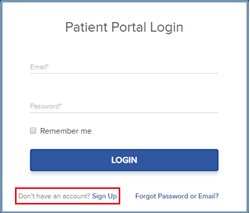
c. For existing patients who have not set up a patient portal, encourage them to click the patient portal link and sign up for an account.
d. Click here to learn how to post patient forms online using the Patient Portal in Patient Engage.
3. Update your medical history form and new patient form to ask patients if they have experienced or are experiencing symptoms of COVID-19 or have had COVID-19.
a. Review patient forms as they are submitted. Use these responses to help screen patients who may need to reschedule their appointment.
b. Update your patient medical history forms in Dentrix to include COVID-19 screening questions, and then upload those forms in Patient Engage. Patients who haven’t filled out this version of the form will be asked to fill it out when they log in to their patient portal.
c. Click here to learn how to update questionnaires in Dentrix and upload them to Patient Engage for patients to fill out.
4. The day before the appointment, send an additional reminder to the patient that reinforces your new office policies and check-in process.
a. In Patient Engage, send a text message to everyone who has an appointment tomorrow to remind them of your new policies and describe what they should do when they arrive for their appointment.
b. Click here to learn how to text instructions to tomorrow’s patients in Patient Engage.
Checking Patients In When They Arrive
With a virtual waiting room, patients do not need to enter your office and wait in your physical waiting room inside the office before their appointments. Instead, you can use two-way texting to communicate with the patient and let them know when you are ready for them.
Upon arrival at the office, patients will send a text to notify you that they have arrived and will wait in their vehicle as they were instructed to do in your reminder emails. Your team members can use two-way texting to let patients know when it is time to come inside.
Complete the following steps for contactless check-in:
1. Instruct patients to text the office when they arrive.
a. The patient can reply to the reminder text they received the day before. It is also a good idea to include that number in any emails you send to the patient so they can find it easily.
2. Acknowledge the patient’s message and send the check-in form text link if the patient hasn’t completed their forms.
a. New text messages received from the patient appear in the Texts section in the upper-right corner of the Dentrix Hub. Front office team members can monitor incoming texts and respond to them from there. Click on a message to see what the patient wrote and to respond.
![]()
b. Click here to learn how to use two-way texting with Patient Engage.
c. Ensure that the patient has filled out or updated their medical history form and any other forms required for the appointment online. If not, send the patient a link to fill out their forms on their phone while they wait.
d. Click here to learn how to send patients a check-in link with Patient Engage.
e. When the operatory is ready, the front office team member notifies the patient using the two-way text feature and the patient can enter the office.
Checking Patients Out After Treatment is Complete
Your virtual waiting room an also include contactless check out. Patients can check out and pay their balance without passing money or credit cards back and forth. There are a few different ways you can handle the payment process. Look at the options below and find the one that will work best for your practice.
If you are using Dentrix Pay:
1. Use a credit card saved on file in Dentrix Pay to charge today’s patient payment amount.
a. Patients can pay at time of service if they have a credit card saved on file.
b. After today’s procedures have been posted in the Ledger, find the estimated patient portion in the Ledger.
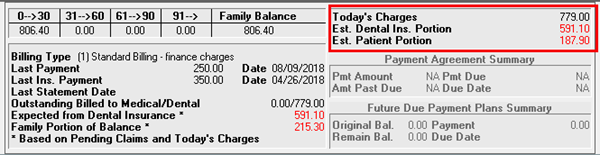
c. Explain to the patient that that is the amount owed for today’s procedure and get their consent to charge that amount the credit card you have on file. From the Enter Payment dialog box, click Process card and select the saved card on file.
d. Click here to learn more about using Dentrix Pay.
2. Use a contactless payment method, like Apple Pay or Google Pay.
a. If the patient has a contactless payment method set up, select that payment method in the Enter Payment dialog box and allow the patient to pay using that method.
3. Key in the patient’s credit card information on the terminal on their behalf.
a. If you do not have a card saved on file and the patient does not have a contactless payment option set up, you can key in the card number for the patient. That way you can collect at time of service without contact at checkout.
b. After today’s procedures have been posted in the Ledger, find the estimated patient portion in the Ledger.
c. Explain to the patient that that is the amount owed for today’s procedure. From the Enter Payment dialog box, check the option to manually enter the card number and process the payment.
4. Limit patient contact to inserting or swiping their card.
a. If you do not have a card saved on file and the patient does not have a contactless payment option set up, you can still charge a patient’s credit card with minimal contact.
b. The front office team can press the buttons on the terminal for the patient, and then turn the terminal toward the patient so they can insert or swipe their own card.
c. After the patient has swiped their card, the front office team should obtain consent from the patient to store their card on file using Dentrix Pay so that no contact is required for their next payment. In the Payment dialog box, check Save Card.
d. Having the patient sign the ePad is ideal for maintaining strong proof of consent. However, if handling the stylus and ePad is a concern, the front office manager can sign on behalf of the patient and note that the patient provided verbal consent. Practices should consult with their own attorneys for understanding the laws governing this in their specific areas.
If you are using QuickBill Email:
1. Email a statement to the patient that includes a link to pay online.
a. You can use this method to collect at time of service if team members can send the statement immediately and request that the patient make the payment online during check out. Click here to see how QuickBill Email works.
b. Click here to watch videos to learn how to send an electronic statement with QuickBill Email.
c. When patients receive their statement email, they can click the link in the message to pay online. Click here to watch a video about receiving online payments from your patients through their statement link.
If you are using CareCredit:
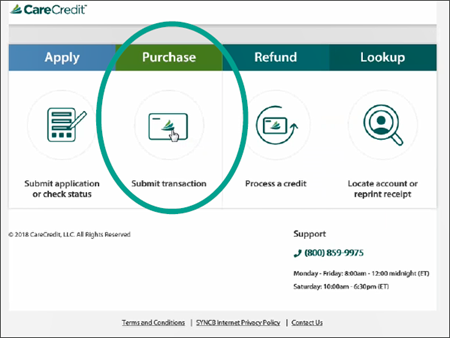
1. Enter the payment from the Ledger using the patient’s existing CareCredit account.
a. You can use this method to collect at time of service if a patient has an existing CareCredit account. Click the CareCredit button in the Ledger and click Purchase.
b. Look up the patient’s existing CareCredit number, enter the amount of today’s payment, and process today’s payment amount. The payment information will be posted to the Ledger from CareCredit automatically.
2. Complete the CareCredit application on the spot from the Ledger.
a. If a patient doesn’t have an existing CareCredit account, you can use CareCredit to collect as close to time of service as possible. Team members can click the CareCredit button in the Ledger, complete the Care Credit application for the patient immediately, and request that the patient make the full payment online as soon as the application is approved.
b. Click the Care Credit button in the Ledger to open Care Credit with the patient’s basic information already filled out on the form. Manually enter the amount due for today’s treatment and the other required information.
c. Instruct the patient to log in to Care Credit and make the payment. The payment details will be posted to the Dentrix Ledger.
Learn More
For other ideas about preparing to reopen your practice after being closed, read Preparing Your Team to Bounce Back.
For more information about the products discussed in this article, visit the links below.


