Learn the difference between write-off adjustments and fee schedules and the advantages and disadvantages of each.
Updated 11/23/21
In my home state of Washington, a large dental insurance company slashed our filed fees by 15 percent recently. Several offices I work with have called me asking for advice on how to deal with it now that even the non-PPO plans are working under a much lower fee schedule. This article explains two approaches you can take when faced with this scenario. You can either apply adjustments (write-offs) or update your fee schedules in Dentrix. Both methods work well, but there are pros and cons to each, so you should choose carefully.
Using Adjustments (Write-offs)
Offices using the write-off system bill out the full fee for the procedure and then perform an adjustment (write-off) in the Total Insurance Payment dialog box of Dentrix Ledger to account for the difference between the office fee and what the contracted fee is with the insurance company. On their billing statements, patients see the full fee and also an adjustment showing how much money their dentist is losing by being a member of their PPO dental plan. Also, in the write-off system, the dental insurance companies are automatically billed the office’s higher fee, rather than the PPO fee, which can help when the insurance company later looks at how much of an increase should be made to the fee schedule.
I love this method! However, there is a disadvantage that you should consider. The Dentrix Treatment Planner is not able to account for that difference when you present the treatment plan. Your office team will be required to make hand-written adjustments to the treatment plan estimate, which may not look professional. Also, it may be challenging to collect on the day of service since the Ledger cannot accurately calculate the patient’s portion if the full fee is being posted to the Ledger. Even though this method requires some tricky work on the calculator, some offices still prefer to use this method.
Using Fee Schedules
Offices that work with multiple PPO plans should use fee schedules. With this method, the office team must keep the fee schedules current, update the coverage table accurately, and attach the fee schedule to the insurance plan properly.
When I discuss this method with team members, the most frequent comment I get is, “I want to bill my full fee to the insurance company, and that is why I have never switched to using fee schedules.” The good news is, with fee schedules, you can still bill full fees to the insurance company. All you have to do is change the claim format to the DX2007F when you are attaching the fee schedule to the insurance plan. I’ll show you how to do this in a moment.
There are three significant advantages of using fee schedules: (1) Collecting at time of service is accurate on the Ledger; (2) The treatment plan estimates are accurate, so you don’t have to do any manual calculating;(3) The production for the day will reflect the PPO adjusted production amount on your Daysheet. These are huge advantages for your team!
Set Up the Fee Schedule
Let’s walk through it together so that you can start seeing those benefits sooner rather than later. After obtaining a copy of your fee schedule from the insurance company, in the Dentrix Office Manager, from the Maintenance menu, point to Practice Setup, and then Fee Schedule Setup to display the Fee Schedule Maintenance dialog box. Click New to set up a new fee schedule.

Give the fee schedule a name and select whether you want to start with a blank fee schedule, copy from an existing fee schedule, or import a fee schedule from an Excel file on your computer. Then select the position where the fee schedule will show up in your fee schedule list and click OK.

In the View/Edit Fee Schedule dialog box, find the first procedure code in the list where you need to make a fee schedule change, double-click the value under New AFTER, change the amount, and press Enter on the keyboard.

Make other fee changes as needed. When you’ve finished, click Save to create your fee schedule.
Add the Fee Schedule to the Dental Plan
Now that your fee schedule is set up, you can attach it to the dental insurance plan using the Family File. To do this, after selecting a patient in the Family File, double-click the Primary Dental Insurance block. On the Dental Insurance tab, click Insurance Data to display the Primary Dental Insurance Plan Information dialog box.
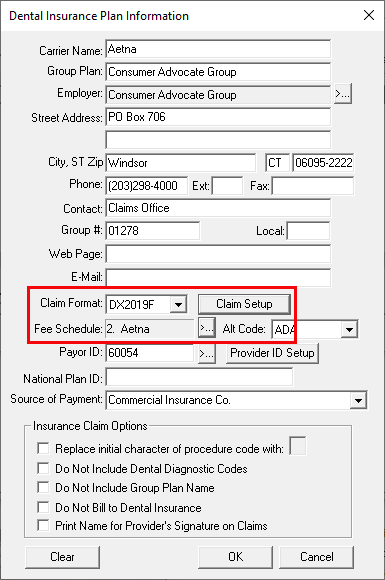
Next to Fee Schedule, click the selection button and select the appropriate fee schedule for the plan (the fee schedule you just updated). Next to Last Update, you should also enter the current date so you have a record of the latest changes.
While you’re in this dialog box, if you want to bill your full fee to the insurance company, you can either set the Claim Format to DX2019F or select DX2019 and customize the Claim Setup.
If you choose the DX2019F claim format, the F tells the Dentrix software to bill the fee schedule fee amount to the patient’s Ledger and the full fee to the insurance company.
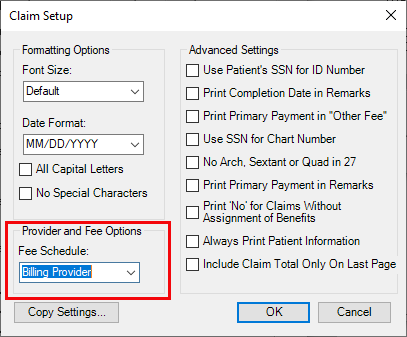
If you select DX2019 and click Claim Setup, click on the drop down menu under Fee Schedule. Then you can choose for this insurance plan if you want bill out the Default fee schedule, Billing Provider fee schedule, or Insurance fee schedule. Here are the definitions:
- Default – This will bill out whatever fees are posted to the patient’s Ledger.
- Billing Provider – Whichever provider is used as the Billing Provider on the claim will have his or her fee schedule pulled. This is similar to using the “F” claim forms. However, many of you may be under the impression that it pulls the patient’s PROV1. If you go to the provider setup, each provider has a fee schedule attached to his or her profile. This feature could be extremely helpful if you have a specialist who comes into your office and you want to bill out a higher fee than the office’s regular fees. For example, if you have an endodontist come in once a week and you bill out a molar root canal for a patient, you could open up the insurance claim and change the billing provider to the endodontist so that his or her fee goes out on the insurance claim.
- Insurance Plan – This will bill out the insurance plan fee schedule if you have one attached to the insurance plan info screen. If you have used any of the “I” claim forms in the past, this feature will perform similar to that.
Remember that if you will be billing out full fees to the insurance companies, when you receive your EOB from the insurance company it may look like you need to do an adjustment because the submitted amount will be greater than the allowed amount. But remember, the patient’s Ledger already has the correct PPO fees, so no adjustment should be necessary.
Update the Coverage Table
The final step in the setup is making sure the Coverage Table is accurate. From the Insurance Maintenance window, click the Benefits/Cov button to open the Dental Insurance and Benefits Coverage window for the plan. Click Coverage Table and make adjustments as necessary.
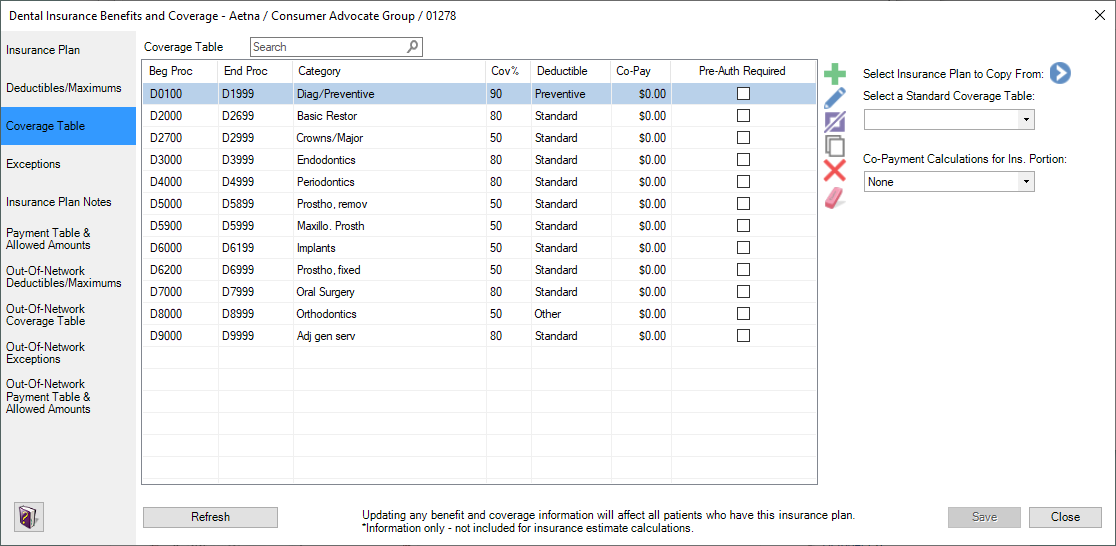
When using fee schedules, do not use the Payment Table unless there is a specific procedure code that falls outside the fee schedule coverage percentage. (A good example of this exception would be the downgrade for posterior composites.) Using the Payment Table does cause the estimate calculations to be different.
If you are just switching over to using fee schedules and your patient has an existing treatment plan, you will need to use the Update Fees feature in the Treatment Planner in order for the treatment plan estimate to reflect the new fee structure. Once you’ve used the Update Fees feature, you can print the patient estimate just as you did before, but now it will reflect an accurate estimate without any manual calculations.
Using fee schedules when you are contracted with an insurance company will give you more accurate accounting of production, help your front office team collect more accurately on the day of service, and help give your patients an accurate treatment estimate when accepting treatment. This is a win-win for everyone!
How Do I Know How Much I Am Writing Off If I’m Not Using Adjustments?
If you want to see how much money you are writing off for insurance if you’re not using PPO adjustments, there are a couple of reports you can use.
Day Sheet
You can see the difference between the billed charges (actual charges on the patient Ledger) compared to the office fee schedule (what is listed in the office fee schedule for each procedure code) on the Day Sheet. When you run your Day Sheet every day, there is a “Compare to Fee Schedule” check box. This is where you would select your full office fee schedule to compare the actual charges to your office fee schedule. When you run your Day Sheet, there will be two new line items that appear right under the charges: “COMPARED TO OFFICE” and “NET DIFFERENCE.”
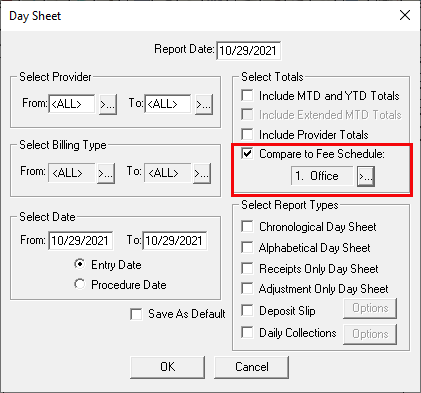
The only thing to be cautious of with this number is that it looks at all accounts (even those with no insurance), so this number wouldn’t necessarily be what your PPO adjustment would have been. For example, let’s say you have a cash patient for whom you are making a nightguard and your full office fee is $500. However, the doctor only wants to charge the patient $250. There would be a NET DIFFERENCE of $250, but this would not have been a PPO adjustment.
Utilization Report for Dental Insurance
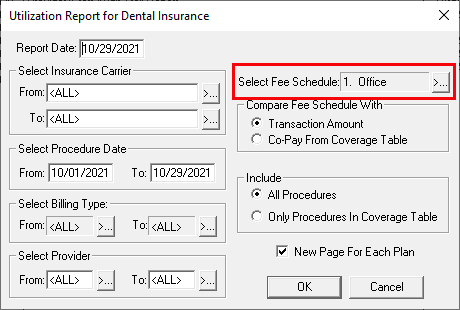
The next report is the Utilization Report for Dental Insurance (Office Manager > Reports > Ledger > Utilization Report for Dental Insurance). This report is more accurate to show what the PPO adjustment would have been. I said “would have been” because we will not be able to reproduce an Insurance Category Report for PPO if there are no adjustments being made. All we can do is try to accurately see the difference between the full office fee schedule and the PPO fee schedule. The difference between the office fee and the PPO fee is the adjustment.
The Utilization Report for Dental Insurance will look at actual charges billed to the Ledger compared to the office full fee schedule. This report can be printed for a specific time frame, group of insurance carriers, billing types, and providers. If you are only looking for a total dollar number, I would suggest doing a print preview and looking at the total on the last page. The grand total (Fee – Co-Pay) would have been your PPO adjustment. This is the difference between your office full fee schedule and the amount billed on the Ledger only for patients with insurance.
Please know that I am not saying that this report will be a completely 100% accurate replica of your PPO adjustment report. Why? For example, let’s say you have a patient with Metlife (non-PPO) insurance and you choose to charge the patient less than your full office fee on a procedure, this would also show as a difference on this report.
There are two ways to get the information to be more accurate. First, if you choose to lower the fee for a patient with insurance, my suggestion would be to still charge the same fee as your full office fee and then make an adjustment. Second, you could also run the report by specific insurance carriers and exclude your non-PPO insurance plans from the report. I would make sure all your PPO plans are spelled the same way so that you can easily do a “TO” and “FROM” list without skipping any. For example, make sure all your Washington Dental Service plans are spelled the same.
So, now you have the scoop: Both systems work, and there is no right or wrong way to deal with PPO plans—but there are pros and cons to each, so you should choose thoughtfully. Hopefully this post has helped you understand your options.
Learn More
Read It’s Time to Update Fees Again for more ideas about managing fee schedules.
See the following topics in Dentrix Help for more information:
- Adjusting Insurance Payments Automatically
- Adding insurance carriers
- Insurance Coverage Tables
- Utilization Report for Dental Insurance
By Dayna Johnson, Dentrix Certified Trainer
Dayna loves her work. She has over 25 years of experience in the dental industry, and she’s passionate about building efficient, consistent, and secure practice management systems. Dayna knows that your entire day revolves around your practice management software—the better you learn to use it, the more productive and stress-free your office will be. In 2016, Dayna founded Novonee ™, The Premier Dentrix Community, to help cultivate Dentrix super-users all over the country. Learn more from Dayna at www.novonee.com and contact Dayna at [email protected].


