
Dentrix G7.4 gives you designated fields in one place to enter and view insurance plan details, like effective dates, exceptions, and limitations.
Dealing with dental insurance carriers and patient insurance plans can be a hassle. It seems that no two are alike! Each dental plan has their own unique coverages, limitations, exceptions, and exclusions. It can be hard to keep track of everything, especially when your practice deals with hundreds of them.
In the past, in order to keep track of all of these insurance plan intricacies in Dentrix, offices would store this information in a notes field, which could be very difficult to find or reference when they needed it. And, depending on who wrote the note, you would have varying levels of detail for each plan. In Dentrix G7.4, insurance data management is more centralized, allowing you to store and access insurance plan details in specifically designated data fields in one place rather than in blocks of text in an insurance note.
To see these new insurance features in action and learn how they work, read this article on the What’s New Blog.
Accessing Insurance Information
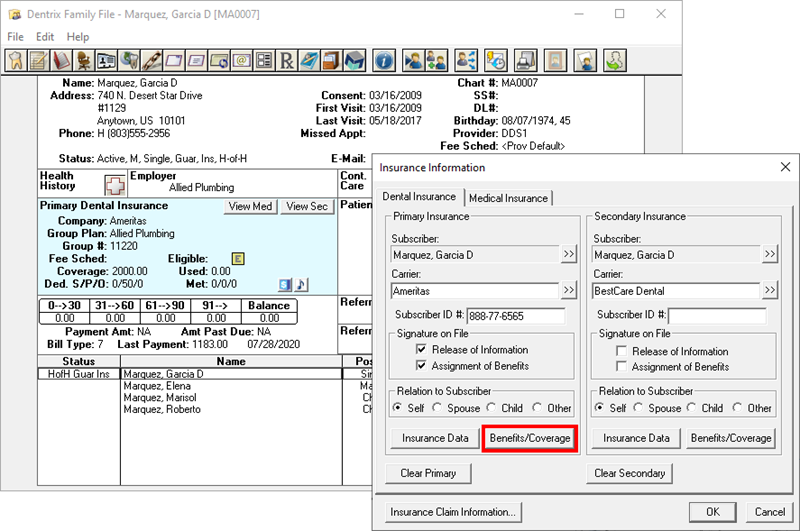
Accessing a patient’s insurance information is easy. Double-click the Insurance block for a patient in the Family File. This is still the place where you can assign an insurance carrier and plan to a patient or their dependents. To access the new, updated insurance features, click the Benefits/Coverage button.
Insurance Plan Information
The new Insurance Benefits and Coverage window is a single, central location you can open in Dentrix to see the insurance information you are looking for. It is divided into major sections that are accessible via tabs along the left side of the window.
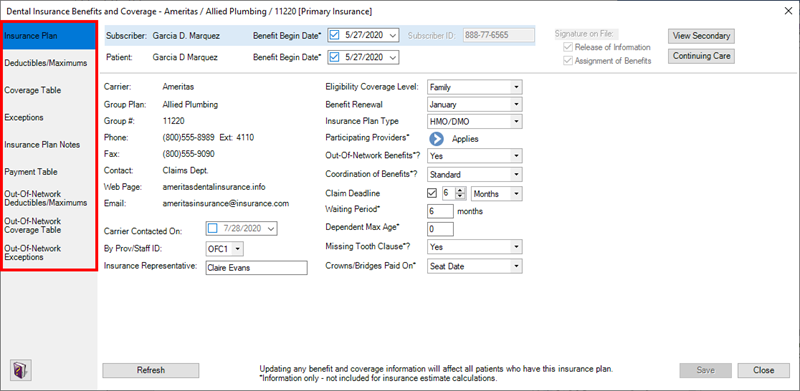
Within this window, you can enter more information about the insurance plan, including the date benefits began for the subscriber and for the patient, eligibility coverage levels, insurance plan type, whether out-of-network benefits apply for the plan in your office, and those providers within your practice who participate in the insurance plan. You can also enter details such as the waiting period before benefits begin, maximum age of dependents to be covered by the plan, and whether crowns/bridges are paid by prep date or seat date.
As you update information about the plan, there is a place to record the date you last verified the information, the staff member who verified it, and the contact you spoke with at the insurance company.
Subscriber and selected patient information is conveniently visible at the top part of the window—no matter which page of the benefits and coverage window you are viewing. There is also a link (when applicable) to view secondary insurance information, along with a Continuing Care button to see the prior treatment dates of all the continuing care types you are tracking. This is helpful to reference when the insurance plan has frequency limitations on coverage for things like X-rays or cleanings. Learn how to add insurance plan information.
Deductibles/Maximums
Within this window, you can record the deductible amounts the patient must contribute for the Standard, Preventive, and Other categories, as well as the maximum benefits that are paid out by this plan. If a patient has met their deductible or used benefits with another provider outside your practice, you can also enter those amounts in this window. Learn how to update deductibles and maximums.
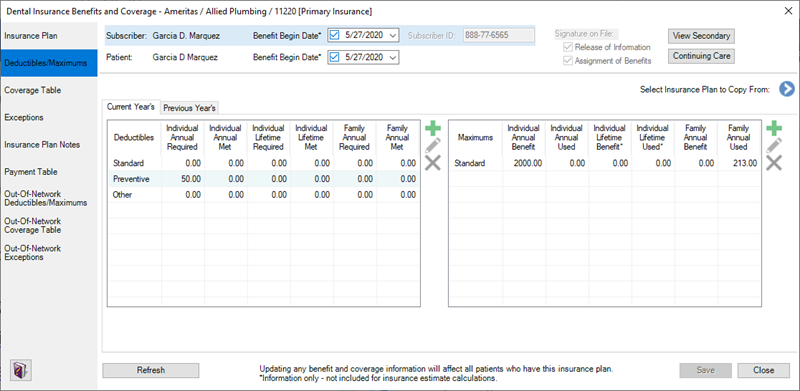
You can also add and manually track additional deductible categories as needed. For example, if the plan has a lifetime deductible for Orthodontic coverage, click the Add new deductible type button (the plus icon), name the deductible category, and enter the deductible amount and whether or not the patient has met it.
Coverage Table
The coverage table is where Dentrix looks to determine insurance estimates. The main functionality of the coverage table hasn’t changed much in this new version of Dentrix. You can now select another insurance plan and copy the coverage table from it to this plan, which can save time and reduce the amount of manual date entry needed to create or update plans. Each row of the coverage table represents a range of procedure codes and the coverage percentage that will be applied to the procedure fee to determine the estimated insurance portion.
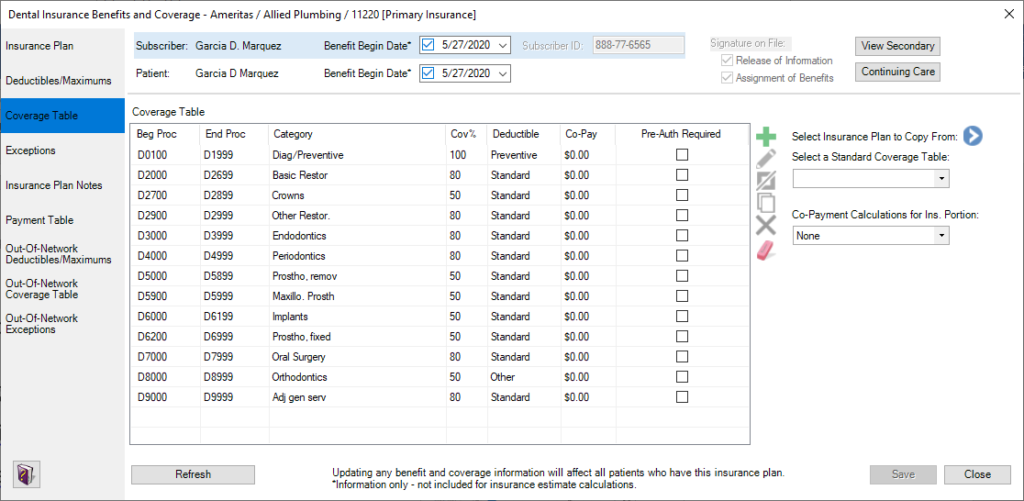
You can select a row and change the coverage amount and deductible category that apply to the range of codes. If the groupings of procedures are too broad, you can use the new Split option to divide a row into more specific groups of codes, and then edit the coverage for those procedure groups. Learn about managing the coverage table.
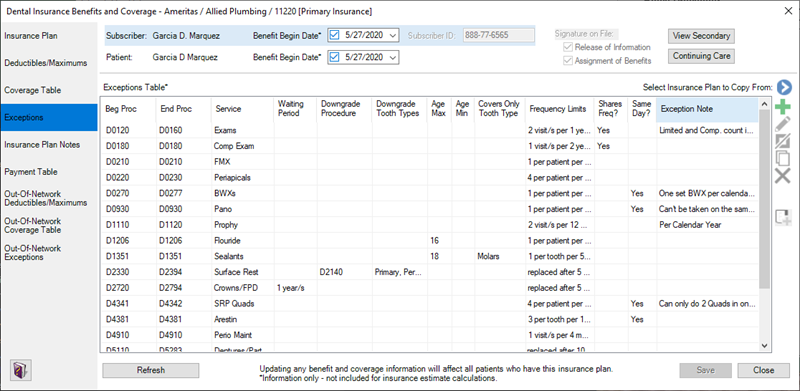
Exceptions
The Exceptions page is one of the new features included in Dentrix G7.4. In previous versions of Dentrix, this type of information was typically kept in insurance plan notes and may or may not have been easily found when needed. Now you have a place where you can add or edit coverage exceptions for procedure code ranges for things such as age minimums and/or maximums, frequency limitations, downgrades, waiting periods, and specify if a procedure is covered only on certain teeth. Learn about managing the exceptions table.
IMPORTANT: Information is more visible and accessible now, but this information is for information only and is not included in insurance estimate calculation.
Insurance Plan Notes
There is now a large space available to enter or read notes about the insurance plan. You can use this space for plan specifics that may not fit into other areas in the Dental Insurance Benefits and Coverage window. Learn about managing insurance plan notes.

Payment Table
The Payment Table provides a place to enter coverage estimate exceptions for individual procedure codes. When you receive information from the insurance company with specific dollar amounts that are paid for certain procedures, you can enter that information in the payment table and Dentrix will use this information to estimate insurance coverage for each procedure.

When applicable, you can copy another plan’s payment table to use as a starting point. You can also select an existing fee schedule and allow Dentrix to fill in the payment table by calculating the coverage percentage for each code. You can also easily add, edit, or delete individual line items within the payment table any time you receive new information that is applicable to all subscribers to this insurance plan.
The Benefits and Coverage window also gives you pages to record Deductibles/Maximums, Coverage Table, and Exceptions when the plan is out-of-network. These pages function very similarly to the ones discussed earlier, so we won’t go into detail here. They are a great place to help you keep track of the differences in this information when working out-of-network. Learn about managing the payment table.
Using the Information in the Dental Insurance Benefits and Coverage Window
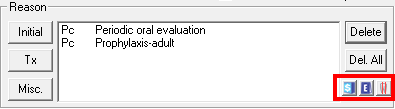
You can easily reference information that you record and document in the Dental Insurance Benefits and Coverage window from other areas in Dentrix where you may need to view insurance coverage information. For example, when treatment planning procedures, under Treatment Plan Case Setup, you will see new icons.

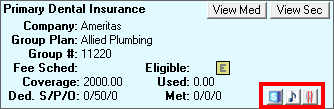
![]() Click the Plan Detail icon (blue with a dollar sign) to open the main Dental Insurance Benefits and Coverage window and see the details for the currently selected patient’s insurance plan.
Click the Plan Detail icon (blue with a dollar sign) to open the main Dental Insurance Benefits and Coverage window and see the details for the currently selected patient’s insurance plan.
![]() Click the Notes icon (musical note) to see the insurance plan notes you have entered for the insurance plan. If no insurance plan notes have been entered, this icon will not be visible.
Click the Notes icon (musical note) to see the insurance plan notes you have entered for the insurance plan. If no insurance plan notes have been entered, this icon will not be visible.
![]() If you have entered any insurance exceptions for the plan, the Notes icon is replaced with an Exceptions icon (a white letter E on a dark blue background). Click the Exceptions icon to view a table of exceptions, limitations or exclusions for the plan.
If you have entered any insurance exceptions for the plan, the Notes icon is replaced with an Exceptions icon (a white letter E on a dark blue background). Click the Exceptions icon to view a table of exceptions, limitations or exclusions for the plan.
![]() If applicable, a Missing Tooth icon may appear, indicating there is a missing tooth clause for the insurance plan.
If applicable, a Missing Tooth icon may appear, indicating there is a missing tooth clause for the insurance plan.
These same icons are reflected in the Treatment Planner view in the Patient Chart, the Insurance block of the Family File, and in the Appointment Information window to help you see at a glance that there is additional insurance information you should be aware of.
Dentrix looks at the new insurance information to help you out as you perform tasks in Dentrix, like scheduling appointments for treatment or continuing care. When you schedule an appointment for a patient attached to that plan, you may see a warning message alerting you that there is a waiting period for the selected procedures, that the provider for the procedure(s) does not participate in the patient’s insurance plan, or that there is a missing tooth clause that may apply.
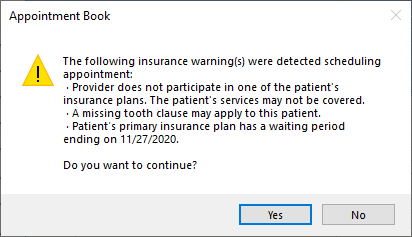
You will also see a warning if you try to schedule an appointment for a continuing care procedure before the due date as allowed by the insurance plan.
Conclusion
Dentrix G7.4 makes it easier than ever to manage your insurance data in a single, central location, by providing specific fields for data that was previously stored in various places within the software. By using the new Dental Insurance Benefits and Coverage window, the dental team can now easily manage and reference specific insurance details related to frequency limitations, downgrades, waiting periods and much more.
Learn More
To see these new insurance features in action and learn how they work, visit the What’s New Blog and watch the Insurance Improvements video.
See the Managing Insurance Benefits and Coverage section in Dentrix Help for more information about how to use these new insurance features.
By Sean Eyring, Contributing Editor


