
For current Dentrix Website Manager customers. Learn how to set up online patient payments on your practice website.
When patients have options available for making their payments, it can be good for them and for your practice. Patients need not be limited to paying their bill in person during operating hours or by mail.
The Patient Portal in Dentrix eCentral offers patients a way to log into their account, view ledger information, and make a credit card payment toward their balance. Payments are processed online and are recorded in the Dentrix Ledger.
Who Can Use Online Payments with the Website Manager?
The information in this article applies for current customers of Dentrix eCentral who have the Website Manager service and a WorldPay Merchant Account. (Note: Dentrix Pay or PowerPay are not required for your in-office credit card processing to make use of Online Payments.)
If you have updated to Dentrix QuickBill eStatements, you should use that superior service instead of this one. Current QuickBill eStatement customers can click here to learn how to set up and send statements by email and allow patients to make login-less online payments!
If you would like to upgrade to QuickBill eStatements and online bill pay, speak with a product expert.
Setting Up Online Payments
There are several steps of one-time setup necessary to complete before you can begin accepting credit cards online. Fortunately, you only need to complete these steps one time!
WebSync Setup
You may have noticed a program called WebSync that pops up on one of your computers daily. This program talks between Dentrix and eCentral, keeping the two systems synchronized. In these steps, we’ll make sure that the right settings are configured so that Online Payments can verify user account requests and record their payments in the Dentrix Ledger.
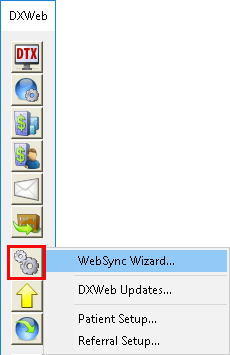
From any module in Dentrix, open DXWeb > Settings > WebSync Wizard.
Click Next until you advance to the WebSync settings page.
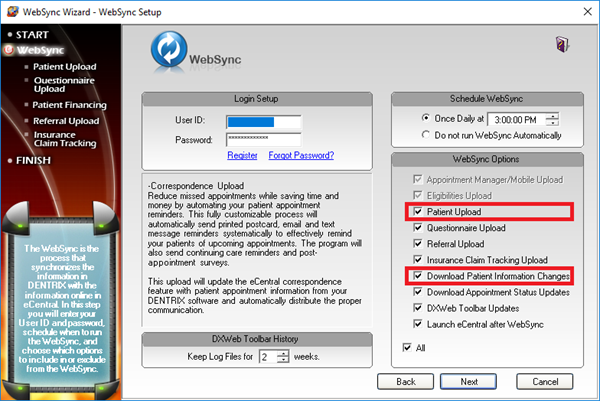
Under Schedule WebSync, schedule an automatic synchronization to happen once daily, and set a time for it to run. Under WebSync Options, you must select Patient Upload and Download Patient information Changes for Online Payments to work.
Click Next to advance to the Patient Upload page.
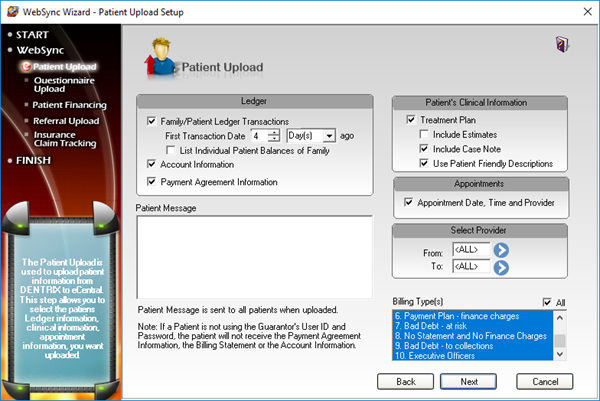
In the Ledger section, select (or remove) as much information as you want the patient to be able to view online. Consider that patients will be logging in to pay their bill, so they will be interested in viewing the detail of their ledgers to better understand what they owe.
Click Next to advance to the Patient Financing page.
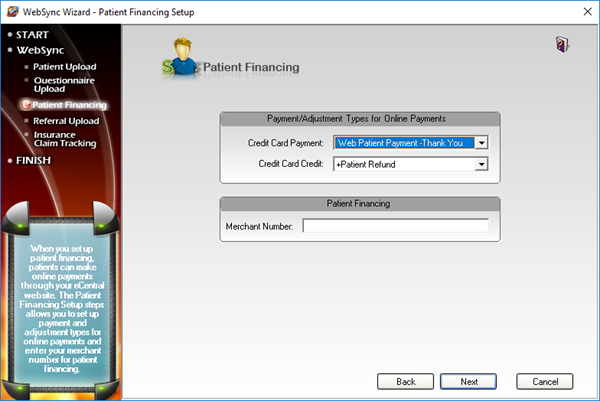
For Credit Card Payment, select the Payment Type that will be used for credit card payments made online. For Credit Card Credit, select an Adjustment Type that will be sued when online payments are voided or refunded. Where possible, it is recommended that you select a payment type and adjustment type that is solely devoted for use with online credit cards. Doing so will help distinguish these transactions on reports.
Click Next to advance through the remaining screens, and at the final screen click Finish.
Dentrix eCentral Setup
For the next setup steps, we’ll be configuring settings on the Website Manager. These will turn on the options allowing patients to request accounts, view their information, make payments, and receive receipts by email.
From the DXWeb Toolbar, click Website Manager.

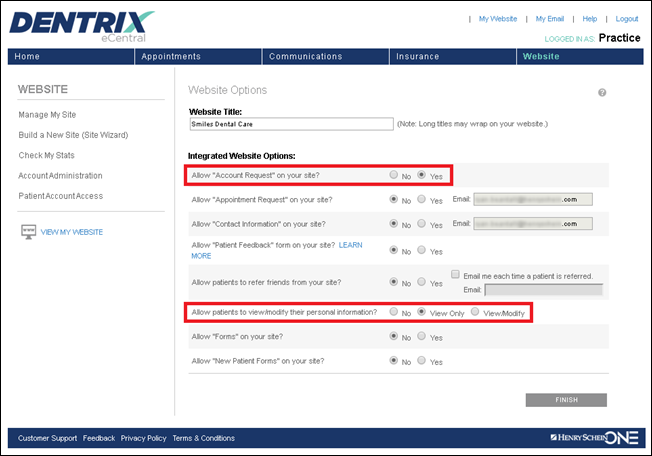
A Dentrix eCentral webpage will open. Select Practice Info & Website Settings. From the Website Settings page, select “Yes” to allow account requests on your site. This will allow patients who do not have an account to register for one.
For the question Allow patients to view/modify their personal information, choose either “View Only” or “View/Modify.” You must allow the patient to view their own information in order to use online payments, but it is up to your office’s preference whether you will allow patients to edit or make changes to their information in this area. (This is not the same thing as using Forms to receive questionnaire responses— that is a completely separate service.)
Next, we will change the settings for the email receipts and enter your merchant account information. From the Website menu, choose Manage My Site. Select Payment Setup.
(If the page you see looks like an enrollment form instead of the one pictured below, and you do already have a WorldPay Merchant Account, contact the support team to enable the correct page. Otherwise, contact our sales team to get the merchant account process started for you.)
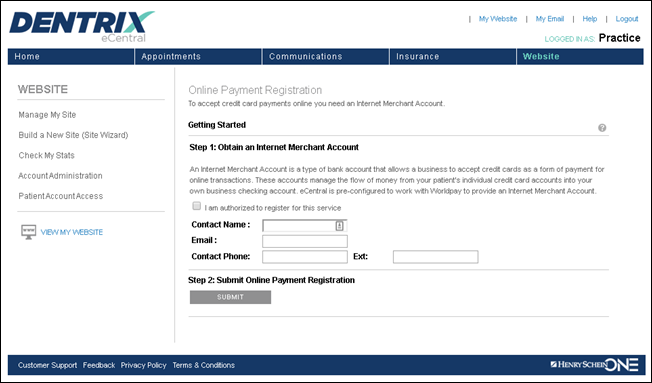
Under the Email Notices section, customize how emailed receipts will look for your patients. Enter a note will appear as the footer, the email address used if the patient replies to the email, the subject line, and customize your greeting that appears at the beginning of each email message. Below your greeting will be the details of the transaction (the information seen in brackets in this setup screen will be replaced with the actual patient and payment information on each email).
Under the General Settings section, select Activate Online Payments and enter your WorldPay Account Token, Account ID, Acceptor ID, and a Terminal ID as prompted.
If you’d like an email sent to your office each day summarizing the daily online payment activity, select Email me a daily activity summary. Selecting this option will send your office an email every day, even on days when there is no payment activity to report.
Enter a Minimum Credit Card Payment amount that is accepted through the online system.
Finally, click Save Changes.
Using the Patient Portal and Working with Patient Payments
Now that the setup is complete, it is time to direct patients to the portal where they can log in and pay their bill online!
If your practice website is maintained through eCentral, patients can go to your website and open either the Patient Information or the Pay Online link that are already part of your site (both of these links will direct them to the same place). If you maintain your website yourself or through another company, contact the support team to obtain a web code so that you can add links or buttons to your site to allow patients to connect to the portal.
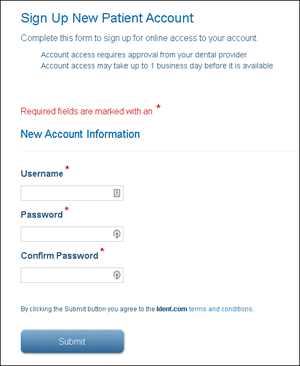
When patients click one of these links, they will be prompted to log in if they have an account, or to sign up for a new account.
Signing Up for an Account
Patients who do not have a patient portal account can sign up for one. When they do, they will enter their information to request an account.
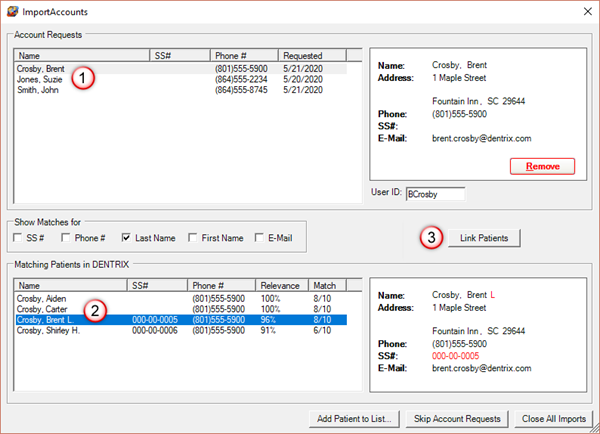
The next time that your office runs a WebSync, the Import Accounts window will appear showing you patients who have requested an online account. Select a name from the Account Requests (1), confirm the patient’s identity by selecting a matching patient (2), then click Link Patients to connect and approve the account request (3).
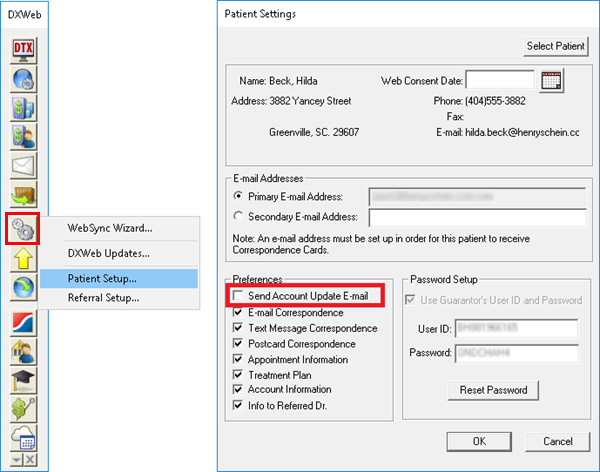
As a matter of preference, many offices find that this online account tends to “over communicate” with patients, sending them emails every time your team makes small changes to their account. To stop these emails, open DXWeb > Settings > Patient Setup. Select the patient, and remove the Send Account Update E-mail selection.
At the next running of WebSync, your approval will be sent back to the online system and the account will become active. With the account approved, the patient can now log in and manage their information or make payments to their account.
Note: WebSync typically only runs once per day. The service only needs to run on one computer in your office. Ideally, it will run daily on an accessible computer where your team are able to read and respond to the messages it delivers.
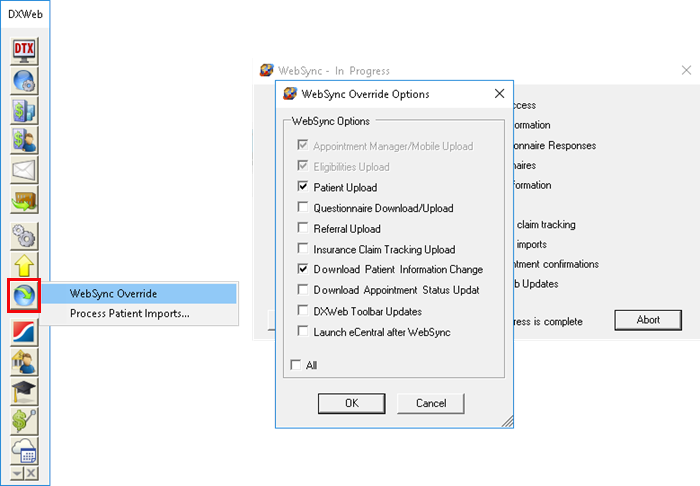
To speed up the account creation and approval process, you can perform a WebSync more frequently, especially when you know that a patient is attempting to register or waiting to be approved. From the DXWeb toolbar, choose WebSync > WebSync Override, and select the “Patient Upload” and “Download Patient information Change” options (you may select additional options, but they will add to the time needed to complete the sync).
Patients Making Payments
Once a patient logs into their online account, they can click the Pay Now tab on the top header and then enter their credit card information. As they follow the prompts, the card will be processed and the money will begin its journey to your account.

Recording the Payment in Dentrix
While the money is already on its way to your bank account, the final step is to record this payment in the patient’s Ledger. The next time you run a WebSync, the Import Payments window will appear and alert you of payments that have been received through the online system.
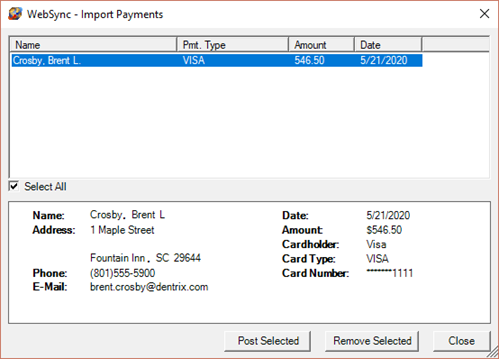
Select a payment and verify the patient information shown in the preview window. Then choose Post Selected.
Additional Management Options
If the need arises, you can reprint a receipt or void an online payment. To do so, log on to Dentrix eCentral. From the DXWeb Toolbar, click Website Manager.
The Dentrix eCentral website will open, where you can select Payment Administration. A view of recent online payments from the previous two-weeks will open automatically. If you need to view a different time period, click Online Payment Search and change the date range.
Click the patient name, and choose Void, Print, or Close. When the next WebSync runs, the Import Payments window will appear, but unlike before, this time the payment amount will show a negative number (appearing in parenthesis). Post this “Payment” and an adjustment will be applied to the patient’s Ledger.
The Dentrix eCentral Online Payment option provides you with another flexible avenue to accept credit card payments from your patients at their convenience!
Learn More
Please note that this feature is available only to current Website Manager customers.
If you are interested in giving your patients the option to pay online and you do not currently have the Website Manager, you can accept online payments and send email billing statements using QuickBill eStatements. For more informaton, visit https://www.dentrix.com/electronicbilling.
By Ryan Beardall, Contributing Editor


