
For current Dentrix eCentral users, learn how to post patient forms online so that patients can fill them out at home before their appointments.
Important Note: These instructions are for current Dentrix eCentral customers. If you are not using Dentrix eCentral, read Allow Patients to Fill Out Forms Online to learn about posting patient forms online using Patient Engage.
In the past, when you wanted to gather information from your patients you handed them pages of printed questions, a pen, and a clipboard. They’d sit in your waiting room and fill out the information, which you would then have to enter into Dentrix. Not the best use of anyone’s time.
You can create those same sort of questionnaires within Dentrix. Plus, you can customize them so that they collect exactly the information you want, including patient information fields that correspond with specific areas within Dentrix, when patients fill out forms online you can upload their responses directly into Dentrix without your having to retype it!
Who Can Use Forms with Dentrix eCentral?
The information in this article applies for current customers who have Dentrix eCentral and are using the Website Manager. This article is presented for those users. If you are a current eCentral user, we highly recommend updating to Patient Engage, with offers forms through the Patient Portal or Check In via the patient’s smart phone.
If you are not a current eCentral user, you can post forms online using Patient Engage. Read Allow Patients to Fill Out Forms Online to learn more about patients forms and Patient Engage.
Setting Up Forms in Dentrix
Before you can post forms online, you need to set them up in Dentrix. You can do this by creating forms from scratch or by importing forms. Let’s walk through those options now.
Creating Questionnaires in Dentrix
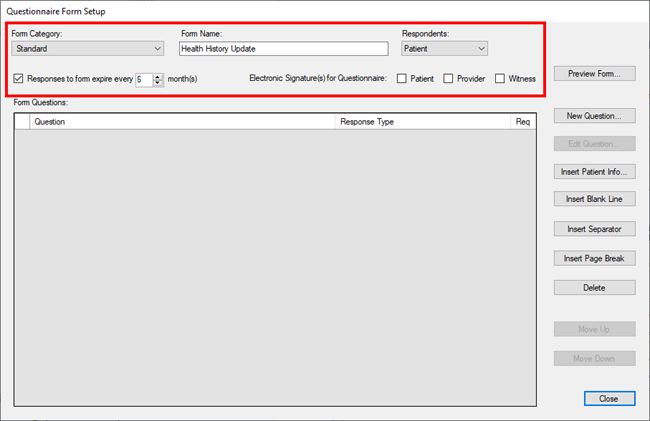
Let’s start by creating a new questionnaire form. In Dentrix, open the Questionnaires module and click Edit > Questionnaire Setup. Then click New Form, select Start with Blank Form, and click OK.
Enter a name for the questionnaire form. This is a name that patients will see, so make sure to use a patient-friendly description and describe what the form is about, for example “Health History Update.” Then set the expiration and electronic signature options for the questionnaire as needed.
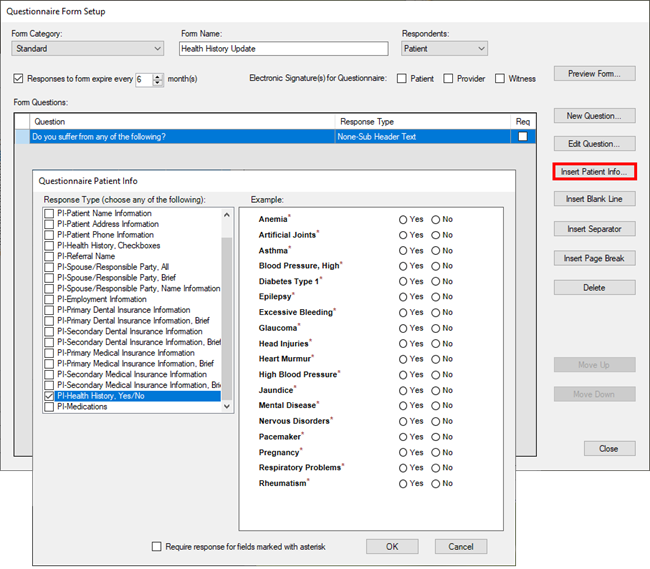
Now you are ready to add questions to the form. Consider if the information you are asking for can be found in the patient’s Family File or Health History. If so, click Insert Patient Info and select a template that contains the information. Using one of these patient information templates will allow the answers the patient gives to this section to be tied back to the appropriate locations in Family File and Health History for easy updating.
To create a questionnaire question, click New Question. Type the question text, and select the answer type you want the patient to respond with for this question. For example, do you want them to respond by typing a response, selecting yes or no, or selecting from a list of possible answers? Follow the prompts that pertain to this question type. You can also make answers to questions be required, meaning that the patient cannot submit the form without answering the question.
At any time, you can click Preview Form to see how the questionnaire will look when presented to the patient. When you have finished creating the questionnaire, click Close to save it. Your newly created form will be added to the Questionnaire Forms list in the Questionnaires Setup dialog box.
Importing Questionnaires
Creating new questionnaires from scratch can be a time-consuming process. And there’s no reason why you need to try and reinvent the wheel. That’s where the ability to import already created questionnaires comes into play. We’ve worked with Dentrix Certified Trainers to create the following three questionnaire forms that you can import and begin using in your practice. You can use these as they are or import them and then modify them to fit your specific practice needs.
-
- Patient Registration Form
- Medical History / Patient Update Form
- Patient COVID-19 Screening Form
Click here to download the file containing these customized forms to your computer. The file is a compressed zip file, so when you open it, look for an option to extract (or unzip) the DQF file within it.
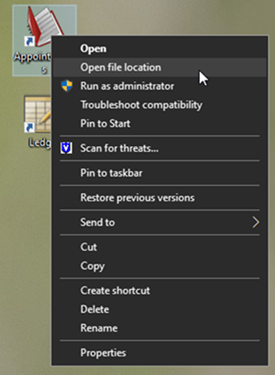
Once you have downloaded the file and saved it somewhere on your computer, you can import it directly to the Questionnaires module. From your Windows desktop, right-click any Dentrix icon and select Open File Location.
Open the Dentrix Questionnaire Form Utility. To do so, find the application called “QF” and double-click it. Tip: Press “Q” on your keyboard and the selection should jump to the first file starting with that letter. The Dentrix Questionnaire Form Utility window will appear. Make sure that the Import Forms tab is selected, and click Select File.
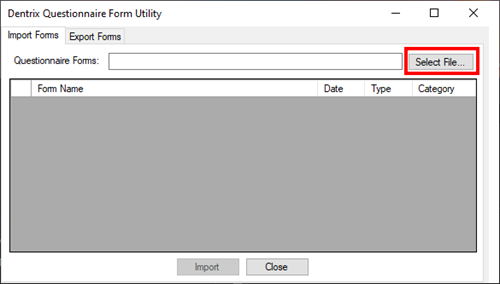
Browse to the file you downloaded earlier and click Open. The three custom questionnaire forms will appear in a list. To preview a form, select it and it will appear in the preview pane on the right. To import the form into your Dentrix Questionnaires module, select it in the list and click Import.
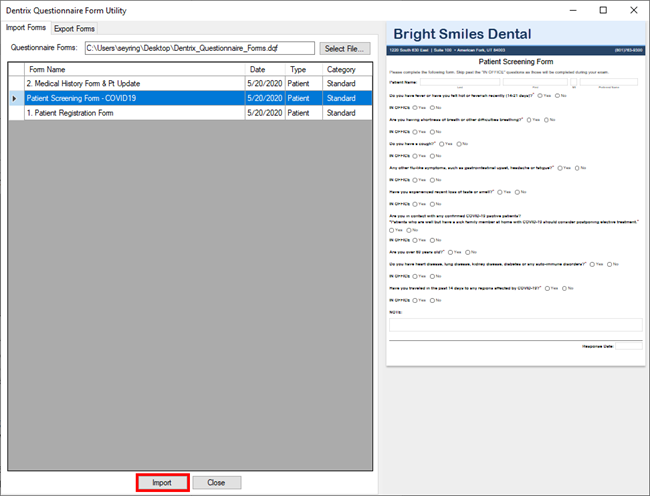
Click OK to the “Successfully Imported” notification, repeat as needed to import the other forms, and then close the window.
If you want to personalize the form or make any changes to it, do this immediately before anyone has the chance to respond to the questionnaire. Open the Questionnaires module and click Edit > Questionnaire Setup, select the form, and then click Edit Form.
Setting up Forms in eCentral and the WebSync
The next step of the setup process is to set up which forms will be uploaded to your website and when using eCentral and the WebSync Wizard.
WebSync Setup
You may have noticed a program called WebSync that pops up on one of your computers daily. This program talks between Dentrix and eCentral, keeping the two systems synchronized. In these steps, we’ll make sure that the right settings are configured so that Forms can verify user account requests and communicate form responses with the Dentrix Questionnaire.
Important: After creating or editing a questionnaire form, wait at least 15 minutes for the Practice Data Sync service to load these changes in the background. Then proceed to upload the forms using the following steps.
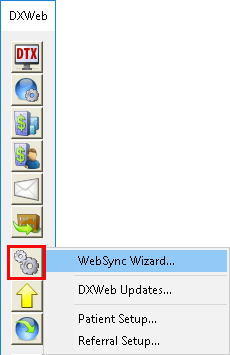
From any module in Dentrix, open DXWeb > Settings > WebSync Wizard.
Click Next until you advance to the WebSync settings page.
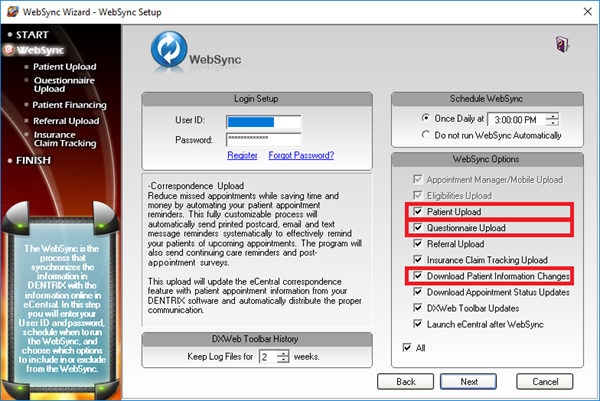
Under Schedule WebSync, schedule an automatic synchronization to happen once daily, and set a time for it to run. Under WebSync Options, select the following options:
-
- Patient Upload
- Questionnaire Upload
- Download Patient information Changes
Note: These are the minimal choices needed for Forms to work. Other options may be selected for additional eServices features.
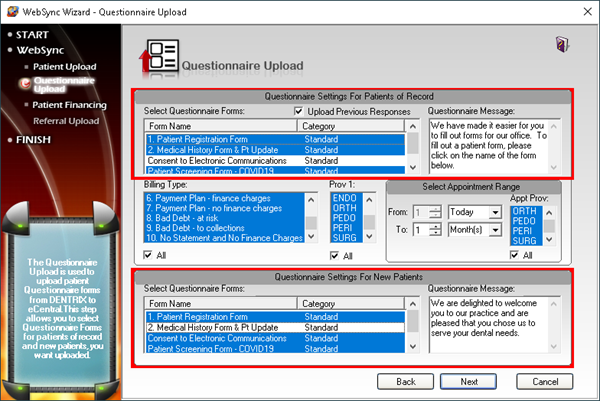
Click Next several times to advance to the Questionnaire Upload page.
The screen is divided into two sections: Questionnaire Settings for Patients of Record and Questionnaires Settings for New Patients. Select the new form(s) you want to upload in either or both sections, depending on if you want the form available for new or current patients.
If your practice website is maintained through eCentral, patients can go to your website and open the Patient Information link that is already part of your site. If you maintain your website yourself or through another company, contact the support team to obtain a web code so that you can add links or buttons to your site to allow patients to connect to the portal.
Click Next to advance through the remaining screens, and at the final screen click Finish. The form(s) will be uploaded at the next scheduled WebSync, which typically happens once per day.
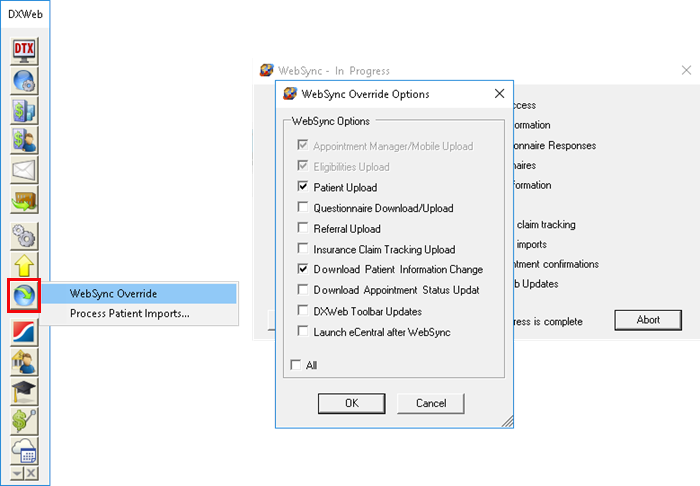
If you would like to upload these changes right away, from the DXWeb toolbar, click WebSync > WebSync Override and then follow the prompts. The forms you created and selected will then be available for all patients to complete though the patient check-in process.
Dentrix eCentral Setup
For the next setup steps, we’ll be configuring settings on the Website Manager. These will turn on the options allowing patients to request accounts, view their information, and submit form responses.
From the DXWeb Toolbar, click Website Manager.

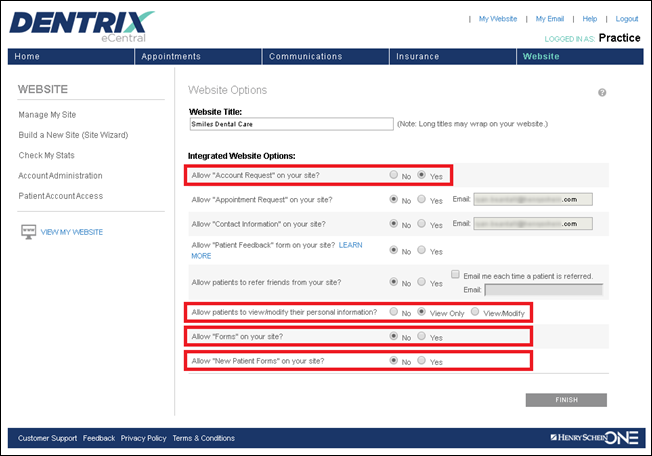
A Dentrix eCentral webpage will open. Select Practice Info & Website Settings. From the Website Settings page, select “Yes” to allow account requests on your site. This will allow patients who do not have an account to register for one.
For the question Allow patients to view/modify their personal information, choose either “View Only” or “View/Modify.” Choosing View/Modify will allow patients to make direct edits to their information on the web page, outside of using forms. If you would like patients to submit information changes only using forms, choose View Only.
Select Yes to the options to allow forms on your site and allow new patient forms on your site.
Existing Patients Interacting with the Online Portal
Now that the setup is complete, it is time to direct patients to the portal where they can log in and complete their forms online!
If your practice website is maintained through eCentral, patients can go to your website and open the Patient Information link that is already part of your site. If you maintain your website yourself or through another company, contact the support team to obtain a web code so that you can add links or buttons to your site to allow patients to connect to the portal.
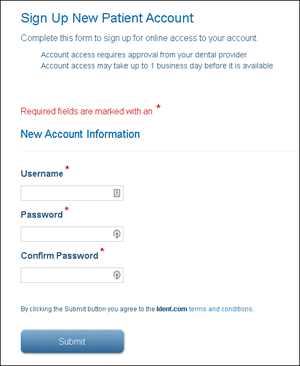
When patients click this link, they will be prompted to log in if they have an account, or to sign up for a new account.
Signing Up for an Account
Patients who do not have a patient portal account can sign up for one. When they do, they will enter their information to request an account.
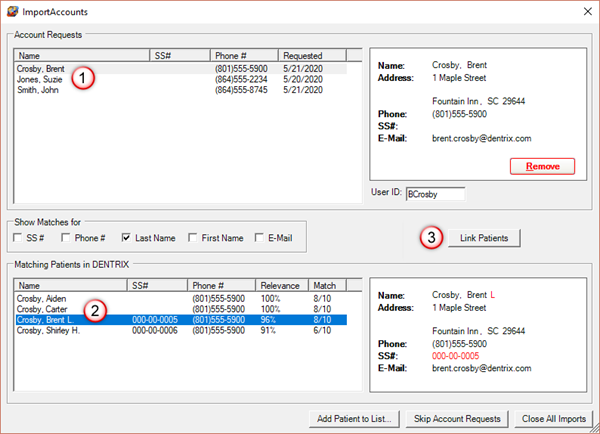
The next time that your office runs a WebSync, the Import Accounts window will appear showing you patients who have requested an online account. Select a name from the Account Requests (1), confirm the patient’s identity by selecting a matching patient (2), then click Link Patients to connect and approve the account request (3).
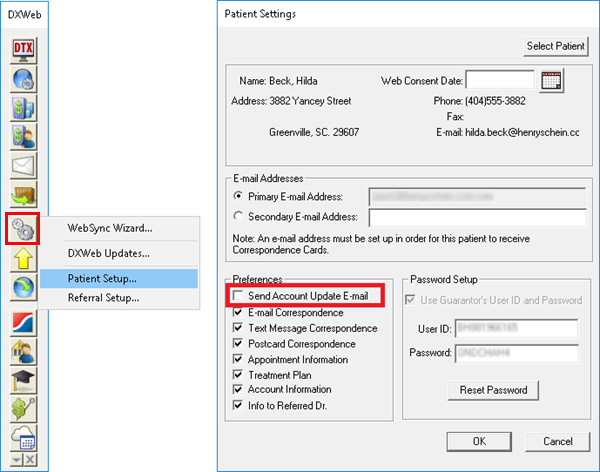
As a matter of preference, many offices find that this online account tends to “over communicate” with patients, sending them emails every time your team makes small changes to their account. To stop these emails, open DXWeb > Settings > Patient Setup. Select the patient, and remove the Send Account Update E-mail selection.
At the next running of WebSync, your approval will be sent back to the online system and the account will become active. With the account approved, the patient can now log in and manage their information or update their forms.
Note: WebSync typically only runs once per day. The service only needs to run on one computer in your office. Ideally, it will run daily on an accessible computer where your team are able to read and respond to the messages it delivers.
To speed up the account creation and approval process, you can perform a WebSync more frequently, especially when you know that a patient is attempting to register or waiting to be approved. From the DXWeb toolbar, choose WebSync > WebSync Override, and select the “Patient Upload” and “Download Patient information Change” options (you may select additional options, but they will add to the time needed to complete the sync).
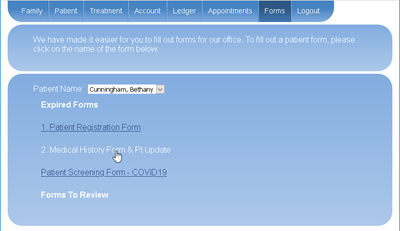
How Patients Complete Forms
Once a patient logs into their online account, they can click the Forms on the top header. They will see the forms that you selected for Questionnaire Settings for Patients of Record. The patient can click the form, answer the questions, and submit the response.
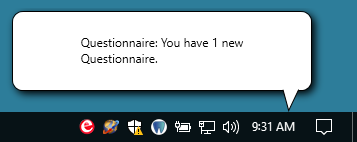
When the patient submits the form, the response will be delivered to your office through eSync service. You’ll be alerted that you have a new questionnaire response by a bubble in the lower-right corner of your screen.
New Patients Interacting with the Online Portal
When a patient clicks the “New Patient Forms” link from your website or emails, they will be asked to verify their name and appointment date. Then they will see the forms that you uploaded earlier in the “Questionnaire Settings for New Patients” section of the WebSync Wizard. They can submit answers, and those responses will be received in the Dentrix Questionnaires module.
Viewing Patient Responses in the Questionnaires Module
Patient responses to questionnaire forms are available to view from the Questionnaires module in Dentrix. You can easily update information in a patient’s Family File or Health History based on the answers provided in the questionnaire.
Open the Questionnaires module and select the patient. From the list of Completed questionnaires, select a form and you will see the form and the patient’s responses in a preview window. If the form included questions you created using the Insert Patient Info option, you can use patients answers to update their Family File or Health History within Dentrix. While viewing the response, click Patient Information.
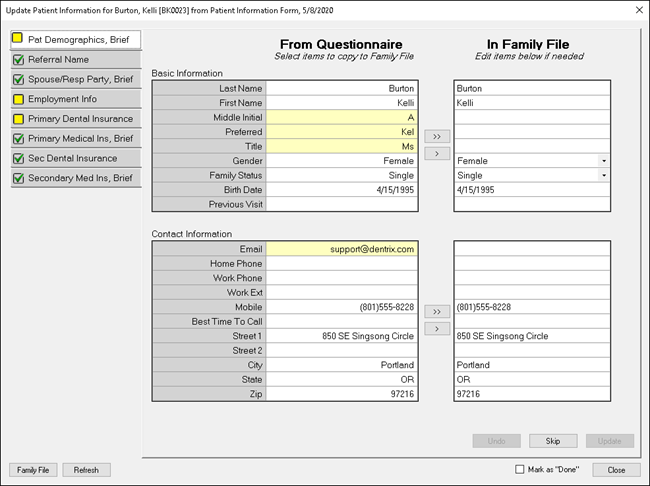
In side-by-side columns, you’ll see the answers the patient provided on the form next to the information currently saved in the patient’s Family File. Items in yellow are different. Select individual pieces of information and click the single arrow button (>) to transfer the answer to the Family File, or use the double arrow button (>>) to update all information from that group at once.
After making any changes, the Undo and Update buttons will appear at the bottom of the window. Click Undo to reverse the changes, or click Update to save them.
The Update Patient Information window will guide you through all sections of the form that contain information that can be updated. Click next through each section until all information is updated. When you are finished updating information, select Mark as Done, and then click Close.
Conclusion
By creating and using online questionnaires, your patients can update and share information with you using the technology they have at their fingertips. You can keep your patient records updated by importing patient information directly into Dentrix, without having to manually enter information from clipboards like you have done in the past. And check-in times can be reduced because patients will have filled out necessary forms ahead of time.
Please note that this feature is available only to current Website Manager customers. If you are interested in giving your patients more options or you are not currently using Dentrix eCentral, read Allow Patients to Fill Out Forms Online for more information about using forms with Patient Engage.
Learn More
For more information, visit www.dentrix.com/products/eservices/patient-engage and view these related articles:
- Setting Up and Creating Questionnaires
- How Dentrix Questionnaires Can Streamline Patient Paperwork
- Setting Up a Virtual Waiting Room with Patient Engage
By Ryan Beardall, Contributing Editor


