
When setting up treatment plans for patients, make sure you are using these tools.
Dentrix has awesome tools to help you provide high quality care to your patients. One of those tools is the Treatment Planner. You can use the Treatment Planner to provide your patients with treatment estimates. These estimates can include important information like the insurance deductibles and maximums, as well as the coverage percentages for specific procedures. The Treatment Planner also has tools to help you with case presentation. The key to high treatment acceptance is successful case presentation, so these tools can improve your case acceptance too.
When a patient has an exam with the doctor and a treatment plan is recommended, the treatment plan should be entered into the Patient Chart by the clinical team.
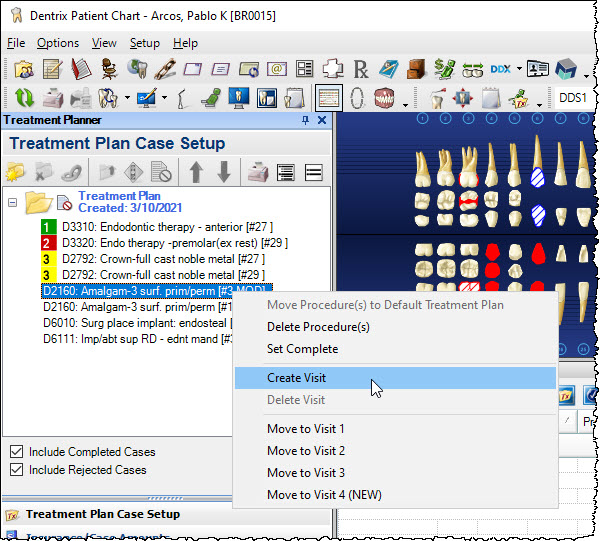
Once procedures are placed within a treatment plan case, your office treatment coordinator can use the Treatment Planner to make the treatment plan clear and easy for the patient to understand. She can do this by first assigning visits for procedures within the treatment plan. This will help the patient to know what the priority is for their treatment plan and which procedures need to be scheduled first.
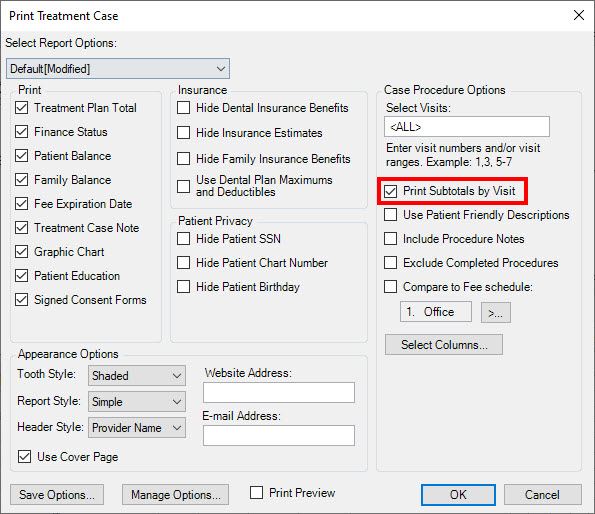
Also, when printing the treatment case, you can select to print subtotals by visit which will help them to know exactly what their out-of-pocket expense will be at each appointment.
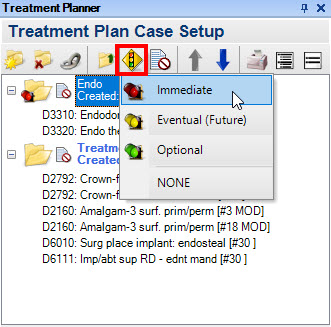
Another thing your treatment coordinator can do in the Treatment Planner is select a case severity of immediate, eventual, or optional for the treatment plan. Case Severity is shown on the printed treatment plan and can be seen by your staff within the Treatment Planner module so both the patient and your office staff are aware of how quickly this case should be scheduled. It’s important to note that case severity applies to the entire case. For example, if you are presenting an immediate treatment need, such as a root canal and a crown, but also are including veneers for cosmetic reasons, these procedures should be in two different cases, because the case severity for each will be indicated differently.
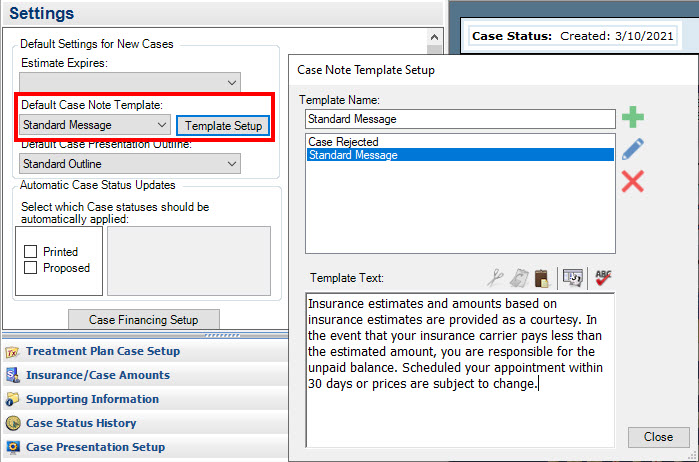
Next, the treatment coordinator can apply case financing status, add case notes, and enter a fee expiration date for the treatment case. If the case notes and other options are the same for all treatment plans made in your office, these can be set as default for all treatment plan cases to save time. For example, many offices have a case note that is a disclaimer about insurance payment not being a guarantee, and they use it on all treatment plans. Set it up once, and then use it for all future plans.
When it’s time to print the treatment case to present to the patient, you’ll find there are many options to choose from. I like to print the simple style, because it uses the least printer ink and it’s very clean and simple. You can select a report style under Appearance Options when you print the Treatment Case.
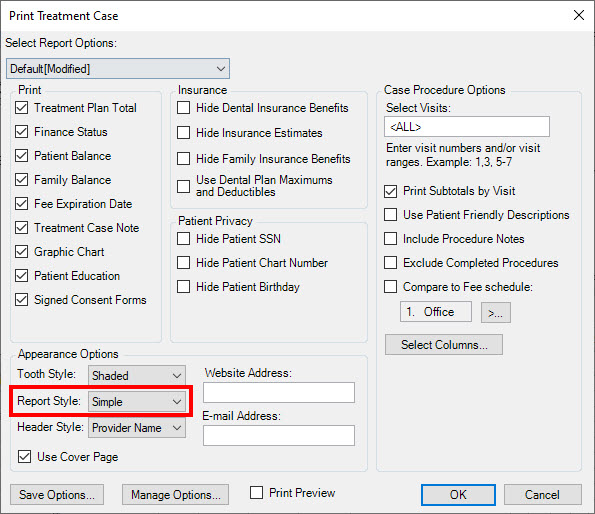
Some other options I always suggest when printing a treatment case are to Use Dental Plan Maximums and Deductibles so that is calculated in the treatment estimate, to Hide Patient SSN for patient privacy, and to Print Subtotals by Visit so the patient knows their expected payment for each visit. Another great option is the option to Compare to Fee Schedule. This is a great tool when your office participates with the patient’s insurance plan and you want the patient to see how much money they are saving by using your office, an in-network provider. When you compare fee schedules, you choose two fees to be shown side by side on the printed report. To do this, you would select to compare to your office fee with the insurance plan fee.
Once the treatment case is printed, the treatment coordinator can present it the patient. I think it’s best to discuss treatment plans and finances in a private quiet place out of earshot of other patients. Never present a treatment plan with a patient lying back in the chair because in that position the patient might feel more vulnerable.
Present the fees for the treatment and explain the insurance’s estimated potion. It’s very important to use the word estimated because ultimately you don’t know exactly what the insurance company will pay. If a patient is insisting on an exact amount, you could suggest first submitting a pre-authorization to the insurance to be sure of the amounts that will be paid for a procedure.
It can be helpful to offer patients payment options, such as CareCredit, so that they can pay monthly for the treatment to make it more affordable.
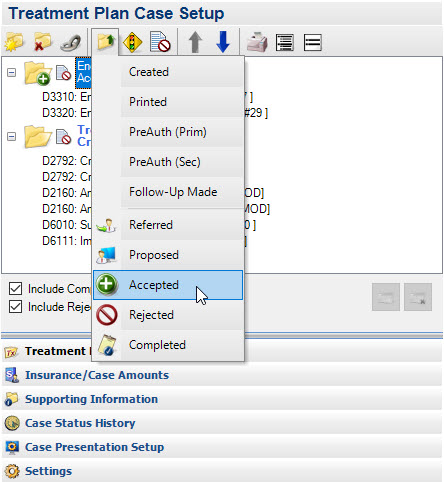
Once you have presented the treatment plan to the patient, and they accept and schedule an appointment, you can update the case status in the Treatment Planner to “Accepted.” This will help you to track your case acceptance, using reports like the Practice Advisor Report.
A high case acceptance percentage is a good indicator of how well your office is doing in educating your patients on their recommended treatment.
You can use the tools in the Treatment Planner to create easy-to-understand treatment plans for your patients, including insurance coverage, deductibles and maximums. Successfully presenting treatment plans to your patients can improve case acceptance, which can ultimately improve both your office’s production and collections.
Learn More
For additional information, read the following :
- Give Patients the Info They Need to Say Yes
- 5 Steps to Patient-friendly Case Presentations
- Tips for Presenting Treatment Plans to Patients

By Charlotte Skaggs
Certified Dentrix Trainer and The Dentrix Office Manager columnist
Charlotte Skaggs is the founder of Vector Dental Consulting LLC, a practice management firm focused on taking offices to the next level. Charlotte co-owned and managed a successful dental practice with her husband for 17 years. She has a unique approach to consulting based on the perspective of a practice owner. Charlotte has been using Dentrix for over 20 years and is a certified Dentrix trainer. Contact Charlotte at [email protected].


