Generate statements and track them in Dentrix, and outsource the folding, stuffing, and mailing. It’s that simple!
Updated 9/25/2023
Do you dread having to run billing statements each month? The mountain of printed paper sits on your desk while you sort through it, piece by piece, folding, stuffing, sealing, and stamping each one. That’s time you could spend focused on your patients.
There’s an easier way to do billing statements! Just sort through your statements on the computer screen, type in any custom notes you want added to the statements, and then submit them to the QuickBill service. They will be professionally printed, folded, and mailed for you.
In this article you’ll learn:
- The benefits of sending statements through QuickBill
- How to set up QuickBill
- How to send printed billing statements
- How to view the QuickBill statement history
Why QuickBill?
When you use QuickBill, you no longer need to purchase blank billing statement forms, printer toner, envelopes, and stamps. For a little more than the cost of postage, QuickBill covers those billing statement expenses.
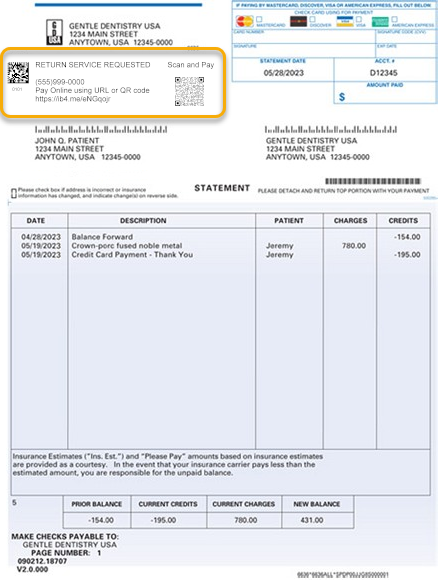
QuickBill verifies all mailed statements against the National Change of Address Verification (NCOA) service to ensure accurate delivery. Any address corrections are reported back to you so you can update your patient files, ensuring that patients receive their statements and making it easier for you to stay in touch with them.
QuickBill includes address bar codes on the envelope, helping the post office to deliver billing statements to your patients faster. The top portion of the statement is perforated for easy removal and remittance. A business reply envelope is also provided with the statement, making it easier for patients to return payment to you. And if you provide your WorldPay credentials during QuickBill setup, a web address is printed on each statement allowing your patient to pay their bill online.
Setting Up QuickBill
The first step is to sign up to use QuickBill. In this process, you’ll agree to the billing terms and be assigned your QuickBill ID and password.
After your QuickBill service is activated, open the Dentrix Office Manager and click Maintenance > Practice Setup > Electronic Billing Setup. Enter your office’s assigned credentials and wait for the “Account Verified” checkmark to appear. Then click Enable QuickBill Mail to activate this method of sending statements.
Optionally, enter your office’s WorldPay Credentials. Doing so will enable a personal website URL to be printed on each statement, which patients can type into their browser address box to pay their balances online.
Select the Statement Color to be used for the lines and shading graphics on the statement. Also select the credit card types that your office accepts, and those card logos will be included on the printed form.
Don’t forget to click Save after making the selections!
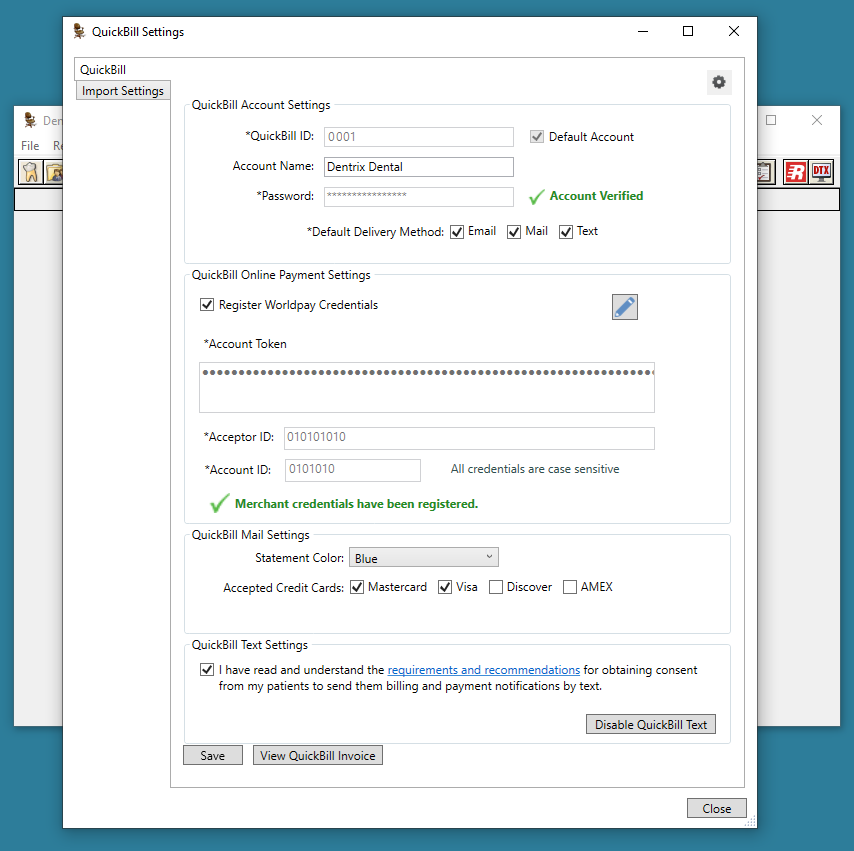
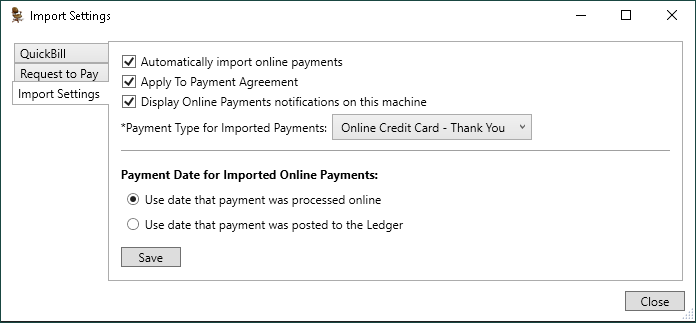
If you will be accepting online payments, click the Import Settings tab to adjust how your office will receive those payments.
If you want online payments to be received and posted automatically to the patient’s Ledger, select Automatically import online payments. Leaving this option cleared will require a member of your team to manually acknowledge each payment before it is posted to the Ledger. That process is discussed later in the Receiving Patient Payments section of this article.
Choose the Payment Type that will be used for online payments. It is recommended that you choose a payment type that is only used for online payments, so that these can be easily recognized and distinguished from other credit card payments on reports.
When you are finished making selections, click Save and then Close.
There are a few other options worth considering. In the Office Manager, click Maintenance > Practice Setup > Preferences. On the General Options tab, review the Payment/Adjustment Options. Just like payments that you enter into Dentrix, these options will be used to split the online payments among providers or family members within the account.

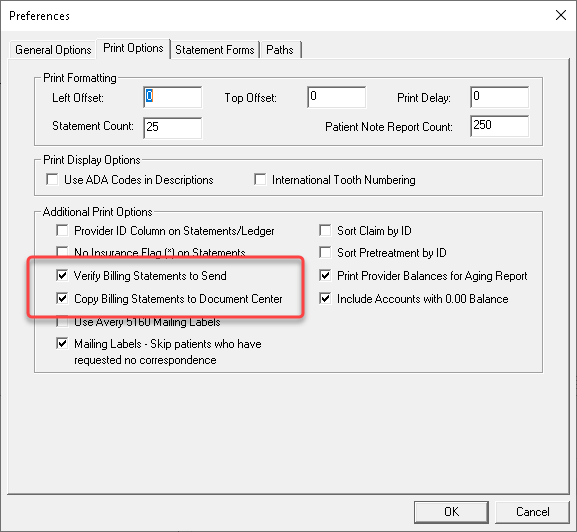
Then click the Print Options tab. Select Verify Billing Statements to Send to enable a preview window that will allow you to review an account, edit the billing statement note, and change the delivery method for receiving a statement. Select Copy Billing Statements to Document Center to automatically keep a copy of the statement in the guarantor’s Document Center. These copies can be useful for reference should patients call with questions about their statement.
Sending Statements
To send billing statements using QuickBill, begin by generating the statements through Office Manager or the Task Scheduler as you normally do.
In the Batch Processor, select the statements you want to send to QuickBill, then click the Electronic Billing Submission button on the Office Manager toolbar.

Verifying Statements
In your old method of manually processing statements, you could review the physical statements as they came from the printer, discard any that shouldn’t be mailed, and write personal messages on others. When using QuickBill, you have the option to view statements on screen using the Verify Statements to Send window. In this window, select a guarantor to preview their statement.
The Verify Statements to Send window offers a lot of options, so let’s break them down.
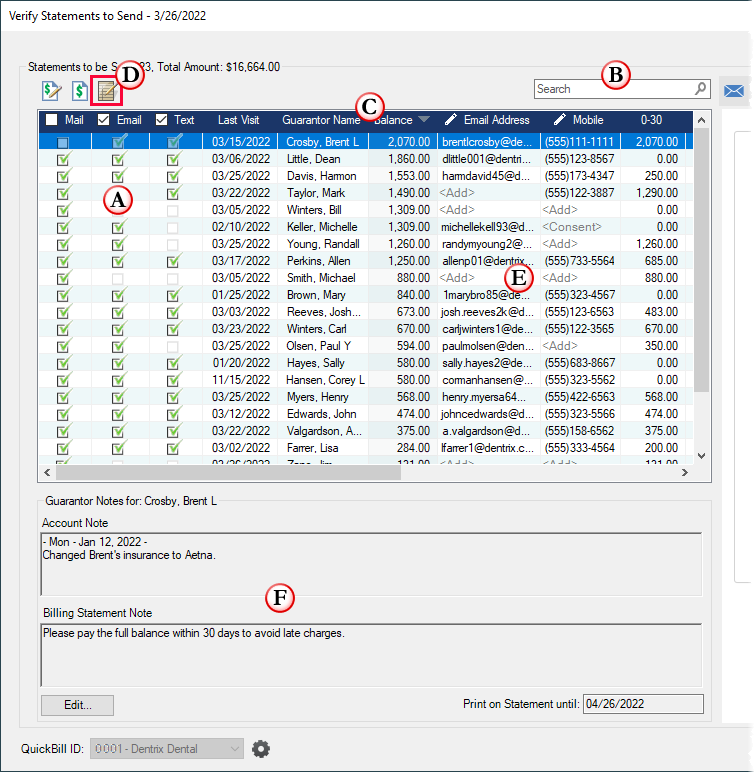
A. Use these check boxes to select how each statement should be delivered to each account. Select Mail, Email, and/or Text. Remove all three selections if you don’t want the patient to receive a statement in this batch.
B. Use the Search box to find a specific guarantor in the list. Enter a name, phone number, or email address.
C. Click on a column header to sort the list. You could sort by balance, last visit date, or other information that is helpful in finding the accounts that you are looking for. Also, you can right-click any column header to reveal a menu that allows you to display or hide additional columns, or to sort or filter the list using more advanced options.
D. You might not remember every detail about each account. Select a row and click the Ledger button to open the Ledger to the selected guarantor. Review the account details to refresh your memory of notes, transactions, payment history, and so forth. Minimize the Ledger window to return to this list.
E. If an account is missing an email address or mobile phone number, or if you catch a mistake in either, you can click and edit it here. Changes are conveniently saved back to the guarantor’s Family File!
F. You can review, add, or edit the Guarantor Note and Billing Statement Note from this window without needing to open the Ledger to do so. As a reminder, the account note is for internal use (it can print on the Aging Report or in Collections Manager), while the Billing Statement Note will be printed on this account’s statement.
Once you’ve reviewed all the statements in the Verify Statements to Send window, click the Send button to submit them to QuickBill for processing.
The Patient’s Experience
Now that you’ve seen how easy it is to generate a batch of statements, let’s look at what your patients will see and do when they receive their statement.
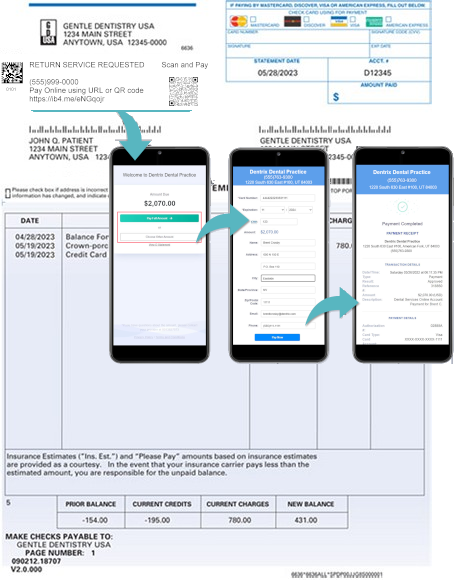
Your patients receive a clean, professional bill. The top portion of the statement is perforated, so they can easily tear it off and send it with their payment in the included business reply envelope, making it even easier for patients to return payment to you.
If you entered your WorldPay account information during the setup process, patients will see a “Pay Online” message which includes a URL and a QR code. When the patient enters the URL or scans the QR code on their device, it takes them to a site where they can enter their online payment.
Receiving Patient Payments
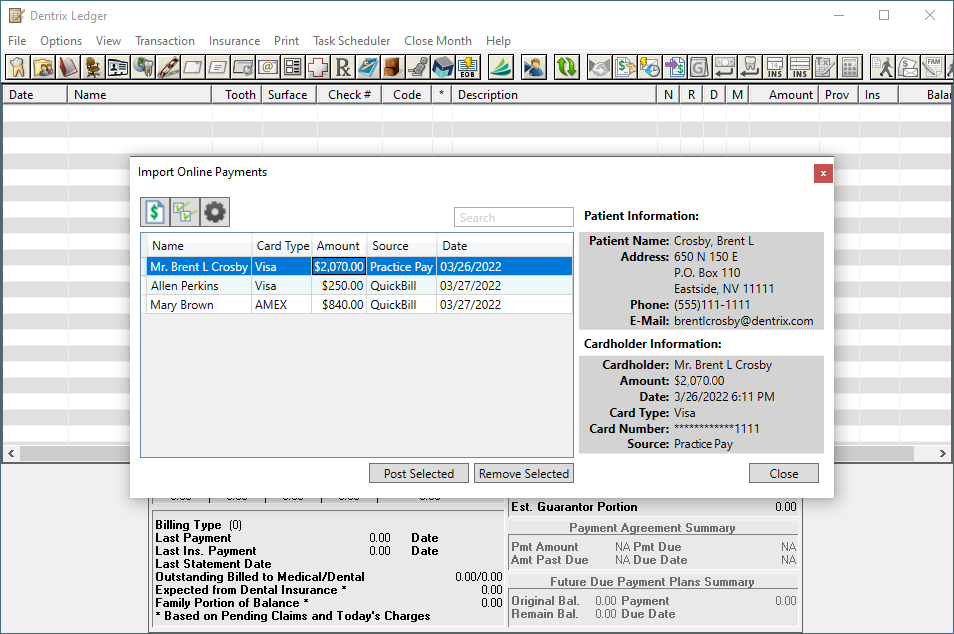
Now that your patients have the ability to pay anytime, day or night, you might wonder how you’ll know that you’ve received a payment. Depending on the import settings that you selected earlier, payments will be received in one of two ways:
- If your payment settings are set to automatically receive payment, simply refresh the Ledger and you’ll see the payment added.
- If payments are not set to import automatically, you will see a notification banner indicating that there is an online payment waiting to be received. Click Review and Import Payments to open the Import Online Payments window. Select the payment and click the Post Selected button to receive it into the patient’s Ledger.

There may be certain workstations in your office where you don’t want to receive online payment notifications. View this tip to learn how to disable notifications on individual workstations.
Online payments will be split according to your standard payment and adjustment split options (which we looked at earlier during the setup process). After posting the payment, you’ll be able to double-click the payment and edit, split, or do anything else that you can normally do with payments in the Ledger.
The payment will be posted to the Ledger using the payment type that you selected during setup too.
Viewing Statement History
Sending statements through QuickBill has another great benefit—you have access to the Statement History for your patients.

In the Office Manager, you can view all statements submitted on a given day. Click File > Electronic Billing Submission History (or click the Electronic Billing Submission History button on the toolbar).
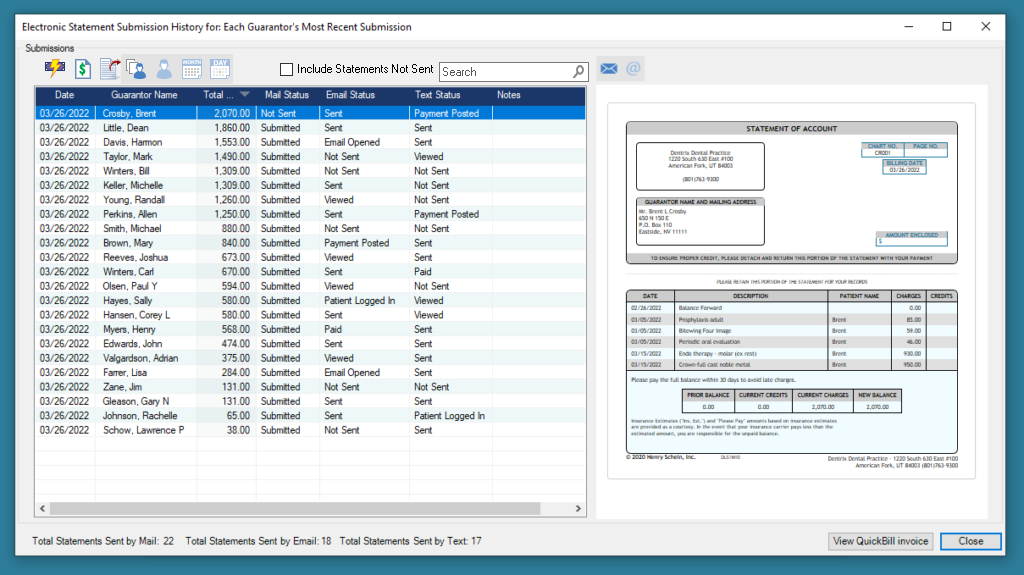
Click a guarantor’s name to see what their statement looked like in that batch. The status will indicate if the bill was or wasn’t sent by mail with this batch of statements (other statuses are available if the bill was sent by email or text).
You can type in the search bar to narrow down the list to specific accounts or click any column header to sort the information. You can also right-click any column to display or hide columns or use advanced sort or filter options.
You can also open the Electronic Billing Submission History button from the Family File, allowing you to see the statement history for a family.
Conclusion
Let QuickBill simplify your billing statements and save you time by doing the printing, sorting, folding, stuffing, sealing, stamping, and mailing for you. Your patients will receive professional-looking statements along with a pre-printed return envelope to complete the billing cycle quickly.
Learn More
For additional information about this and other QuickBill options, visit www.dentrix.com/products/eservices/quickbill or read these other articles:


